Toroidal Launcher - High RPM Propeller Launcher


Print Profile(17)


Description
Boost Me (for free)
Like the model and want to support the designer? Click the button to boost, it's free! 🚀
🚀 VERSION 2.0 NOW AVAILABLE, CLICK HERE!! 🚀
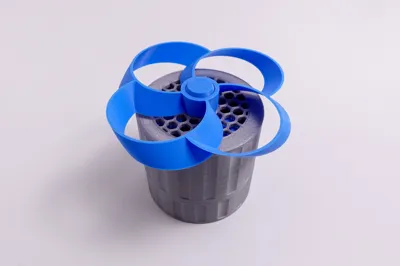
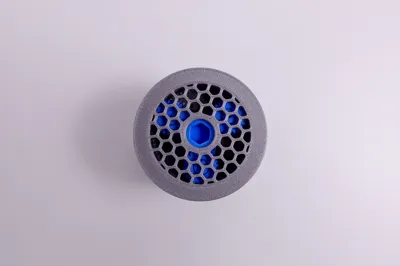
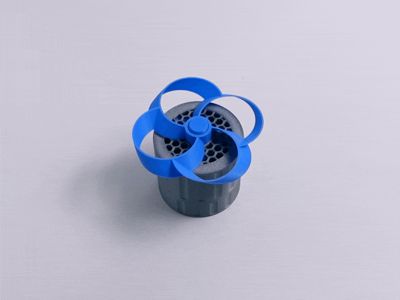
Toroidal Launcher
This is an original design created for the Flying Objects design contest and features a handheld three-stage planetary gearbox to launch a toroidal propeller over 3000 RPM! The design is 100% 3D printed and all pieces press fit together with no required hardware.

Specifications
- Three stage planetary gearbox with 1:48 gear ratio
- 0.75mm gear module for ultra-smooth performance (24/72 teeth)
- 10mm hex driver for connecting gear stages
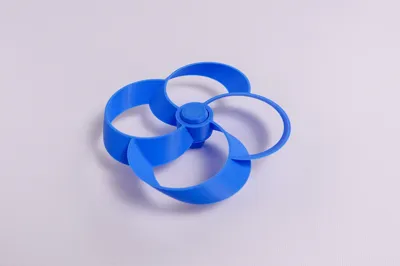
- Toroidal ring design with four blades (1.2mm thick) available in three sizes
- 100mm diameter, 150mm pitch
- 125mm diameter, 175mm pitch
- 150mm diameter, 200mm pitch
Printing Tips
- To avoid layer adhesion issues always clean build plate using water and a light soap (wiki guide)
- Recommended to use Basic PLA, PETG or ABS/ASA for gears and functional components
- Cosmetic and fiber reinforced filaments can be used for a more aesthetic housing if desired
- For best results run flow rate calibration on all filaments to ensure dimensional accuracy
- The launcher housing prints using the standard 0.20mm profile from Bambu Labs
- The launcher gears are available in two print profiles with the following changes to the standard 0.20mm profile:
- Arachne wall generator
- 5x top and bottom walls, 25% infill
- 75 m/s inner and outer wall print speed
- The toroidal rings are available as a single print profile with the following changes to the standard 0.20mm profile:
- 0.6mm line thickness, Arachne wall generator
- 75 m/s inner and outer wall print speed
Assembly Walkthrough
- Assemble the planet carrier with three planet gears and one sun gear as shown below. Repeat for all three planet carrier assemblies.

- Use the shorter hex drive to connect two sets of gears. Align both planet carriers and hold them with one hand while holding the double ring gear in the other hand and slowly turning as you close the gear; once closed insert the assembly into the main housing to hold secure. The gears should spin freely; if they don't remove the gear assembly and repeat this step.

- Use the longer hex drive to connect the last set of gears and then assemble with the threaded cap as shown below.

- Carefully mesh the single ring gear with the planet gears taking note of the 2mm flat section that is positioned towards the main gear assembly as shown below. Use the same method of rotating while slowly closing and covering with the cap to hold secure.

- Done! The assembly should spin smoothly with the output shaft making 48 rotations for every one turn of the input knob. Performance depends on printer tolerances and filament used; for best results use the included print profiles and apply a bit of plastic safe lubricant (e.g. Super Lube 51004) to the gears and inner posts.
Toroidal Ring Assembly
- Insert the hex drive into the interlocking driver; the clearance is tight but it should be a snug fit.
- Insert the assembled driver into the output sun gear, the fit should be the same.
- If the driver does not stay secured when launching the ring a small amount of CA glue can be use.
Modifications and Add-on Designs
These designs can all be printed and used to modify and enhance your launcher. Experiment with gear ratios, try different toroidal rings or remix an attachment of your own!
- Gearbox modifications
- Propeller designs
- Remix Templates
New to 3D printing or looking for your next print?
Make sure to click the follow button on my MakerWorld profile to be notified of new model releases and check out some of my other designs listed below which showcase some of the many possibilities of 3D printing!
- Vortex Blaster - Rubber band powered blaster that launches rings over 30m
- Fibonacci Spheres - Customizable airless balls using MakerLab and OpenSCAD
- Not Another Filament Clip - Multi-feature filament clip that snap fits Bambu spools
- USB Rotating Display - Convert your Marble Run Kit into a USB powered display
Community Support
Thank you to everyone who downloads and prints the Toroidal Launcher! If you would like to support my design work and the development of more fun 3D printed models the easiest way is to simply click the button below and Boost the model for free.
Boost Me (for free)
Click the button to boost!! 🚀
If you would like to support even more you can purchase filament through the official Bambu Labs store using the links in the Bill of Materials.
License
You shall not share, sub-license, sell, rent, host, transfer, or distribute in any way the digital or 3D printed versions of this object, nor any other derivative work of this object in its digital or physical format (including - but not limited to - remixes of this object, and hosting on other digital platforms). The objects may not be used without permission in any way whatsoever in which you charge money, or collect fees.
Comment & Rating (4750)