AMS 1 Saver Snag Cutter V5.0


Print Profile(6)


Bill of Materials


Description
Boost Me (for free)
I put an unbelievable amount of lot of time and care into designing and testing this model, and your support is greatly appreciated!
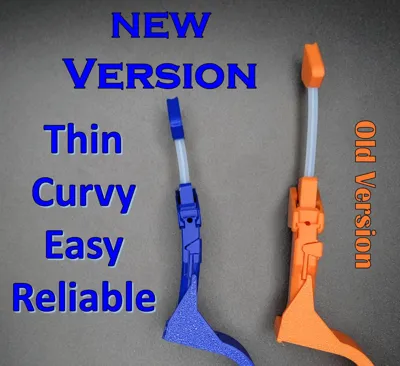
Major Improvements


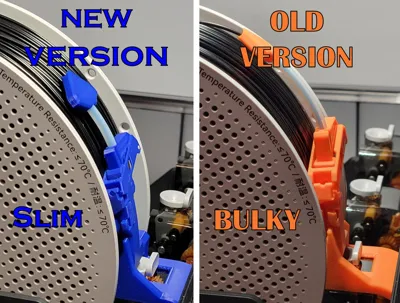
The latest print profile is Version 5.0. It includes countless improvements over the previous versions. Some improvements include the following:
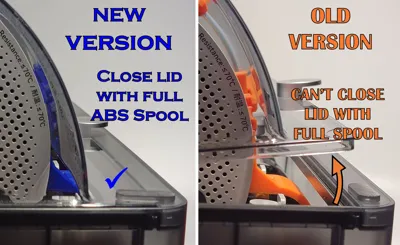
- Thinner and curved so the AMS lid can close with full spools.
- Easier to print with bed adhesion helpers.
- Textured for a more finished look.
- Improved tube retention features for easier assembly.
- Two user-selectable trigger forces.
- Included tube cutter jig and assembly helper.
Please only use the print profiles with the green “Designer” label. The other print profiles are not the latest version, and I have no control over them.
Alternate Versions
AMS 2 Pro | AMS Lite | Universal |
 |  |  |
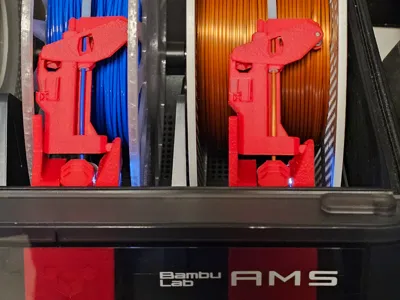
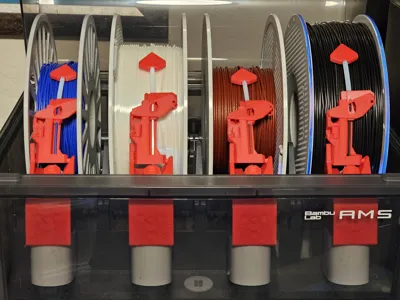
What is this?
This is an AMS Saver unlike any other. Not only does it prevent wear and tear on your AMS filament inlet, but it also prevents snags and obstructions from delaying your print!

How does it work?
This AMS Saver differs from the other options because it has a mechanism that automatically cuts the filament if a tangle or an obstruction (taped end of the spool) is detected. This feature is turned on or off with a slider lock. Cutting the filament when a snag is detected allows the printer to automatically switch to your backup filament by setting up the Auto Refill function. If you are running a long print, this can save you hours of delayed print time! If you don't have the Auto Refill function activated, it gives you a few minutes to take action while the printer continues to use the filament in the tubes. You have a few minutes to address the issue and re-feed the filament manually for an uninterrupted print.
Process WITHOUT Cutter
- Snag is detected by the printer.
- Printer immediately pauses and the spool is retracted.
- Warning is displayed "The AMS Assist motor is overloaded. This could be due to entangled filament or a stuck spool. [0700 8010 083713].
- Printer remains paused until the issue is fixed manually
Process WITH Cutter and WITH Auto Refill enabled
- Snag is detected by the Cutter (not the printer).
- Filament is cut.
- Printer detects the end of the filament.
- Printer continues to print uninterrupted until all filament in the tubes is depleted.
- Printer switches to the refill spool automatically and continues to print.
Process WITH Cutter and WITHOUT Auto Refill enabled
- Snag is detected by the Cutter (not the printer).
- Filament is cut.
- Printer detects the end of the filament.
- Printer sends a warning message that the end of the filament has been detected and needs attention, but the print is not paused.
- Printer continues to print until all filament in the tubes is depleted (this takes a few minutes).
- Printer pauses if the tube is depleted before the issue has been fixed.
- Printer remains paused until the issue is fixed manually
- If issue is fixed before the filament in the tubes is depleted, then the printer continues uninterrupted.


Compatibility
- AMS Style
- This is compatible with the AMS 1 (Original). It is not compatible with the AMS Lite, AMS HT, or AMS 2 Pro. See the top of the description for links to alternate versions.
- Desiccant holders
- It is compatible with desiccant holders placed in front of the AMS.
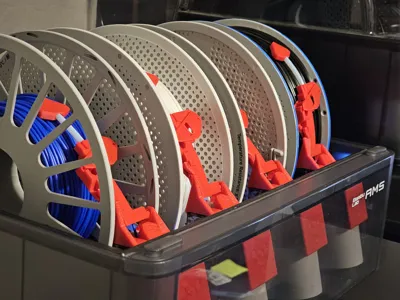
- Spools
- It is compatible with all spools that are compatible with the AMS, even the Narrowest Respool!
- Filament
- Some engineering-grade materials such as PA-CF may be too tough/strong/hard for the mechanism to cut. If you have trouble, try using a new sharp blade.
Materials Needed
- Filament
- The cutting trigger force is dependent on the filament's stiffness. I tested with PETG HF, but if you use a different material, the trigger force may be too high or too low. Refer to the “Trigger Tuning” section below.
- PTFE Tube
- A length of at least 55mm of 4 mm OD is required for each of the four assemblies. Spares may have been included in your AMS shipment, or you can purchase them at the Bambu Store.
- Filament Cutter Blade
- The blades used in this model are also used in the X1, P1, P2, and A1 series printers.
- Spare blades are included with your printer, and you can purchase them separately by using the Bill of Materials link on this page.
- Do not purchase blades from Amazon because they are not the correct size.
- As seen in the image below, Bambu has two styles of blades. Unfortunately, the large difference in length causes problems with the AMS Saver Snag Cutter. Follow the instructions in the Assembly section below to ensure proper fit.

Assembly and Demonstration Video
Please see the video below for details regarding the improvements, assembly, disassembly, installation, and operation of the AMS Saver Snag Cutter V5.0. If you prefer written
Mechanism Overview
- Actuate the Cutter mechanism by moving the Slide down into the Body. To adjust the trigger force, see the “Trigger Tuning” section below.
- Reset the Cutter mechanism by moving the Slide up out of the Body until it clicks and stops.
- Lock the Cutter by sliding the lock to the right until an (X) is visible (note that the mechanism must be in the reset position to lock).
- Unlock the Cutter by sliding the lock to the left until a circle is visible.

Written Instructions
1. Remove All Support Tabs and Trees
- Wait until the plastic has cooled completely before removing the support tabs and trees. This will help make a clean break and reduce the need for additional cleaning.
2. Cut The Teflon Tubing
- Cut a Teflon (PTFE) Tube section to 5 mm and another section to 50 mm by using the guide provided and a sharp blade.


- Alternatively, you can use this nifty little tool to help cut and install the tubes:
https://makerworld.com/en/models/982416

3. Attach Teflon Tubes to the Slide and Guide
Insert the 5mm tube into the holder provided, press the end of the tube into the hole at the bottom of the Slide, and continue pushing the tube until it is flush with the bottom of the Slide.

- Insert the 50mm tube into the hole at the top of the Slide and the other end into the Guide.
- Push the Tube into the Slide and the Guide until it stops.

- Verify the Tube is fully seated in the Slide and Guide.

4. Attach the Blade
- Determine the proper Arm model to assemble. The long Blade goes with the long Arm, and the short Blade goes with the short Arm.

- Insert one of the blade's pins into one of the Arm's holes, and rotate the blade until the other pin pops into the other hole.

5. Assemble the Arm into the Slide
- Orient the Slide/Guide and the Arm/Blade as shown below.
- Insert the Blade into the Arm Slot as shown below.
- Press the Slide Slot over the Arm Pin until it clicks.

- Note that you can disassemble the mechanism by rotating the Arm down until the Arm releases from the Slide.

6. Attach the Body
- Line up the slots on the Body with the ridges on the Arm.
- Insert the Slide into the Body while inserting the ridges into the slots.
- The Slide will snap in place.

- Note that you can disassemble the mechanism by pushing a piece of filament into the hole on the side of the Body.

7. Attach the Lock
- Push the Lock into the Body until it snaps into place.

8. Attach the Bracket
- Insert one pin fully into one hole.
- Rotate the Body and bend the Bracket to insert the second pin into the second hole.

9. Attach the AMS Feeder
- Slide the Bracket into place on the Feeder so that the tabs in the back fit under the housing.
- Push down on the middle of the Bracket so that the bottom of the Bracket snaps into place.

Note that you can remove the Bracket by reaching down and pushing the bottom of the Bracket free of the Feeder.
10. Attach the Hat
- The Hat is an optional piece that allows for easier filament loading.
- Slide the short end of the Hat under the front of the Button and slide the Hat back.
- Push down on the back of the Hat until it snaps into place on the Button.

11. Removal and Disassembly
- To remove and disassemble, you essentially perform the assembly instructions in reverse.
Setup and Features
1. Load the Spool
- Swing the assembly towards the front of the AMS to access the AMS Spool Holder.
- Insert the spool into the AMS
- The moving Side of the mechanism should not rub against the side of the spool, as this may cause false triggers.
- If a narrow spool is being used, it should be shifted to the right such that the left-hand rim is slotted into the channel shown below.

2. Insert the Filament
Ensure the Cutter lock is engaged so you do not accidentally cut the filament while loading it! The (X) is visible when the Cutter is locked.

- Ensure the lock is in the locked (X showing) position. The Body can't rotate past the top of the Bracket if the lock is disengaged. This serves as a reminder to lock the cutter when installing filament.
- Straighten the end of the filament if it has a curve at the end.
- Insert the end of the filament into the Guide.
- Push the filament through the Saver and into the Feeder funnel.
- Push the Hat towards the Spool to align the Funnel with the Filament.

3. Use during printing
- Select the trigger force.
- For a heavy/stiff trigger force, push the Slide all of the way up so that the bottom of the Slide aligns with the triangle marker on the Body.
- For a light/loose trigger force, push the Slide down until the top of the Slide is aligned with the top of the Body.

- After the filament loading and trigger setting have been completed, unlock the Cutter by sliding the lock to the left until the circle is visible.

- Ensure you have the “Auto Refill” option enabled on the printer (if you have a backup spool).
- Note: If the cutter is triggering too soon or too late, you can further refine the trigger force by referring to the Trigger Tuning section below.
4. Remove the filament
- Ensure the lock is in the locked (X showing) position. The Body can't rotate past the top of the Bracket if the lock is disengaged. This serves as a reminder to lock the cutter when installing filament.
- Rotate the roll of filament backward until the filament exits the Guide.
- Be sure not to let the end of the filament go free and get tangled.
- Rotate the assembly forward.
- Remove the Spool.
Trigger Tuning
The material you use to print the model may be softer or stiffer than the PETG HF that I used for development. A softer material will create a weaker spring, resulting in a lighter trigger and less force to activate the cutter. The inverse is true for stiffer material. If you are having issues with the cutter triggering too soon (cutting without a tangle) or too late (the AMS feeder can't feed), don't worry. I have you covered.
The Slide part has the plastic spring incorporated into it, and there is a letter on the back of the Slide indicating the stiffness of the spring.
- The default trigger Slide is marked with "N" for Normal, and it is included on print Plate 1.
- The heavy spring will compensate for triggering too soon. The Slide is marked “H” for Heavy, and it is included on Plate 6.
- The light spring will compensate for triggering too late. The Slide is marked “L” for Light, and it is included on Plate 7.
Blade Gap Tuning
Before tuning the blade gap, you must determine the proper Arm model based on the blade style you have. As seen in the image below, Bambu has two styles of blades. The long Blade goes with the long Arm, and the short Blade goes with the short Arm.
Even once you have selected the proper arm size (long/short), the blades from Bambu have some variation in length. This can cause dragging/scraping of the blade against the filament even when the blade is fully retracted. Multiple arm versions were created to account for this variation. Start by printing the standard Arm model Plate 1. If no dragging occurs, then there is no need for further tuning. If dragging occurs, then proceed with the steps below.
Each Arm is labeled with its size on the removable tab:
S BLD NOM GAP = Short blade, nominal gap
S BLD BIG GAP = Short blade, big gap
S BLD MAX GAP = Short blade, maximum
L BLD NOM GAP = Long Blade, nominal gap
L BLD BIG GAP = Long Blade, big gap
L BLD MAX GAP = Long Blade, maximum gap

Plates 2 through 5 have these different Arm variations. If the blade drags against the filament when retracted, then print the “Big Gap" Plate. If that fixes the dragging issue, then there is no need for further tuning. If the blade continues to drag against the filament when retracted, then print the “Maximum Gap" Plate. This should stop the dragging.
Boost Me (for free)
If this model helped you, a boost or share goes a long way.
Please check out some other models by Hexavalent!


License
You shall not share, sub-license, sell, rent, host, transfer, or distribute in any way the digital or 3D printed versions of this object, nor any other derivative work of this object in its digital or physical format (including - but not limited to - remixes of this object, and hosting on other digital platforms). The objects may not be used without permission in any way whatsoever in which you charge money, or collect fees.
Comment & Rating (2139)