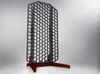
KYZ HSW Display Stand - Large - No Screws!


Print Profile(4)


Description
Introduction
Why hexagons? Why not a grid of holes (pegboard) or slots (Skadis), octagons (multiboard), or just a thick slab full of threaded holes (that other printable board)? Well, maths: honey and wax. Min max. Min wax. And it just looks more sciencey (have you seen the James Webb Space Telescope?). In case you are not familiar with why hexagons are mathematically, scientimagically and just naturally the bestagons, please first familiarise yourself by watching this video:
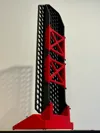
And with that, here is another unnecessarily over-engineered project! A wider and taller version of my earlier display stand. No hardware needed, easily collapsable, compatible with all Honeycomb Storage Wall accessories. Everything printable without supports and the parts have only easy overhang angles for super clean prints. What is it for? You can:
- Use it as an organisational tool in your workshop if you don't want to put holes in your walls for a regular HSW or pegboard,
- As a display stand at shows and markets,
- House entryway key organiser,
- Display collectables at home,
- Take it to school to display things for your science/craft fair (collapse and put it in your backpack!)
Fully assembled, it is 455mm tall, 236mm wide and 190mm deep.
If this is too big, here's a smaller one printable on an A1 mini!
Materials
- Pins - PLA
- Feet - TPE/TPU (feet are optional),
- Everything else - PLA, PLA-CF or PETG-CF (or ABS-GF if you want the nicest one out there)
- PETG not recomended - too soft
- PLA silk not recommended - too brittle
Print settings
- Reduce AUX fan speed - there are no supports, all overhangs are easy and very little bridging in the design, plus the layer time will generally be high so there is plenty of time for each layer to cool.
- Print the vertical wall pieces with 3 or 4 perimeters,
- Print the base and arc connectors with minimum 4 perimeters, 5 bottom layers and 6 top layers,
- Print the outer walls slow so they are accurate and strong,
- The rest is up to you
- If using plain ABS or ASA the base and arc connectors may warp on you, take care with your print settings and perhaps add some mouse sears
(If you are using a Bambu machine, just find on and print from Makerworld)
Fitment of the pins
I have found that the pins fit differently whether they're connecting PLA pieces or PETG-CF pieces due to differences in friction, print dimensional accuracy, etc. I have done my best to made an all-rounder pin but if you are hoping that they fit a little easier or more snugly, you can scale them in the width direction a little to change how they fit. I hope they work well the first time for you but they are quick to re-print.
Recommended accessories
 |  |
 Bowls - 8 sizes available |  Round Shelves - 8 sizes available |
 Price/description labels - 10 sizes available Printables Store paid model - for commercial use, and a way to say thanks |  |
 Ball Holders - 6 sizes available |  Cups and Collars - 9 sizes available of each |
 Keychain hooks - 4 sizes available |  |
 |
Support
The parts don’t need support but if you would like to say thanks, please post a make and share here and on socials. You could buy me a few metres of plastic on Ko-Fi otherwise, please post a make and check out my other HSW models in this collection.
Remixes of individual parts with significant changes very welcome.
Tuned print profiles are also very welcome on all of my models (and please don't feel you have to donate the points to me, the points are for your work in making the print profiles!)
Versions
03/07/2024 - V1.0 launched
14/07/2024 - Print profile for an extra set (8x) of arc connector pins to be used with the upcoming extension
Comment & Rating (1115)