Search models, users, collections, and posts

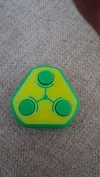
Infinite Pop-Up Fidget Toy

GIF

Print Profile(3)

All
A1 mini
X1
X1E
H2S
P2S
H2C
H2D
H2D Pro
P1S
A1
P1P
X1 Carbon
X2D
A2L

Original 0.2mm layer, 2 walls, 15% infill
Designer
1 h
1 plate
4.2(555)

MERGED 0.2mm layer, 2 walls, 15% infill
Designer
1 h
1 plate
4.3(49)

0.2mm layer, 2 walls, 15% infill
48 min
1 plate
4.1(15)

Open in Bambu Studio
Boost
3923
8760
1054
175
15.4 k
11.8 k
Released 

Bill of Materials

Bambu Filaments
Select all
Iron Gray Metallic (13100) / Filament with spool / 1 kg
Silver (10102) / Refill / 1kg

Description

NEW VERSION IS RELEASED! FIND IT HERE: https://makerworld.com/en/models/2241650


Read Print and Assembly Instructions!

Description:

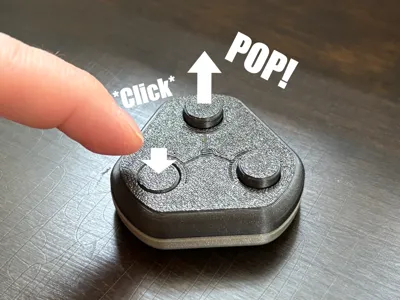
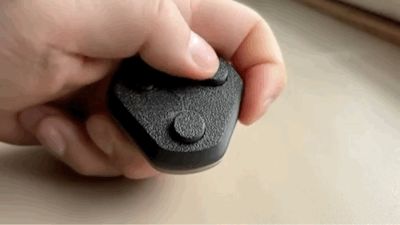
Automatic return! Fun, relaxing and satisfying. Enjoy endless button pressing with this fidget.

Boost Me (for free)

Like this print? Check out my other designs and consider leaving a boost! Thanks!

Print:

Important! Choose a stiff filament that doesn't bind or bend easily. Tested to work best with PLA Metal and PLA Basic. PLA Matte and PETG-HF work OK, but buttons need more loosening before assembly. PLA Silk and other cosmetic filaments are not recommended. Colors are also known to cause differences in print accuracy and part stiffness. Experiment with different materials if at first you don't succeed.


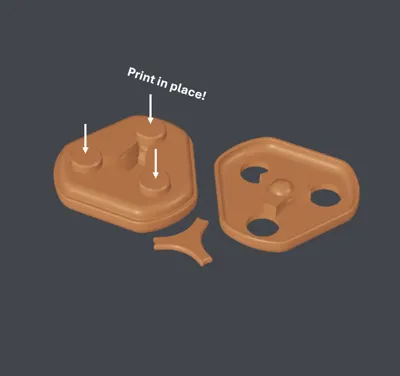
Use the provided profiles. If printing via Bambu Handy app, don't increase the number of copies. This can cause the buttons to move outside the housing, making the assembly impossible. If you must print multiple copies, or the buttons don't print inside the housing for some other reason, use the “MERGED” profile. The reason for this is that the buttons are not merged to a single assembly with the main body in the default profile. This is done so because it allows for the buttons to have different layer height than the body, which reduces friction between the parts. The “MERGED” profile does not have this feature.


The design uses small tolerances and assumes your printer functions with normal accuracy (test prints were done with a fairly new A1 mini). Check your filament calibration and printer axis & belt tension if the print-in-place parts stick together.


If slicing yourself:

a) Use the provided STL (not 3MF) file to make sure all parts are positioned correctly. The Buttons/Pins are print-in-place and cannot be installed if printed separately.

b) If possible, print the Body and Buttons and different layer heights to reduce binding. I used 0.2mm and 0.15mm.

c) Print the middle lever with high infill. (~100%)


Assembly:

Make sure the Buttons/Pins move freely before assembly! Move them up and down until they move smoothly and click up and down with low force.

  1. Once the pins move freely and smoothly, push all the pins up and position the first end of the lever inside.
  2. Push the second end of the lever inside. Some force is needed as well as finding the correct alignment.
  3. Push the first two buttons down with the lever ends. Position the two ends of the lever in the lower button grooves to get more space for next step.
  4. Make sure the last button is still in the up position. Push the last end of the lever in.
  5. Once the lever is in, push the third button down.
  6. Combine the two halves.
  7. Done! If the buttons don't at first return easily, help them a bit to loosen the mechanism. Once running smoothly, the mechanism gets even better with use.

Also check out these amazing prints:

Pro Cutter V2 for Filament and PTFE Tubing
CUBY - CyberBrick Robot Buddy
Tilting Wall Mount for AMS 2 PRO & AMS HT
 Infinite Pop-Up EVO Fidget Toy
OMNIBOT- The CyberBrick All-direction Explorer
Infinite Foldagon Fidget
Infinite Cogs Magnetic Fidget
Shape Changing Marble Fidget with Magnetic Snap
Shape Changing Marble Fidget

Comment & Rating (1054)

(0/1000)

Pinned by Designer
Made several with color change (heat sensitive) filament to add an extra fun element to it! Came out good. Still working them to get them smoother but fun little fidget
The designer has replied
designer
9
Reply
My daughter has decided she likes them better as they come off the plate. Just being able to push the buttons back and forth versus them popping back up. Saves me the assembly :-)
0
Reply
What a fun twist! Thanks for sharing!
1
Reply
Where can I buy that filament?
0
Reply
Print Profile
MERGED 0.2mm layer, 2 walls, 15% infill
(Edited)
Other Issues:All the pieces stuck together. Could not fit the Y piece in there. Do Not PRINT!!
9
Reply
but there are many good comments
(Edited)
Show original
profile
1
Reply
are you dumb
0
Reply
but printing, worked flawlessly, you have to pay attention in school
Show original
0
Reply
Print Profile
Original 0.2mm layer, 2 walls, 15% infill
Worked flawlessly! After using it more it gets even better! congrats for the amazing instructions too!
The profile uploader has replied
3
Reply
Thank you so much 😊
0
Reply
I still can’t assemble it
0
Reply
does it not work
0
Reply
Print Profile
Original 0.2mm layer, 2 walls, 15% infill
this didn’t work guy
The profile uploader has replied
0
Reply
Hi Guy! Why didn’t it work? The print quality looks okay
0
Reply
Replying to @Viltsu :
exactly.it looks fine
0
Reply
Replying to @kimgirl67 :
so what happens if you push the button that is up?
0
Reply
Print Profile
Original 0.2mm layer, 2 walls, 15% infill
very hard to assemble but this is very good toy!
The profile uploader has replied
4
Reply
Thanks! :)
(Edited)
1
Reply
i read instrustions... haha.
0
Reply
I'm not alone..
0
Reply
Boosted
Print Profile
Original 0.2mm layer, 2 walls, 15% infill
After an evening of clicking and popping, it works amazing now!
The profile uploader has replied
profile
4
Reply
Awesome!
0
Reply
Takes a while to loosen up, but once it does it works great. Snaps together well and is easy to assemble. I added a colour swap at layer #12 and #127 myself, which I think looks great. (I'd upload the profile, but the license set forbids me to do so)
The designer has replied
designer
4
Reply
Great! Looks nice with the color swap. I didn’t know the Standard license doesn’t allow for profile uploads.. Probably because it’s an exclusive model.
1
Reply
Impossible to assemble. Printed with an A1 and eSUN PLA+, directly from the Bambu app. The filament was dry and calibrated! I printed two and already destroyed one, as I couldn’t even get the nipples in with a hammer 😁
The designer has replied
Show original
0
Reply
This is how it looks when printing from the app. How did you manage to move to move the pins outside the body? 😆
(Edited)
2
Reply
You are supposed to print the piece on the right with the buttons in place. Mine worked fine.
designer
3
Reply
Ah, okay. The issue is that I made two copies in the app. This caused the pens to print next to the housing. 😁 The description should mention that only one copy should be printed when using the app! 😁
Show original
1
Reply
.help
The designer has replied
0
Reply
Hi! 😊 Looks good!
0
Reply
Replying to @Viltsu :
no, I broke it
0
Reply
The middle piece is stuck and it won’t pop up. The case will just pop out.
0
Reply
Print Profile
Original 0.2mm layer, 2 walls, 15% infill
the burins are Riley hard to Pooh’s
0
Reply
you mean the buttons are really hard to push
0
Reply
what filament is that?
0
Reply
Bud's keyboard has a lisp.
(Edited)
1
Reply
Print Profile
Original 0.2mm layer, 2 walls, 15% infill
i printed 2 different times. first one: i printed one clicker and it came out great, i even sold it for a dollar. second one: i printed 2 clicker's and they came separately, which i have no clue how to put together, the parts that you click were printed separately, ive tried melting them so i can slide them it but nothing, i tried pushing it as hard as i can, nothing. is this because i printed multiple at once?
The profile uploader has replied
0
Reply
i just printed a third plate with 2 copies, now its normal again. i think the one i selected the second time was the seperate one
0
Reply
Yes, if you print multiple from the app you need to use the ”merged” profile. This is explained in the model description, please read it 😊
0
Reply
Replying to @Viltsu :
oh mb, im american so im pretty blind. i just noticed the second profile says merge. thank you
0
Reply

License

This user content is licensed under a Standard Digital File License.

You shall not share, sub-license, sell, rent, host, transfer, or distribute in any way the digital or 3D printed versions of this object, nor any other derivative work of this object in its digital or physical format (including - but not limited to - remixes of this object, and hosting on other digital platforms). The objects may not be used without permission in any way whatsoever in which you charge money, or collect fees.