A1 HSW System


Print Profile(3)


Description
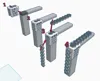
I love the modularity of the Honeycomb Storage Wall and the creativity of the community. I saw several walls mounted on the larger printers like the P1s and the X1s but I couldn't find anything that would fit an A1 in a reasonable way so I cut down the wall into a line and created a 1mm thick bracket to mount and few of them onto the edge of the A1. Granted, this doesn't allow for many tool spaces, but more lines can be joined onto the mounted ones with connector pieces if desired. The hangers for this design will need to be compact and/or (for the top honeycomb line) feature vertical elements, which is new to the space if I am not mistaken.
Version 2 of this is now available here with tons of upgrades! Check it out for additional brackets and a mounting panel on the BACK of the A1 support bar for up to 3x additional organizational capacity!
Assembly
- Place the bracket/mount over the top left corner of the A1 Printer. It should fit snugly except for some play left to right.
- Adjust the bracket/mount to slide as far left as you like without slipping off of the frame of the printer. This should give the print head plenty of room in case of tall prints.
- Insert the honeycomb lines into the cutouts on the mount.
- You should be able to push the hanging honeycomb in a bit farther than the top one give the left to right play in the bracket. I may reduce this play in later iterations but for now I like the extra tolerance along this axis to help hold in the hanging honeycomb. You may choose to glue the honeycombs into the bracket at this step.
I am currently waiting on some fun colors to print my organizer inserts but please let me know if this model is helpful for you in organizing your A1 printing workstation. I look forward to feedback and improving on this design. I also look forward to seeing some excellent knew inserts that can hold A1 tools and accessories within the slim profile of the A1 frame or on top! Please share!
Boost Me (for free)
I am considering adding in some magnetic features given the intended use for this design. Leave a comment and a boost if you want to see this and I will get to work!
I enjoy designing but I am fully aware that my models could be improved. If you have trouble with this or any of my designs, please include feedback with your ratings so I know what to work on. If you really like this design and want to see more like it, please reach out and let me know what you'd like to see! I love reading comments!
Boost Me (for free)
If I get enough credit for a multi-color native printer I'd love to start pushing out some multi-color profiles. Your boosts help me get there!
Documentation (1)

Comment & Rating (51)