Search models, users, collections, and posts

A1 LED Light Bar [Plug-N-Play]

Remixed by
GIF

Print Profile(1)

All
P1P
A1
P1S
X1E
H2D
X1
X1 Carbon
H2D Pro
H2S
P2S
H2C
X2D
A2L

0.2mm layer, 2 walls, 15% infill
Designer
1.9 h
1 plate
4.8(24)

Open in Bambu Studio
Boost
92
221
38
16
303
178
Released 

Description

Introduction:

One of the first things you may notice is that the lighting on A1 (or really all Bambu Labs printers) is very inadequate and severely lacking, especially when trying to view the print through the camera. Originally I created This low profile LED bar that bolts along/behind the X-Gantry. If you like to tinker, then that might be the setup for you as it calls for opening the base of the machine and wiring the light directly to the PSU (detailed instruction on the page). But as this machine is marketed mostly toward beginners I thought it would be nice to create a more Plug-N-Play option that didnt really require tinkering at all.


Design:

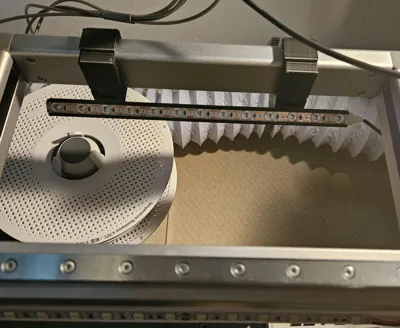
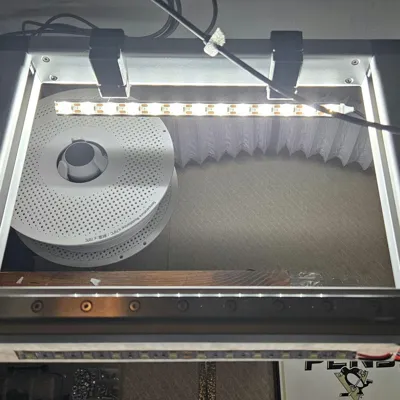
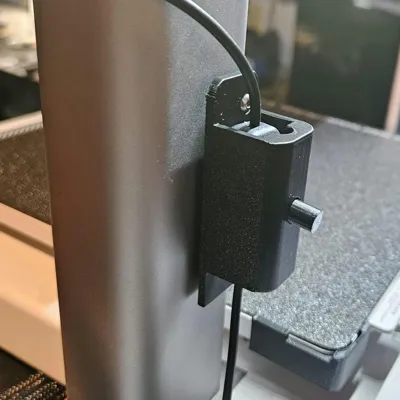
This design is based on DerTobi01's original design but I've modified and improved the bar in a way that utilizes a premade LED strip that plugs right in to the spare 4-pin ams port on the back of the machine, which you can purchase directly from me at Bambu A1 LED Strip. The LED strip slides in to the bar (no need to rely on the 3M backing), snap the tabs on the bar in to the frame clamps and snap those clamps closed on the top frame cross bar. Should only take a minute or two to install. There should be threaded holes in the back of the right side Z frame tower [Re-Release of A1, not sure if they are there for the 1st gen of the A1.] This is where you will mount the switch for the light. First insert the switch extension button in to the housing, feed the lights plug through and slide the switch in place. Thats it.


Now you have more than sufficient lighting for your printer with almost none of the hassle to get it! 

Should be compatible with the BIQU Panda Lux


UPDATES:

5/17/25 - Increased the side of the slot so the light strip can be slid in much easier if it should have a little bit of size variation. Shouldn't have any issues with it being too tight now.

Boost Me (for free)

Boost if you found this useful!

You can find the A1 Mini Version Here

Comment & Rating (38)

(0/1000)

Print Profile
0.2mm layer, 2 walls, 15% infill
It's a very snug fit but looks fantastic
Show original
profile
1
Reply
Print Profile
0.2mm layer, 2 walls, 15% infill
Was able to shove a 12mm phillips smart strip into it. Its super tight (obviously) and will permanently disfigure the strip at the edges but it was a cheap strip anyway.
0
Reply
Print Profile
0.2mm layer, 2 walls, 15% infill
0
Reply
Can the LED light be turned off via the Bambu app on my phone, or is it only possible using the manual switch?
The designer has replied
0
Reply
As it's setup only with the manual switch, the only other way would be to wire it directly to the wires that go to the factory led
(Edited)
1
Reply
thx for the quick reply
0
Reply
There is actually a way to turn on LED from the App or LCD. One can customize "Panda Lux LED Upgrade Kit " by extending the sensor wire. Its a light sensor that gets sticked over the existing bambu led, and used as a light sensor switch. https://biqu.equipment/products/biqu-panda-lux-led-upgrade-kit-bambu-lab-a1
(Edited)
0
Reply
Print Profile
0.2mm layer, 2 walls, 15% infill
Even works with AMS lite top mount. Loving this new light.
1
Reply
I gave it a go using the same light strip but it’s a super tight fit, so I didn’t force it in. Might damage the strip otherwise. Would be great if there was a version without the inner channel added.
The designer has replied
0
Reply
I could cut it a hair wider if that would help...it is tight but I haven't had an issue so far from all that I've assembled. I usually start it and slide it in using my index finger on one of the bulbs and pulling it forward. You could also trim a very small amount of the edge of the light strip. Shouldn't hurt it
0
Reply
not bad, but the 24V strip does not fit into the channel It only has room for 10mm, but the strip is 12 or 13mm As a result, there isn't enough adhesive surface and the strip falls out again
The designer has replied
Show original
0
Reply
I'm not exactly sure what LED strip you are using, but the one I sell in the link in the description, slides in and slots in to the mount. You dont need to use the adhesive strip
(Edited)
0
Reply
Great solution for adding more lighting to the A1 via the unused AMS port!
The designer has replied
0
Reply
Thanks! I also make dual USB Power HUB that takes advantage of the unused port as well to power more USB lighting options, web cam, charge your phone while doing timelapses...etc. Converts the 24v to 5v, check it out here. https://makerworld.com/en/models/742049
1
Reply
Fits perfectly and with the AMS top mount as well. Thanks
0
Reply
Boosted
Print Profile
0.2mm layer, 2 walls, 15% infill
Passt wunderbar!
0
Reply