Search models, users, collections, and posts


Bio
Husband & Wife duo ❤️
Designing for Dungeons & Dragons and fun game related items
Interested in selling our designs? Join our Commercial Membership!
Interested in collaboration? Contact us at:
📨Together3dprints@gmail.com
An overview of tilesets that are included in the commerical licence, can be found here:
https://docs.google.com/spreadsheets/d/1IHzV0OVgYjPoRxCEkMt2npTjCFHBzRm2_QzBiGgoR48/edit?gid=0#gid=0
Achievements

MakerWorld Guardian
Active more than 20 days out of last 30 days UTC time

Contest Winner
Won 1 model contest award.

Popular Model
1 model more than 5,000 successful prints.

Popular Creator
More than 1,000 followers.

MakerLab Innovator
Export 172 models created by MakerLab

Stellar Reviewer
Rate or Comment 590 different models

Pioneer Maker
Print successful 327 different models and 8,320 hours

The design series of Meccha Chameleon is not doing well for my purge-amount 🫢
However, the colors are so vibrant, it is totally worth it.
The latest adition: an Octopus magnet designed after the octopus of (primalary) the Osaka map of Meccha Chameleon.
In the video attached you can check out (a big part of) the design process of how this design came to real life!
#Themakingoff #Meccha Chameleon #Blender #Meccha
Share
3
0
0
I honestly Cannot thank you enough for this model.
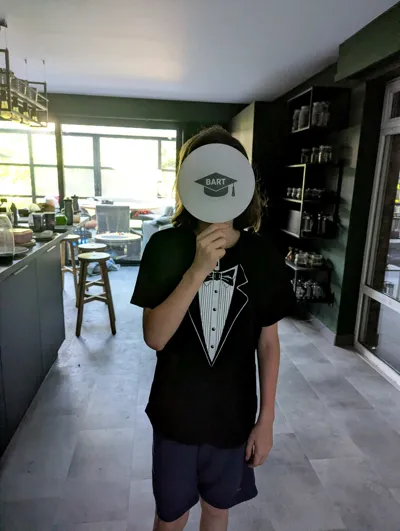
we had a ceremony for my sons graduation, it was 40 degrees (Celcius) and it was HOT.
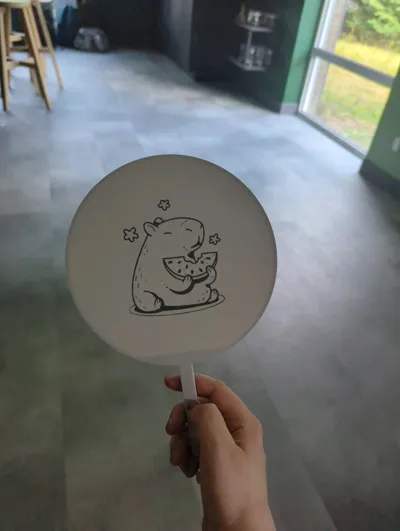
so, 2 hours befor his ceremony i printed your fan with a graduation Cap and his name on it, prayed to the designer gods that your model wouldnt break instantly (like a lot of these do), turned out SUPER sturdy. made 3 more with different images for all my family members and we LOVE them.
they print super fast, are super cute and easy to add An image too, very few filament and seriously after 4 days of whacking them around by my kids, they still didnt break!!
your design is simple, Well made and easy to print.
thank you, for making me a cool mom at his graduation, and for helping us through this heat.
Share
2
0
0
Anyone else playing Meccha Chameleon?
Our family of 4 is having a blast with it - my husband is mostly the hunter 🤣 We prefer to hide.
By his request I made some items in the game: the robot and penguin plushies from the penguin hotel map (my favorite map to hide in).
What game item should I make next?
#meccha chameleon #game #Newdesign
Share
7
9
0
Whenever a (un)natural occurance happens. People always try to harness that power for their own benefit.
Thus, when "The breach" happens, arcane mages try to channel its vast energy in a magical crystal. Bearily holding it together with a magical barrier, inscribed with a language few understand and magical chains anchored tightly to three ancient pillars. Marked with Trinity Knots for binding power.
Since I focus on easily printable multi use terrain, I made different "toppings" to change the use of the disc. It can be a giant floating crystal, normal pillars, bases or crystal clusters.
The center also rotates, meaning you can use it as a puzzle element in your story.
This contest has brought up many discussions about AI, so I'm also adding a "making off" video to show (parts) of my process making this Arcane portal.
Not everything sadly - because this project grew when it first started to what it has become - and honestly some parts are embarissingly slow 🤣
#Contests #Hostedbycreator #Thebreachcontest(Edited)
Share
4
2
0
Ahoy, matey! Ready to sail the seven seas looking for treasure?
A pirate costume vest is one of the most used dress up items in our household. So for the kids play contest, I really wanted to make a full pirate play set.
The set includes: eyepatch, hook, treasure coin and a sword. For the sword I made a foamsword handle and a full 3D printed option (wich is blunt ofcourse).
Great thing is: the designs fit both kids and adults 😏
My kids assisted me with making photo and videofootage of the set and we had a blast playing in our garden 🥰
As what did you used to dress up as a kid? Or what do your kids dress up as a lot?
#Contests #ChildrensToys
Share
2
0
0
The Hive - Mike Gyver Minis x Together 3D combo
The Hive is a collaboration project between Mike Gyver Minis and myself, Together 3D. Where we combine our strenghts into a ready to print and play miniature adventure.Mike Gyver Minis supplies the high quality detailed miniatures and I create the envionment where your party can encounter them. The spark of inspirationEvery project starts with inspiration, and for this modular hive tileset, that spark of inspiration was a single, jaw-dropping image. When fellow miniature designer Mike Gyver Mini’s sent over a picture of an in progress sculpt —an incredibly detailed, terrifyingly epic wasp - inspiration struck.This giant wasp deserved his own hive and we decided to make it work.The goal: a complete print (paint) and play adventureWhen playing tabletop RPGs (like dungeons and dragons), you are building a world and making your players live it.We decided to combine our strengths and work towards a complete package: epic miniatures to encounter in a matching setting.With Mike Gyver Mini’s incredible creatures providing the threat, and my modular tilesystem providing the environment, we are trying to make the hive world come alive.How it grewWhen I looked at the giant wasp Mike Gyver Minis made, I immediately thought of a hexagon tilepattern.
But after testprinting it wasn’t how it should be. It felt flat and with not enough detail to match the Giant Wasp.
After adding extra texture, it felt more in synch.However, finding a way to keep the same style in the different tiles needed to build a map, proved a challenge. Multiple designs were scratched because they felt “off” with the Hive-vibe.But, every input and test made it better to end up where we are now:a fully functional Hive-tileset, with epic giant wasps to interact with.Designing is not a solo hobbyYou might think designing is a solo hobby, because you are sitting behind your PC by yourself - right?
It is not, and that is the beauty of it.Mike Gyver Mini’s and I have been bouncing ideas back and forth for a while. Hyping each other up, asking advice (even though not always implemented 😏).What now?Is the hive done? Oh no - this infestation is just getting started.Expect even more modular tiles and perfectly matched miniatures to join the hive in the near future. What do you think would be a great addition to the hive?You can check out the ever growing collection of The Hive here.
Share
7
5
0
A magical flying carpet has been on my to-design-list a very long time.
I finaly took the time the way I wanted to make it: a modular and supportless riser system. Where you can screw as many height-sticks on eachother as you want, to actually move your players over your terrain. Making in-air battle possible.
I also wanted a way for dungeon masters to introduce this way of transportation, so I made an animated like magic rug that you can encounter, defeat and use as your personal taxi.
I made 2 versions of the rug: for 2 players and for 4 players.
I also made multiple bases so you can chose which variant you like the most and is handy for you to move around.
I also learned about the rug of Smothering, a magical carpet that, well, tries to smother it 😅🤣
Our party may or may not encounter a magical carpet soon 😏
#Newdesign #Dungeons and Dragons #Ttrpg
Share
5
2
0
From request and AI reference, to 3D design and print.
I was requested to make a metal door for the dungeon tile series. Since a metal door and a metal door are 2 different things, I asked a reference image to make sure I understood the request.
It was an easy way to know what was asked and gave a great reference to build the actual model in blender.
A great addition to the dungeon tile collection in my opinion!
Check out the full tile collection here => https://makerworld.com/en/collections/4898807-dungeon-stone
To clearify: apart from the reference image, no AI was used in this model 😅
#Design Request #Openlock #Dungeons and Dragons
Share
5
2
0
Our daughter is a very "girly girl" (a bit opposite of me tbh 🤣).
Anyway, her closet is mess. She has a ton of scrunchies (partly my fault... i sewed them) just in a giant bin.
In an attempt to clean up her closet I made these scrunchie holders.
With the topper they keep the scrunchies on the rod, even if it would fall over and it keep it more in line with her aesthetic 💗
The design is made supportless and you can switch out the different toppers. I also tested it with text on the topper, to use as a prize indication at fairs.
My daughters personal favorite is the curved star 🌟 Which one do you like? Or should I add?
I'm pretty sure I'll need to print more in the forseeable futur 🤣
#Contests #Hostedbycreator #Homegallery #daughter
GIF
GIF
Share
10
3
0
I'm revisiting some older models I made to make them more true to the in game characters, adding playability by making them posable and single color print friendly.
This Seek model has a seperate eye you can glue on, making the waste practicly non existant.
My son has been running around the house with it all week - so I can conclude: sturdy model and great playability 🤣
#Doors #remade #Roblox
Share
2
0
0
The next ARC Raider design has been posted 🤩
I really liked the sci fi look of the ARC Assessor and will totally be using this as terrain during a sci-fi D&D session.
I'm sure a lot of designers get the question "Did you AI this", I try to share some "making off" video from time to time.
It has been speed up 16 times though 🤣
#3Ddesign #Blender #Newdesign
Share
3
0
0
A few months ago I made a design of Figure, an enemy in the game Doors (Roblox) by request of my son.
it was good, but there were issues. So I took it down later, planning to revise it.
It took me a few months to start on the design again. But I am finally happy with the result:
Easy to print, sturdy, in game acurate, posable and VERY playable 😉🤩
#Roblox #Newdesign
GIF
Share
2
0
0
I have been under a lot of pressure on work recently. So as a mental break I went on a design spree and made 4 designs from Pressure (game on Roblox) - fitting isn't it? 🤣
So Candlebearer, Ferryman token, Necrobloxicon cube and imaginary friend (with remote) just joined the collection.
They were all requested, so that's always nice to (finaly) send that messege: "Hey! I made what you requested, check it out, I hope you like it" Even though it took ages 🤣
#Design Request
#Model Request #Roblox #Pressure(Edited)
GIF
Share
5
0
0
When you can turn plastic into something meaningfull. It is time to act.
Designers: Assemble!
This wasn’t planned. But it’s growing.
Over the past weeks, something started here that I didn’t fully expect. What began as a simple question — asking designers if it would be okay to print their models for children in pediatric oncology — slowly turned into something much bigger. People said yes. Designers shared their work. Prints started coming off the machines.And step by step, something real began to take shape.Not planned. Not structured. Just growing through the people involved. The idea behind “Pieksekisten” is simple.Children going through treatment often spend a lot of time in situations that are anything but easy. And sometimes, a small object — something to hold, to play with, to focus on — can make those moments just a little bit better.That’s where all of this is leading. Over the past days, another shift happened.More people joined. More ideas came in. And it became clear that this could go beyond just a few prints.Something is forming in the background right now. And today, it’s live.The Pieksekisten Design Contest is now officially open.Together with MakerWorld, we’re opening this up to more creators.You can explore it here and follow along as it grows:https://makerworld.com/en/contests We’re opening this up in a way that allows more creators to become part of it — not as a typical competition, but as something that connects what we create with real moments.Not about winning. Not about numbers.But about creating things that actually reach someone, somewhere, when it matters. I’ll share more as this continues to grow.For now, I just wanted to show you where this is going. —If you want to follow how this evolves: Forum thread https://forum.bambulab.com/t/charity-3d-printing-for-kids-at-augsburg-pediatric-oncology-pieksekisten/239767 Website https://thores-pieksekisten.de/ Instagram https://www.instagram.com/thore_medulloblastom_kaempfer
(Edited)
Share
5
0
0
When I saw the post about the Pieksekisten initative, I was determined to enter a design.
As a mother I can only be thankfull that my kids don't have to go through such an ordeal. And if a 3D printed toy can bring a little light in such darkness, I'm all for it.
I asked my kids what they would like to pull from those boxes.
My daughters answer was instant: Flexi's!
When I asked what kind she said: any animal you can think of.
So I started designing my very first flexi toy. Boy did I underestimate that 🤣
But I'm happy with the result, a small, cute bear flexi toy. I particulary liked the little heart paws on the legs.
With optional keychain hole through his little tail, it has some extra functionality.
I've also made a non-AMS variant where you glue on the eyes and nose, so it doesn't waste filament.
Want to know more about the Pieksekisten project? You can read it here:
https://thores-pieksekisten.de/
#Hostedbyu #Contests
#Pieksekisten#Flexi(Edited)
GIF
Share
21
6
1
It is alright to fail - As long as you try again
On the 27th of January I started to design “The Queen”, a supersized 6 legged spider like robot from the game “Arc Raiders”, made by Embark Studios.I wanted it to be epic, as epic in the game.
Which meant I wanted it to be huge. I wanted to make it so that the print plate would be maxed out. And when assembled, the previous models I made from the game would be in scale with this monster of a robot.I wanted it to be able to move like in the game. Posable in a way you like. Giving space to creative dioramas.I wanted it to be printable. As supportless as I could. To make sure the amount of wasted filament would be minimal.Step 1: reference materialI started my process as usual:Go into the game with a free loadout, screen capture on, turning and running around in game to capture all the angles of that giant robot.After dying a few times, I got the reference material I needed and was ready to start.Step 2: designingsmooth sailingsI started off great!
The bottom leg had amazing detail and I loved building it up in Blender. A speed up youtube video of me making the bottom leg:https://youtu.be/s-VcfQ9Jthk Week 1 flew by, creating the legs with as much detail as I could. Trying to make sure they were as accurate as possible, but printable. One of the great challenges when creating something from a game. But then we came to the body…Keeping printability and functionality in the back of my head. I cut the design up in multiple parts:Bottom bodyConnectorMiddle part (so it can rotate)Upper head I knew I had to make concessions with the body, to keep it printable.I started with the lower body. But quickly came across multiple technical difficulties. Curves I wanted to make that I never had done befor, the conflict of game VS printability. It was a lot.After I was finally happy with the lower body. I loaded it into Bambu slicer…. and found out I had a major design error making it unprintable.Going back a version or 4, I was able to fix it thankfully. But it took so much time to get the error out… But on to the next part!The middle body was thankfully pretty easy. But I had to scale it so the legs could be next to it. But okey, done! Then the head… I procrastinated SO much on that part. In game it is a combination between straight and curved and I-could-not-get-it-perfect.
It drove me INSANE.I printed 4 versions, trying to get the perfect curve. The leg capsule was another ordeal… I had to make a lot of concessions on that part compared to the in game reference, and it didn’t feel right.I got discouraged. Thankfully my husband motivated me to just make a cube, test out the system and go from there.That easy step helped a lot. Posable: joints, joints and more jointsI normally make designs with balljoints.
An easy system where you click a ball into a hook.
But, the ball joint system didn’t match with the looks of The Queen. And therefor I couldn’t bring myself to use it.I made my very first hinge. Trying to get enough tension so that the joint would hold, but still would be posable. I spend a whole week trying to get the hinge to the perfect friction. But every time after posing the part a few times, it would fall flat and lose tension. I had to scratch the whole idea of a hinge. Discussed the model with different designers and thankfully came up with a solution: a joint that is posable when assembling, but stays still when assembled. Still, I never made anything like that. I cursed Blender for a full night but in the end I combined Blender made models with old school basic Tinkercad stuff.
Step 3: AssemblyAfter I got the joints to work, I had to incorporate it into the design in a way that matched the vibe.Luckly cut outs in Bambu Studio were the answer to change the cut outs easily and adjust after printtesting.Every joint is 7 different parts. So I spend a full night assembling the prototype. When assembling, I was ecstatic! FINALLY! the model was done! Step 4: Collapse & FailThe model collapsed. The legs swiped away on my table.
We tried adding anti slip, I changed the position of the legs with different connectors, I reprinted every part with less infill, trying to lower the weight of the body. Nothing worked. The assembled body stood on my desk for a full week. Staring at me. Judging at me.
You failed. Step 5: Stand tall (and add a base)After a few motivational speeches of my husband. We decided that no way those tiny legs would hold a giant body like that. And it is just a real life limit. The answer: a base! I could facepalm myself that I didn’t think of that sooner. But, then again.I wanted it posable and epic… and a base can be very in the face.I saw it as my personal pillar of failure. Step 6: CompromiseI wasn’t happy. Not by a long shot.I loved the design I made, but the functionality wasn’t as I wanted (gravity is a *****).I couldn’t deal with the fact that it wasn’t how I wanted it. I worked so hard towards it and in the end, it felt like I failed.Not the design itself (I still think those legs are killer awesome accurate), but the total package wasn’t as I envisioned it. After (yet another…) motivational speech of my husband, a compromise was found:Make it a Makerworld Remixable exclusive.That way people can use the design and change it, the way they like it. And I thought that was perfect (o what I had in my mind). Giving this 2 month mental ordeal to the creativity of others is the perfect way to end this adventure.It does justice to the design, but gives opportunity to make it even better. I look forward to see what people do with the design. Final thoughtsI told my husband to stop me if I ever mention designing something like this again…
But then again, I know I will again in the future. It is alright to fail, as long as you learn and try again.And I learned a LOT working on this project. And next time I go to the harvester event, you know I’ll bring some extra wolfpacks and throw it right at her. Just as a thank you, for this learning experience. On to the next project creators! 💗
(Edited)
Share
7
6
0
Do you know what the most annoying thing is during Dungeons and Dragons?
When you make a super awesome map and a Barbarian takes his move and.... shifts all the dungeon tiles all over the place.
The OpenLock system fixes this issue. with the supportless and modular system, you can click, assemble and disassemble the tiles in any configuration you want. Making it unable to shift while playing on it.
What type of tiles are you still waiting to appear on Makerworld?
#Openlock
#Questions(Edited)
Share
1
0
0
After my miniature bonsai tree earrings, I wanted a more flowy and elegant design. Think "Druid evening wear look" 🤣
Inspired by bonsai tree curves, I created a sturdy but flowy earring mimicing the curving tree trunk and branches of a bonsai tree.
Thanks to @MikeGyverMinis who helped me finetune the support settings on this one ❤️
And thanks to @Satisartes who's design to show off earrings I have used abundantly in the last year 🤣
I made a video how I started with an AI generated image as a reference and modelled the earring in Blender.
Note that this was for the first prototype. The design changed A LOT after the first print test 😉#Blender(Edited)
Share
2
0
0
I've started to make more screen capture video's when I design in Blender.
It is speed up 16 times to make it watchable 🤣
But you can see that from a sphere, you can create a trunk, and from more sphere patches of leaves are grown.
And thus shaping a little miniature bonsai tree, to end up as super cute earrings 🤩
The finished design: https://makerworld.com/en/models/2546811-bonsai-earrings-2-variants#profileId-2804450
#Bonsai #Contests(Edited)
Share
20
31
0
Nothing says "I'm play a Druid in Dungeons and Dragons" more then bonsai tree earrings 🤣
I was looking for some cute earrings to wear in theme of my character and bonsai trees are such a flowy lovely form.
I couldn't decide to make a round or rectangle pot, so I made both - that way I can switch them out.
Which one is your favorite? Round or rectangle pot?
#Contests #Bonsai
Share
2
0
0