Test inserted letters


Print Profile(1)
Description
Boost Me (for free)
If you printed this model and liked it, a 'Boost' helps me enormously to keep creating
Surely if you have a printer with AMS you have tried to paint a name or phrase that you wanted to insert into a model with a different color and when you sliced it.... it generates a lot of waste because it has to change color in each layer, if the name or phrase is on the top face of the model it will hardly be noticeable, but if you do it on a vertical face it will greatly increase the time and material waste
As an example, in the first image we have a model with only two colors that generates 67 grams of waste and 6 hours of printing

In the following image we have the same model but in only one color

We have no waste and the printing time has been reduced to just two hours
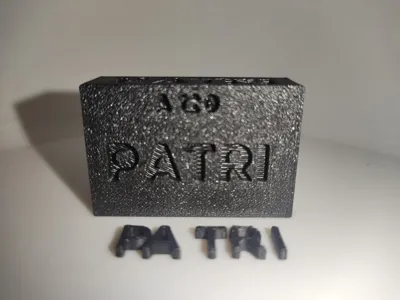
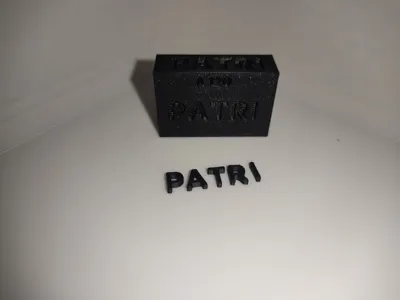
In this case, if we want the letters in another color, we will have to create them in another print plate, select the same text font and size. But for them to fit, certain parameters must be adjusted. To decide which values to set, we have this test, which prints the modified name with a value of -75 in the BOLDNESS (Text thickness) field and the body holes where you are going to insert that name with a value of 60 and 120, so you have two options, the holes printed on a vertical axis face are not the same as on horizontal faces, horizontal faces will always need less tolerance. The test is present on all 4 faces of the rectangle and identified so you know which are 120 and which are 60
Parameters to modify once you decide which tolerance fits your design

These are at 60

These are at 120

In this case the letters remain flush with the model, but if you want them to protrude from your model you just have to make them “taller”
I hope it helps you!!
License
You may create derivative works based on this object, provided that all such derivative works are published exclusively on the MakerWorld platform and include proper attribution to the original creator. You may not share, upload, host, distribute, or publish this object—or any derivative work of this object—on any other digital platform, marketplace, or distribution channel. Commercial use of this object and any derivative works is strictly prohibited. This includes, but is not limited to, selling, renting, sublicensing, or using the object in any context in which you receive monetary compensation or other financial benefits.
Comment & Rating (0)