UPDATED BISSELL SpotClean Pro Pet head holder


Print Profile(2)

Description
Turtles Rule
UPDATED!:
Stronger thicker clips, easier to install, more turtle-shaped, only 36g, supports for the clips!
Summary
Made this years ago and originally uploaded to the Thing. Super rudimentary but functions and serves its purpose well. Take extra care to reinforce the clips and it should be able to lift the machine without breaking. Probably don't do that though. Added a folder with an option that has “legs” in the provision to be more turtle-like, like I originally imagined it. There's also an option without any text on the top.
Original description:
Ready to slice and print with no adjustment needed afaik, but do you bb. Just ensure the clips get some good infill when slicing.
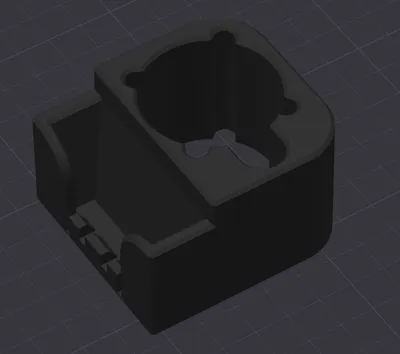
This is the final version of a custom holder I made for the extra head that comes with the BISSELL® SpotClean Pro™ Pet. The machine doesn't come with anywhere to store the extra head, and I didn't want to lose it so I made this to keep them together. This will also fit a regular BISSELL® SpotClean Pro™ and should fit any head meant for either machine since they're identical in the relevant dimensions, afaik.
Installation:
Place the machine on the floor or other sturdy surface and slide the holder over the topmost three-prong-bit sticking out of the hose reel. Push straight down until the clips overcome the lip of the prong. Wiggle gently and inspect to ensure a tight fit and that all the clips have seated behind the lip. Done.
The clips are thick, and so long as they got some decent infill, don't be afraid to wiggle a bit and push harder to get them to seat properly. If you can't print very small overhangs/bridges without sag, you may want to use supports to ensure the bottoms of the clips come out flat, but they came out flat enough for me on a stock Ender 3 Pro.
No real idea what people need so STL, OBJ, STEP, and SKP included. Measured all dimensions with some calipers and threw this together in Fusion 360 based on those measurements. I'm sure there's a million better ways to do it, but this worked well for me so I hope it works for you too. Lemme know if there's any issues or if you remix it and improve it or something.
Print Settings
Printer Brand:
Creality
Printer:
Ender 3 Pro
Rafts:
Doesn't Matter
Supports:
Doesn't Matter
Resolution:
0.2
Infill:
The clips are tiny so make sure they get some infill, other than that use whatever makes you happy I guess. I used 25% grid and it's fine.
Filament: Hatchbox PLA
Black
Notes:
Built in Fusion360, sliced in Cura with the default "Standard Quality" preset calibrated/personalized for my machine. I used Hatchbox black PLA. Just using the 0.4mm nozzle that came with the machine, 200/60 temps. No supports. Not tested with any other presets, filaments, materials, temps, settings, etc.
Turtles rule.
Turtles Rule
Comment & Rating (7)