3" or 4" flexible vent duct to 60x60mm fan adapter


Print Profile(4)


Description
Update 2026-01-05: Added 4" version
STEP files available in “Download STL/CAD Files”!
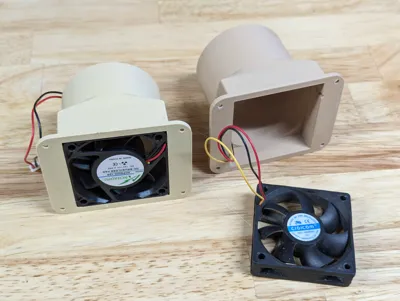
Worried about the toxic fumes when printing ABS, ASA or PA (Nylon)? I was too! So I created an adaptor for a 3" or 4" flexible duct to connect on the back of your printer (X1C or P1S) to extract the air when printing to evacuate the VOC outside.
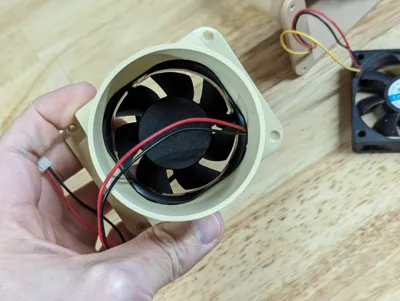
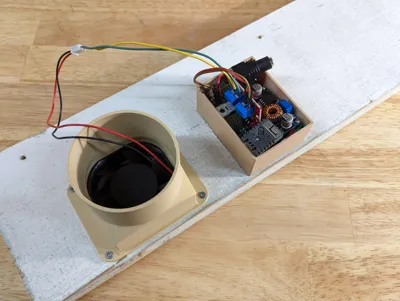
The design is for a 60 mm x 60 mm fan of either 15 mm or 20 mm deep. I initially used a very old computer fan and switched to a newer one that I bought on AliExpress. If you need another size please ask. The box for the microcontroller is not included but is easy to design. Please ask if you'd like me to publish one.
Hardware needed
- 12V 60mm x 60mm fan. Take one with ball bearings, not sleeve. Chose one between 0.1A and 0.2A to get good suction.
- 12V power adapter that is rated at least for 0.5A (I salvaged an old one)
- LM2596 DC-DC step down adapter to go from 12V to 5V
- One of:
- Relay for an on/off control
- IRF520 MOS driver plus a PC817 optocoupler for variable speed via PWM. Another option is a L293D.
- esp32 microcontroller
- A breadboard or protoboard
- Female DC 5.1mm barrel adapter
Wiring
With a relay:

With a IRF520 and a PC817:

While the examples above use GPIO32 or GPIO22, on an ESP32 you can use any GPIO.
Automation
The fan shall be controlled by a small esp32 or esp8266 running esphome.io, talking to home-assistant.io, which talks to your Bambu printer via github.com/greghesp/ha-bambulab. This way you can make sure the fan only runs when needed during a print!
The first step is to install Home Assistant. Once it's setup, install the ha-bambulab extension. Once you can query and control your printer, it's now time to flash your microcontroller and make it available to Home Assistant. This way you can use Home Assistant automation to start and stop the fan and adjust its speed if you use a IRF520 or equivalent.
Here's an example for turning on automatically:
alias: "3D Printer: Exhaust on"
triggers:
- entity_id:
- sensor.x1c_chamfer_fan_speed
above: 20
trigger: numeric_state
- trigger: state
entity_id:
- sensor.x1c_current_state
to: printing
conditions: []
actions:
- type: turn_on
device_id: (your fan)
entity_id: (your fan)
domain: fan
mode: single
Then to turn off:
alias: "3D Printer: Exhaust off"
triggers:
- trigger: numeric_state
entity_id:
- sensor.x1c_chamfer_fan_speed
below: 20
- trigger: state
entity_id:
- sensor.x1c_current_state
from: printing
conditions:
- condition: numeric_state
entity_id: sensor.x1c_chamfer_fan_speed
below: 20
- condition: not
conditions:
- condition: state
entity_id: sensor.x1c_current_state
state: printing
actions:
- type: turn_off
device_id: (your fan)
entity_id: (your fan)
domain: fan
mode: single
Adapt the entity names accordingly.
Boost Me (for free)
I'm making my models freely available. While I often make them for myself first, it takes a fair amount of time to create pictures, print profiles and documentation so it's easy to print for you. If you find this design useful, please consider supporting with a boost (and feel free to leave design suggestions!). Thank you for the support!
License
You shall not share, sub-license, sell, rent, host, transfer, or distribute in any way the digital or 3D printed versions of this object, nor any other derivative work of this object in its digital or physical format (including - but not limited to - remixes of this object, and hosting on other digital platforms). The objects may not be used without permission in any way whatsoever in which you charge money, or collect fees.
Comment & Rating (14)