Large Scale Measuring Caliper (15x15mm)


Print Profile(1)
Bill of Materials
- Aluminum or steel square tube (15x15mm) x 1:
- Self-adhesive measuring tape (matching the length of your tube) x 1: https://www.amazon.de/dp/B0DNW67J1W?ref=ppx_yo2ov_dt_b_fed_asin_title&th=1
Description
Need to measure large objects like the wall thickness accurately but don't want to spend a fortune on a massive, specialized caliper? I designed this modular measuring caliper (also known as a forestry caliper or sliding caliper) specifically to fit standard 15x15mm square tubing. I modeled this completely from scratch in Shapr3D because existing designs used hard-to-find dimensions. With this design, you can easily build a custom caliper up to 2 meters long by simply visiting your local hardware store!
Required Hardware (Non-Printed Parts):
- 1x Aluminum or steel square tube (15x15mm) – Choose your desired length (e.g., 1m or 2m).
- 1x Self-adhesive measuring tape (matching the length of your tube)
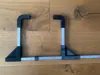
Printed Components (included in this profile):
- Zero Point / End Cap (Nullpunkt): The starting point for your measuring tape.
- Fixed Jaw (Festteil): Mounts securely to the zero-end of the tube.
- Moving Jaw (Bewegteil): Slides smoothly along the 15x15mm tube for accurate measurements.
- 2x Measuring Tips (Messspitzen): Attach to the jaws to reach around objects.
Assembly Instructions:
- Cut your 15x15mm square tube to your preferred length.
- Carefully apply the self-adhesive measuring tape along the side of the tube.
- Attach the Fixed Jaw and the Zero Point end cap to the "0" side of the tube.
- Slide the Moving Jaw onto the tube so the reading window aligns with the tape.
- Attach the Measuring Tips to both jaws.
- (Optional: Use some glue or small screws if you want to permanently secure the fixed parts, depending on your tolerances).
Printing Recommendations:
- Material: PLA, PETG, or ABS/ASA all work fine. PETG is recommended if you plan to use it outdoors.
- Walls/Infill: Use at least 3-4 perimeters/walls and 25% infill for rigidity, as the jaws might experience some leverage during use.
- Orientation: Print the parts flat on the bed as imported. No supports should be needed if oriented correctly!
Happy printing!
License
You shall not share, sub-license, sell, rent, host, transfer, or distribute in any way the digital or 3D printed versions of this object, nor any other derivative work of this object in its digital or physical format (including - but not limited to - remixes of this object, and hosting on other digital platforms). The objects may not be used without permission in any way whatsoever in which you charge money, or collect fees.
Comment & Rating (0)