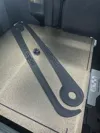
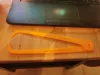
Search models, users, collections, and posts

Print Profile(7)

All
X1 Carbon
P1P
H2D Pro
A1
H2D
P2S
X1
P1S
H2C
X1E
H2S
X2D
A2L
A1 mini

Tighter tolerances - More resistance
55 min
1 plate
4.8(546)

Curved & Narrow 0.2mm layer, 4 walls, 20% infill
2.1 h
2 plates
4.8(740)

0.2mm layer, 4 walls, 20% infill
1.6 h
2 plates
4.8(116)

NEW pin insert for even more resistance!
52 min
1 plate
4.9(23)
Click to see more

Open in Bambu Studio
Boost
4929
12084
1513
400
20.4 k
15.8 k
Released 

Description

Here is my Cosplay Caliper tool I designed after seeing Nikko Industries awesome video explaining how he made his with foam. I figured I'd take that same concept and make it 3D Printable.

I've also shared the Tinkercad file. Feel free to modify it further and share your tweaks!
Here is a video explaining the process


*UPDATE - I added a .3mf file for Bambu Lab Printers - Quick 1 hr print on the X1 or the P1P


This thing was made with Tinkercad. Edit it online https://www.tinkercad.com/things/h387ngVeYoE

Thanks for watching!
Uncle Jessy

Print instructions

Unassociated tags: how to measure, Nikko Industries

Category: Hand Tools Print Settings

Printer Brand: Creality

Printer: CR-10

Rafts: No

Supports: No

Resolution: .2 mm

Infill: 10-20%

Notes:

This was designed to be printed on a 300x300 build volume printer, however, it can be scaled to any print bed size.

After printing snap the parts together and then take your measurements.

How I Designed This

Workflow

I initially designed the outline in Adobe Illustrator > Exported to SVG > Edited in Fusion 360 > Exported to STL > opened the file in Tinkercad and further modified the file for printing.

Comment & Rating (1513)

(0/1000)

Print Profile
Curved & Narrow 0.2mm layer, 4 walls, 20% infill
easy to put together, and easy to use. I watched a guide on how to use them and the results were great! I printed the Mandolorian style helmet using the measurements from the calipers as a guide when scaling.
35
Reply
where did you get the helmet? :,v
Show original
0
Reply
brother that is absolutely tuff as hell
(Edited)
1
Reply
Print Profile
0.2mm layer, 4 walls, 20% infill
Just what I needed to get the right measurements! Worked great with my cat’s head – perfect CatBat for Halloween 😂
24
Reply
awwww so cute but deadly
(Edited)
1
Reply
i want to hug him
0
Reply
he looks MAD
0
Reply
Print Profile
NEW pin insert for even more resistance!
Worked great! Decided to add a gauge so I don't have to measure it every time.
8
Reply
I like the Gauge add on is there a file for it?
0
Reply
Replying to @Keoki82 :
Trying to get that uploaded now.
(Edited)
1
Reply
Replying to @Geotru :
awesome i will keep a eye out for it.
0
Reply
Great print. I was able to print all of it on one plate in about 50 minutes. Great quality.
5
Reply
Print Profile
Curved & Narrow 0.2mm layer, 4 walls, 20% infill
easy fast print, definitely a most before you print your first helmet.
4
Reply
Print Profile
Curved & Narrow 0.2mm layer, 4 walls, 20% infill
Perfect! Now all I have to do is take the measurements!
2
Reply
Print Profile
Tighter tolerances - More resistance
My deadpool helmet came out great, thanks to these calipers and the refmaker.app website to help me scale it!
1
Reply
Print Profile
Curved & Narrow 0.2mm layer, 4 walls, 20% infill
came out pretty good
1
Reply
Print Profile
Tighter tolerances - More resistance
I'm still going to use it, but it's excellent
Show original
0
Reply
why do you have so many notifications? it says there's more than 100
0
Reply
Great, thank you very much I printed it in PLA Plus, only the ring to join the two parts broke when trying to join both pieces I modified it, I put 80% infill and 5 perimeter loops, it was enough for the small ring to hold, it will be very useful to me, thank you very much friend. Regards
Show original
0
Reply