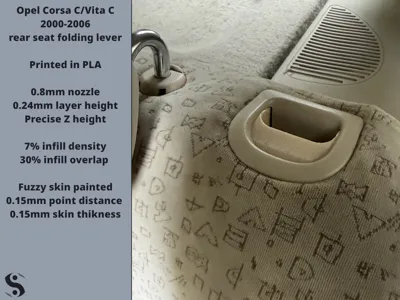
Opel Corsa C/Vita C rear seat folding lever


Print Profile(1)
Description
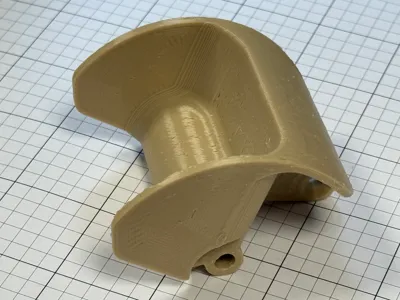
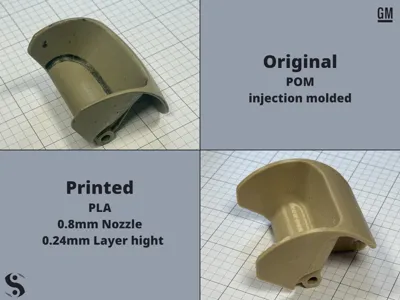
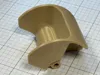
Replacement Handle/Lever for Rear Folding Seats – Opel Corsa C / Vita C (2000–2006)
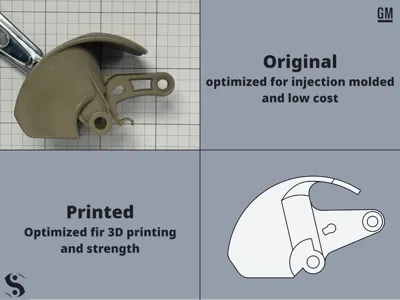
A drop-in replacement for the original rear folding seat handle/lever. Designed to fit without modification in most cases. Left and right sides use the same part and are fully interchangeable.
Tested and confirmed on a 2001 Opel Vita C 4-door GLS trim. Most models across the production years should be compatible, however some variation in seats has been noted across the range, so minor fitment differences are possible.
PRINT SETTINGS
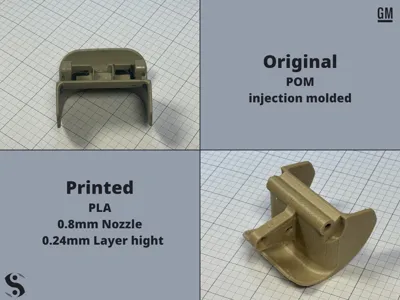
Nozzle Diameter: 0.8mm (recommended)
Layer Height: 0.24mm
Top/Bottom Layers: 5
Top/Bottom Pattern: Concentric
Sparse Infill Density: 7% Infill/Wall
Overlap: 30%
Supports: Tree (Auto), build plate only
Fuzzy Skin: Painted (point distance & thickness: 0.15mm)
Precise Z Height: On
Print Orientation: Print on its side, as provided in the included print profile.
Estimated Print Time: Approximately 1h 20m to 1h 40m with a 0.8mm nozzle.
Nozzle Size: A 0.8mm nozzle is recommended for better print speed and part strength, but a 0.4mm nozzle will also work. If using 0.4mm, increase wall loops from 2 to 4 to compensate.
Infill: 7% infill is intentional. Since most of the part consists of walls, high infill density is not needed. At 0.8mm with PLA, this provides enough rigidity while allowing slight flex under load rather than snapping, tested and confirmed on my own vehicle. It also keeps material usage low. Feel free to increase infill if using a 0.4mm nozzle or a more rigid filament.
Fuzzy Skin: Applied purely for aesthetics, to blend in with the texture of the surrounding interior.
MATERIAL
This part was designed and tested with generic PLA. ASA or ABS are likely better long-term choices due to their UV resistance and lower moisture absorption, especially for a part living inside a car. If using ASA or ABS, adjust infill and wall loops to account for the difference in material stiffness.
Regardless of material, thermal expansion during printing may affect fitment. If the center hole is too tight for the plastic pin, a small amount of filing should resolve it.
KNOWN LIMITATIONS
The cable pin hole has not been fully tested, as the cable on my vehicle was damaged at the time of design. This feature may require further refinement. If you are able to test it, please share your findings in the comments and I will incorporate any fixes into a future version.
INSTALLATION INSTRUCTIONS
Tools recommended: flat head screwdriver or trim removal tool, pliers, latex gloves.
Latex gloves are strongly recommended due to the sticky residue left by the adhesive used on the seat covers and foam underneath.
- Slightly tilt the seat and remove the headrest.
- Remove the plastic trim surrounding the handle. It is held in by clips on the left and right sides. To remove it, push down the seat cover and foam from the top, then locate and gently pull the delicate plastic piece to unhook it from the handle housing. Alternatively, you can skip this step for now and remove the trim later by stretching the seat cover cloth over it once the cover is loosened.
- Remove the seat cover from the back of the rear seat. It is held in place by rubbery plastic strips pressed into grooves around the perimeter. Use a flat head screwdriver or similar tool to free a small section of the strip, then pull the rest out by hand. The strips come in sections. You only need to remove the section on the outer side closest to the handle and along the top to gain access.
- Pull the seat cover aside to expose the foam underneath, then carefully remove the top corner of the foam from the seat frame to access the release mechanism and handle.
- You will find a black housing box containing the handle. It is held in place by four clips, two at the front and two at the back. Press the clips to release the box, but do not pull it straight out yet. A connecting rod that activates the folding mechanism is attached to the handle, and some vehicles may also have a cable attached.
- Pull the box upward to clear the metal cavity, then slowly rotate the assembly to disengage the connecting rod from the handle. If a cable is present, twist the cable end to align it with the groove and it should pull free.
- You should now have the black housing box, the handle, and a yellow plastic pin in your hands. The yellow pin passes through both the box and the handle and is the only thing holding the handle in place. Handle it carefully to avoid damage.
- To remove the yellow pin: using pliers, gently pinch the clipping end of the pin just enough for it to fit back through the hole. While holding it pinched, use a trim removal tool or flat head screwdriver to push from the flat end and work the pin out. Once the clipped end clears the first hole, pull the pin straight out the rest of the way.
- Insert the new handle into the housing, reinsert the yellow pin, and reassemble in reverse order.
- Reinstall the plastic trim around the handle last, after the seat cover is back in place. Simply align it with the housing and press down until it clips in.
Comment & Rating (0)