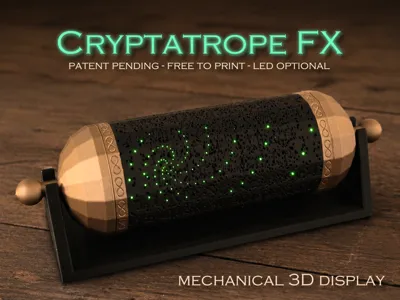
Mechanical Pinhole 3D Illusion


Print Profile(12)
Bill of Materials


Description
Engineering + Art = Magic primetowerdesigns.com | ||
 Beginner's Guide |  The Next Dimension |  How It's Made |

3D Animations from Geometry
(not electronics)
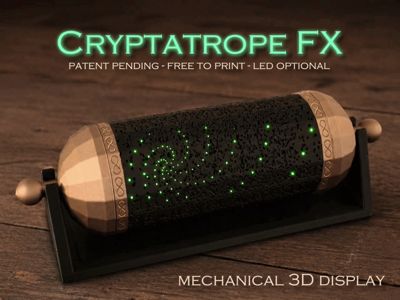
The free core effects (FX) Cryptatrope. Easy print. AMS not required.
The Cryptatrope is an evolution of my zoetropic devices, using precise pinhole tunnels and motion to produce naked-eye animations and reveal hidden text. It's clearer, more detailed, easier to use, and it stretches the effect by projecting separate views to different points in space.
The result is a type of mechanical hologram: a volumetric display which does not require electronics, fueled only by a glow stick or LED. Furthermore, the FX's 4 distinct perspectives can be stereoscopically viewed from 3 head positions, producing a 3D animation with parallax.
Boost Me (for free)
Boosts, follows and honest reviews all help me keep releasing free designs. THANK YOU!
FX Designs
Each design leverages the effect in a slightly different way.
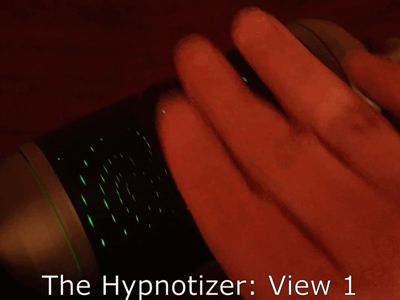
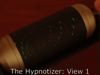
1) The Hypnotizer
Produces a strong sense of depth in a dark environment.

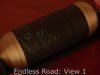
2) Endless Road
A more complex animation.

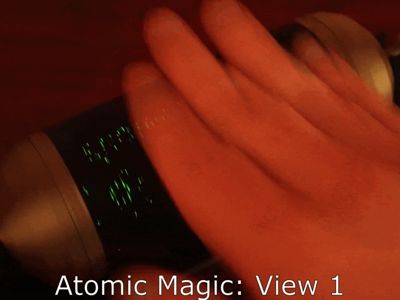
3) Atomic Magic
Animation + hidden text (spin rapidly to resolve). The atomic symbols appear to float within the device. This design has a 2-perspective version with clearer letters, and a 4-perspective version with parallax.

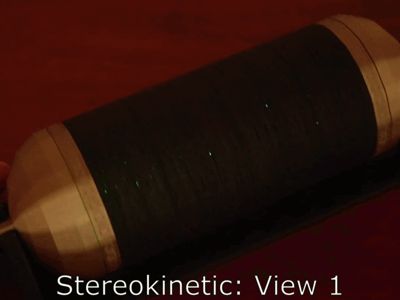
4) Stereokinetic
The stereokinetic direction for this design was suggested by Professor Akiyoshi Kitaoka. It uses a rotorelief-type pattern to support a stereokinetic effect within a stereoscopic stimulus. Previously, using stereoscopy alone, about 10 cm was the deepest point at which objects could be comfortably fused. This version reaches 20 cm.

Upgrade to an Adventure
“This is truly a groundbreaking concept and prop that we haven't seen
used anywhere else in the puzzle realm.” -ESCAPETHEROOMers
The original Cryptatrope is more than an optical effect. With print-to-solve puzzles and brief video monologues, Cryptatrope: A Maker Adventure breaks the fourth wall and sets something deeply consequential in motion.
Although the crowdfund has finished, you can still back the completed project for immediate access to this 3-chapter sci-fi adventure.
To preserve the experience of discovery, it's best to work your way through the adventure first. But if all you want is eye-popping effects, you can absolutely skip ahead to the free FX version.
Tech Enabled by 3D Printing
These effects rely on geometry that traditional manufacturing cannot produce.
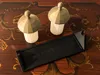
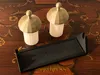
Required Materials
Over time, additional lighting options and corresponding printable parts will be available at primetowerdesigns.com/cryptatrope-supplies.
Option 1: No electronics
- A glow stick (thick 6” green kind)
Inexpensive emergency prep supplies carried by many big stores. Brightness varies considerably across brands and colors. Must be the type with a true hook. This is the kind I use (affiliate links) - whatever you get should look nearly identical: 10-pack, 32-pack

Option 2: A more polished and lasting setup
A Cryptatrope parts kit (ZL022) is available in Bambu's store. The kit mentions a paid adventure model but also works with this free FX one.
While the kit is easiest, you can opt to buy the components individually:
- 2 magnetically activated Y LEDs (white)
The Cryptatrope can be customized to fit LEDs from other vendors. - 1 round neodymium magnet (25x3 mm)

How to Print
Preconfigured .3mf files are provided for Bambu users. Raw .stl files are provided for everyone else.
Core Components: Caps & Diffusers

General Instructions
- Pick the glow stick or LED version.
- For the brightest diffuser, use basic (not matte) white PLA.
- Or you can use a bright color basic PLA for the LED diffuser.
(to approximate a glow stick, try Bambu Green)
Instructions for Non-Bambu Users
- Diffusers:
- Layer height: 0.2 mm
- Wall loops: 3; Wall generator: Arachne (important for proper fit)
- Top & bottom surface pattern: Concentric
- Caps:
- Layer height: 0.1 mm (precise) or 0.2 mm (quick)
- Wall loops: 4; Wall generator: Arachne (important for proper fit)
- Top & bottom surface pattern: Concentric
- Normal / snug supports, top & bottom Z distance of 0.2 mm
(Disable independent support layer height.)
Advanced Option
The caps and diffusers can both be customized. This can be helpful if you wish to use a different LED than the one in the Bill of Materials, or you otherwise need to adjust diffuser tolerances for your printer. To do so, click the Customize button at the top of this page (desktop version of the site), and select the component to customize. After changing parameters, click “Generate” to apply them.
Before printing customized caps and diffusers, apply the print settings from the standard versions. In Bambu Studio, you can transfer these settings by right-clicking the old object (cap or diffuser), selecting “Copy process settings,” then right-clicking your custom version and selecting “Paste process settings.”
Stand

General Instructions
- The slot underneath holds an optional magnet for the LED version.
Instructions for Non-Bambu Users
- Layer height: 0.1 mm (precise) or 0.2 mm (quick)
- Wall loops: 4; Only 1 wall on first layer
- Infill direction: 90 degrees (to approximate a wood grain look)
- Normal / snug supports, top & bottom Z distance of 0.2 mm
(Disable independent support layer height.)
Tube (Photonic Cylinder)

General Instructions
- Use a dark matte PLA for the message area. Darker is better.
- If you don't have multicolor capabilities you can use the same filament for both colors. Alternatively, you can add manual swaps at heights 5.1 mm & 95.1 mm.
Instructions for Bambu Users
- Profiles labeled “quick” print over twice as fast as the “precise" ones.
(the resulting display is subjectively about 90-95% the quality) - Floating region warnings can be ignored.
Instructions for Non-Bambu Users
- To colorize, cut object to parts at heights of 5 mm & 95 mm. Accent colors for top & bottom parts.
- Layer height: 0.1 mm (precise) or 0.2 mm (quick)
- Wall loops: 2 or 3; Wall generator: Classic is faster
- Top & bottom surface pattern: Concentric
- Infill density: 8%
- Prime tower: Disable
How to Assemble
All parts are designed to slot together without glue.
Note that if an LED core is inserted too forcefully, the LED may turn off.
How to Use
- Activate the internal light source
- Glow stick: Crack its inner container and then shake.
LEDs: Bring close to base magnet. Avoid their strobing mode.
(will not turn off automatically so remember to do so)
- Ensure proper viewing conditions
- While the animation is visible under normal indoor lighting, the 3D effect is maximal in a very dark room. Curtains or blinds typically don't block enough sunlight.
- Target viewing distance is approximately 14 inches (35 cm).
- Keep your head level. Move left/right to find the 3 positions where both eyes see an image.
- Spin and watch
- Spin rapidly to resolve letters if applicable.
- Spin slowly using knobs for clear animations.
- The depth effect gets stronger the longer you look.

Engineering Challenges
The Cryptatrope started as a rethinking of my pinhole tunnel illusion form factor, mostly to address challenges some people had spinning the tops: Top Secret, The Enchanted Ornament, The Infinite Diamond Glitch
Once I ditched that form factor, I was able to go bigger, but that introduced a new challenge. Since all the pinhole tunnels in a given animation frame were parallel, at any moment only part of the larger image could be seen. I had to rethink the entire basis for generating pinhole tunnel geometry, replacing parallel projection with a focal point. And once I saw how well image isolation worked in practice, it opened up the possibility for stereoscopic projection and beyond.

Stereo animations came with their own challenges, and making the effect believable required a lot of fine-tuning. While there is plenty of research about depth cues such as accommodation (how much your eye's lens has to flex to focus the light), and about what depths are tolerated when emulating a 3D scene on a 2D display, the specific properties of the display (e.g. contrast) have a large impact.
So while I had some guidelines, it ultimately required tons of trial-and-error to dial in these effects, with each print taking the good part of a day, and often with 4 printers running in parallel. I hope you agree it was worth it.
Coming Soon: Custom Messages
I aim to enable new puzzle scenarios for the Cryptatrope, such as use within escape rooms and D&D campaigns. It's a big part of why I iterated on the earlier form factors. Unlike those, the Cryptatrope can be reassembled countless times without causing wear, and the same light core can be used with several cylinders as part of a multi-step puzzle. Perhaps most importantly, however, is that unlike spinning a top, the Cryptatrope does not require special skill to use. It's well-positioned for puzzle-lovers of all ages.

What's still missing, of course, is a personalized message option. The sheer complexity of this model, however, has made it prohibitively slow to generate using the MakerWorld “customize” feature that I used for Top Secret. The website simply times out.
So instead, I'll be providing customization through my website as a purchasable offering: primetowerdesigns.com/cryptatrope
Going forward, I hope this approach resonates. My commitment is to continue making my unhindered effects available to the community, while selling personalized “magic” as a way to support new free designs.
Cover Photo
Decent low-light photography requires expensive equipment that I do not have. The new cover image is based on a real photo, updated with AI to improve environmental lighting and background. Other than this, the animated gifs and videos do not use AI.
Thank You
I'd love for you to share a photo and/or comment. It motivates me to keep putting out more free designs, like the custom message Cryptatrope as well as a stereo parallax adaptation of a traditional slit zoetrope.

Though the optical mechanism is patent pending, Cryptatrope FX is always free to print for personal use (includes gift-giving). Cryptatrope FX is not currently part of my commercial membership plan. To explore commercial use opportunities (such as props for escape rooms, exhibits, or other interactive installations) feel free to message me.
 Enter the Next Dimension |
Boost Me (for free)
Boosts, follows and honest reviews all help me keep releasing free designs. THANK YOU!
License
You shall not share, sub-license, sell, rent, host, transfer, or distribute in any way the digital or 3D printed versions of this object, nor any other derivative work of this object in its digital or physical format (including - but not limited to - remixes of this object, and hosting on other digital platforms). The objects may not be used without permission in any way whatsoever in which you charge money, or collect fees.
Comment & Rating (43)