Deluxe Dial Protector


Print Profile(1)

Description
Update 13 April 2025
Added a set without the tabs.
It's incredibly easy to mar watch dials / faces - stop, do not pass go!
Don't go anywhere near the hands to remove them, unless the dial is protected in some way. The finish on some dials will mark if you brush against them with anything more solid than Rodico (a ‘poster putty’ for jewelers & watchmakers use to dab-at, hold and clean things) - and even Rodico can leave contaminants on black gloss dials. Enough said - treat dials like working with arsenic! No touching.
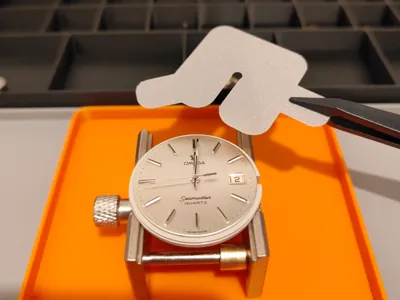
Not satisfied with the dial protectors I could buy or find online - the Swiss Bergeon 6938 being one of the most famous - I made my own. This protector includes some tabs for easier handling. I printed it with a single 0.12 mm layer, precise Z height and ironing - to help smooth the top layer.
Using the Deluxe Dial Protector
Be careful maneuvering this protector around the hands, put them in the 12 O'clock position or some common position (if you can) and come in from below as I show in my additional photos. This means you will be maneuvering under the short end of the hands - where it's less likely you will catch and bend them - be careful, they are super delicate.
An alternative to using a protector - Sometimes the protector just won't fit or work well. Drape some flexible thin plastic over the top of the face, sandwich bag plastic or cling-film can both work, and scoop in under the hour hand and pop off the 1 or 2 hands above with it. You may need to do this if there is a particularly small tolerance between the hour hand and face.
NOTE: Watch hands are press-fit onto several concentric shafts, 2 or 3 depending if you have a Minute hand. The are normally just levered off and pressed on. The levering will make hard-tool-contact with the dial. That's what this is to prevent.
Printing the Deluxe Dial Protector
Dimensions
If the protector is too thin or too thick you can tweak thickness with the Quality > Initial layer height setting as this model is only 1 layer thick. 0.12 with ironing (which attempts to smooth the top layer) comes out at about 0.18 mm on an X1C. I recommend waiting for the plate to cool and using a good scraper to remove the print/s as they are easy to crease and damage during removal.
There are three sizes, Small, Medium and Large - This references the width of the hand-gap and central shaft cutout - 2 mm, 1.5 mm and 1 mm widths. The center cutouts are about 2.2 mm on the tabbed versions and 2 mm on the non tabbed versions.
Remember you can use Bambu Studio's scaling option to change the size of any of these protectors if the dimensions don't meet your needs. Or just ask me in the comments and I can build something to spec.
Material
I have only used Bambu Labs PLA Basic and PLA Matte to print these. Both seem to work well.
Settings
Printing outcomes get a little complicated when you push the system to the limits - like a single thin layer - so I thought I would show what I did to get this to work.
- Quality:
- Initial layer height - Set to 0.12 mm for a thin part. There is only 1 layer in this print. This setting can catch you out if making thin parts, as the default is normally 0.20.
- Precise Z height - Not sure if it helps but just trying to keep it thin
- Ironing - Top surfaces. Ironing re-prints the top layer with a very low flow rate to smooth it out bumps - just like ironing a shirt.
- Strength
- Top shell layers - 1
- Top shell thickness - 0.12 to match the height of the part which is also scaled to be 0.12 mm.
- Bottom shell layers - 0.
- Others:
- Print sequence - By object. This prints the protectors one at a time, to prevent the head leaving each print and creating strings or crossing boundaries and leaving a mess. If you haven't done this before, its possible with parts with a low height and becomes increasingly difficult to arrange as the part height increases - Parts of the print-head (not just the tip) needs to clear previously printed parts.
Labels
If you don't want the S, M and L labels on the tabs - you can open the Process > Objects tab and click L Text, M Text or S Text and the Delete key to remove them.
License
You shall not share, sub-license, sell, rent, host, transfer, or distribute in any way the digital or 3D printed versions of this object, nor any other derivative work of this object in its digital or physical format (including - but not limited to - remixes of this object, and hosting on other digital platforms). The objects may not be used without permission in any way whatsoever in which you charge money, or collect fees.
Comment & Rating (56)