


Print Profile(2)


Bill of Materials


Description
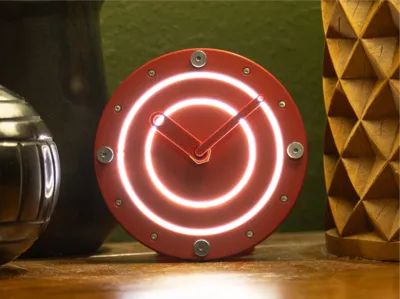
This clock uses two COB LEDs to show the time with an illuminated dial. 3 included faces (detailed below) give you optionson the appearance and the hours are marked using bolts and screws which reflect the LED light. The lights are dimmable using a potentiometer so that they can be comfortably used in darker rooms.
Included Clock Faces
Note that you only need one set of hour and minute hands. Multiple designs are included so that you can choose which to use.
| Traditional hands: although mostly traditional, these hands do have a small window for the LED light to be visible as they turn. |  |
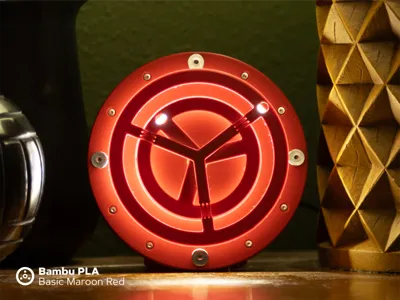
| Peek-through: this face shows the time by letting the lights 'peek' through a rotating ring. |  |
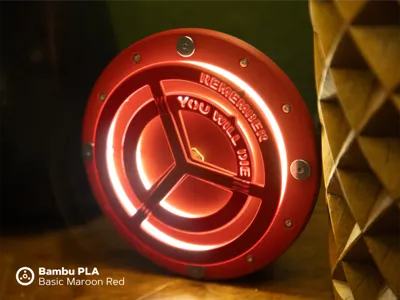
| Memento Mori: This Latin phrase translates roughly into "Remember, you will die" and was a frequent theme in 13th-17th century art. I consider it a positive message - our time is limited and we should make the most of it! |  |
Printed Parts

- Back Shell
- Base
- Hour hand
- Minute hand
- Stand
- Potentiometer Cap
- Circular pass-through hands
- Minute
- Hour
- Memento Mori hands
- Minute
- Hour
Assembly Instructions
| Attach the potentiometer to the base with using (2) M2x8 screws - orient the port so that it's facing out with room to attach a wire. |  |
|  |
The following process should be repeated for both the 300mm and 200mm COB LED strips. Start at the end of the LED and press the strip into the channel - be sure that the front of the LEDs are facing out. |  |
| Attach the back shell to the base using (8) M2x8 screws and (4) screws at the 12, 3, 6 & 9 positions. The M5s should not be fully inserted - be sure to leave some space or they will warp the back shell. You may need to be cautious that none of the wires are pinched in the process. It can be helpful to lightly tape them in place so that they are not damaged when attaching the shell. |  |
| Insert the back of the clock kit through the base and attach with the brass nut. First place your chosen hour hand onto the shaft of the clock kit (it'll be a tight fit) and then follow with the minute hand. |  |
| Insert the stand into the back and attach with an M2x6 screw. |  |
Printing Tips
- Be sure to use a dark, opaque filament so that you don't experience too much light leakage through the body of the clock.
- Use a smooth PEI plate so that the front surfaces will not be marred. Be cautious when removing the fron shell - since it's thin it can easily break or discolor.
Updates
- January 29th: Updated the back plat to account for additional spacing needed for the stand
Clock Series
Here are my other clock designs if you'd like to check them out:


Boost Me (for free)
If you enjoy my models and would like to support me, please consider sharing a boost!
Membership
Want to sell prints of my models? This Commercial Membership grants you a license to all of my MakerWorld models!
I love creating models to share for free, personal use. If you enjoyed this model, please consider buying me a coffee or joining me on Patreon.
License
You shall not share, sub-license, sell, rent, host, transfer, or distribute in any way the digital or 3D printed versions of this object, nor any other derivative work of this object in its digital or physical format (including - but not limited to - remixes of this object, and hosting on other digital platforms). The objects may not be used without permission in any way whatsoever in which you charge money, or collect fees.
Comment & Rating (2)