Mini Watering Can Kit Card


Print Profile(1)


Description

👁️ Before you print: Please read Special Considerations below 👁️
🧼 Clean build plate is a must 🧼
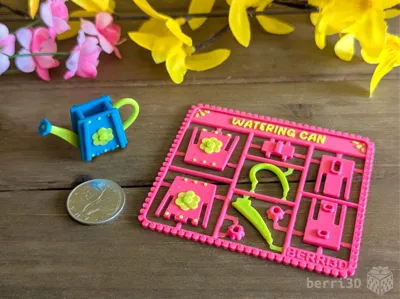
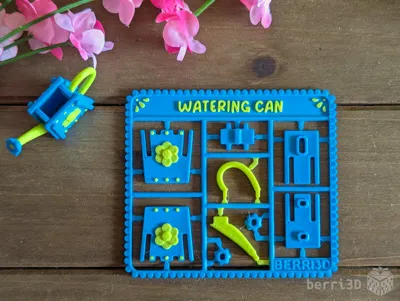
This kit card builds an adorable mini watering can. It's sized to be a perfect accessory to my Easter Garden Kit Card set.
- Easy to build* with printable instructions
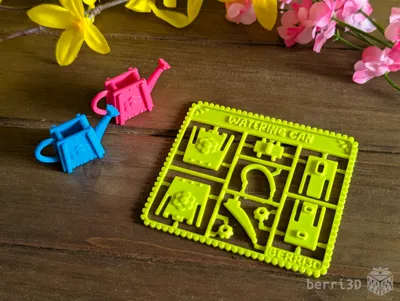
- Print single colour or multicolour
- Sized for batch printing: can fit x4 on the A1 mini and up to 8 on P-series and X-series
- Title text is customizable in Bambu Studio
- Great for party favours, gifts, or group activities!
* Recommended unassisted build age 10+, otherwise adult assistance is required, always do a test build yourself to gauge suitability

Table of Contents
Most people don't have problems with my models as I rigorously test everything I create. But for the few that do, having solutions and tips ready-to-go is quicker than waiting for me to answer ☺️
If you're already familiar with printing kit cards, you can skip most of the following (except Special Considerations if you haven't read them before) and go straight to section 2 for the assembly guide.
- Special Considerations – if you read nothing else, please read this section
- Assembly – diagrams and building tips
- Print Information – best practices, tips, process settings, filament recommendations
- Text Customization – how-to for those who haven't done it before
- About – design inspiration, commercial licensing, etc.
1. Special Considerations – please read before printing
- ⚠️ Small parts. Choking hazard. This is a miniature. It is not suitable for young children.
- ⚠️ Flush cutters or sharp pointed scissors required. If you don't want to cut out parts, print the separate parts instead.
- ⚠️ Adult assistance required for assembly. Kids ages 10+ should be able to assemble unassisted on their own. Always test build beforehand.
- ⚠️ Clean build plate required. Small details will get dragged if the plate isn't clean. Print profiles contain settings which will help adhesion but cannot perform miracles 😥. Please see this wiki article for correct plate washing procedure.
- If you scale up the models yourself, I make no guarantees of model quality or fit as I haven't tested it myself.
- The parts are snap fit though some glue may be advisable for certain parts or if it will be played with.
- Textured build plate recommended when printing kit cards. The sprue points are fragile and can break upon removal from a high-tack plate such as smooth PEI or some of the newer “blue” plates.
2. Assembly
General Tips
|
Assembly Guide is also available as a downloadable paper-printer ready PDF. See the Documentation section below.
⚠️ Sprinkler head orientation matters as the hole isn't square. There are very small locating marks to help you line it up. This part is also meant to be a very tight fit; firm pressure and a tiny bit of wiggling should help it go home.

3. Print Information
💡 Best Practices
- A properly cleaned build plate is vital for printing small and detailed items.
- Do not batch print build kit cards without first printing a few smaller pieces to check fit: This will help save you filament by identifying fit issues before committing to a full multicolour plate. Seed packs do not need test prints as they are designed to be loose fitting.
- Be careful when removing kit cards from plate: sprue connectors can break prematurely.
- Use a textured plate. High tack plates often break delicate sprue tips.
- Let the plate cool completely. As parts cool, they contract and will often detach on their own.
- Still attached? Remove the plate and flex it gently by the edges. Go slowly and bend in all directions until they pop off. Don't touch the printing surface of the plate while doing this as skin oils transfer quickly.
🎨 Suggested Filaments
For best results, I recommend basic PLA (not silk or matte) for all parts. Matte filaments produce “softer” parts which may deform or bend where they shouldn't. Silk filament can be brittle or have fit issues.
I’ve tested this model extensively using the following filaments. Test prints were made using calibrated and non-calibrated (default) profiles on a Bambu X1C and were found to have a good fit between parts. Your results may differ due to filament colour/type/brand, and printer.
| Brand | Type | Colour(s) |
| Bambu | PLA Basic |
|
🖨️ Print Process Settings
Models were prototyped on a Bambu X1C with a 0.4mm nozzle. These are the process settings I used and which are contained as part of the print profiles. Please note that changing layer height, using a smaller nozzle, or scaling models up may result in poor print quality such as parts not fitting together.
| Setting | Value | Reason |
|---|---|---|
| Layer height | 0.2 | Part fit and colour swaps were designed with this value. Changing this value will throw off colour changes and part fit. |
| Wall generator | Classic | Prototyped with this generator. Changing to Arachne may make parts not fit. |
| Wall order (first layer modifier only) | outer/inner | Printing the outer wall first gives any tiny inner walls something to stick to. Only applied to the first layer as it's inadvisable to use for the entire model. |
| Only one wall on top surfaces | Not Applied | Results in a nicer top surface to the parts. |
| Elephant Foot Compensation | 0 (off) | Chamfers have already been applied to the parts. This setting shrinks the first layer too much on top of the chamfers so it should be off. |
| Seam position | Default/Painted | Manually painted to avoid areas where a seam would weaken the part. Overriding this placement will result in parts more likely to bend or break. |
| Wall loops (all parts except handle) | 2 | Default. These do not need strength. Increasing this value may affect fit. |
| Wall loops (handle) | 3 | Increases strength for this part |
| Sparse infill density/type | 10% / gyroid | As this isn't a weight-bearing model, less infill results in faster printing. |
| Object flow ratio (applied to the first layer of the sprinkler head only) | 1.1 | The first layer needs a bigger squish to ensure it prints nicely. |
| Object flow ratio (applied to the “flourish” on the text panel only) | 0.9 | Small detail requires less material to avoid looking blobby |
| Initial layer speed | 20 mm/s | Slower speed allows complicated first layers enough time to cool and adhere. |
| Initial layer infill speed | 50 mm/s | Slower speed allows complicated first layers enough time to cool and adhere. |
| Outer wall speed | 100 mm/s | Slower outer wall speed is better for overhangs and overall surface quality. You can increase this speed but the quality may not be as nice. |
📏 Adjusting Fit of Build Cards
How well a build card fits together depends heavily on your machine, filament brand, and filament type/colour. I do my best to make models that assemble smoothly across a range of filaments, but as there are too many variables to account for, tuning by the end user (that's you) may be required.
- Multicolour kit cards → Adjust flow rate up or down.
- Single colour kit cards or separate parts → two methods depending on which part isn't fitting. If everything is too tight, use contour compensation. If one type of part fits but another doesn't, use either:
- Parts that slide together (sides) → change X-Y contour compensation by ± 0.03; OR
- Parts that insert into holes (handle and spout) → change X-Y hole compensation by ± 0.03
Note: these values are guidelines only and may need further tweaking.

4. Customizable Text
The text on all the kit cards in this set can be changed within Studio. Make your own greeting or even translate it into a different language! You will need to download it into Bambu Studio (not Handy) to change it there. If you've never done it before, this video is a good all-round primer on how to do it. Just remember to check the Preview tab to see how the sliced font looks. If it doesn't look good on-screen, it won't print any better 😥
5. About
This little watering can was one of my more tricky flat-pack style cards to create. Getting the angles just right was a challenge and then some! But aside from the hair pulling I went through, there was some fun parts like designing the sprinkler head. I learned its real name is a “rose” and so chose to make it into a flower instead of the boring round one that my first prototype had.
As for why it was delayed instead of being released with the garden, my teen found some issues during test building: the handle was impossible to insert and my instructions were confusing. Small problems but with a big impact if I were to release it! So I pulled it until I had time to properly fix everything. The handle should go in nicely now and hopefully the instructions are more clear. Thank you for your patience!
🥰 How to Support me
If you appreciate the work I did to bring this model to you, please consider supporting me on Ko-fi. Even a small tip will help offset the cost of prototyping filaments. Alternatively, a like or a boost is another easy way to say “hey, you don't entirely suck.”

⭐ Licensing
If you wish to sell my models, you may purchase licensing rights through my official Ko-fi page.
This model is shared using my own Personal-Use License which supplements (but does not replace) MakerWorld’s Standard Digital License. My license is fundamentally the same (no public remixes, no file sharing, no selling) but includes specific exceptions and allowances not covered by the Standard Digital License.
Licenses offered through third-party websites (e.g. Cubee3D) are not authorized and are not valid.
Boost Me (for free)
🚀= 💪🐹 👍 = 🦵🐹 My models are created on a smoking hot Compy386 powered by Hunrod the Unusually Swole Hamster™. Every boost and like makes Hunrod stronger.
Documentation (1)
License
You shall not share, sub-license, sell, rent, host, transfer, or distribute in any way the digital or 3D printed versions of this object, nor any other derivative work of this object in its digital or physical format (including - but not limited to - remixes of this object, and hosting on other digital platforms). The objects may not be used without permission in any way whatsoever in which you charge money, or collect fees.
Comment & Rating (2)