Search models, users, collections, and posts


Bio
I'm just a guy who likes to tinker and make things. Have previously done a lot of CNC, wood working, fiberglass, metal work, etc. Bought a 3D printer so I could take advantage of down time and have things printing while I'm doing other work. Going to incorporate 3D prints into some of my other design work.
Achievements
MakerWorld Guardian
Active more than 20 days out of last 30 days UTC time
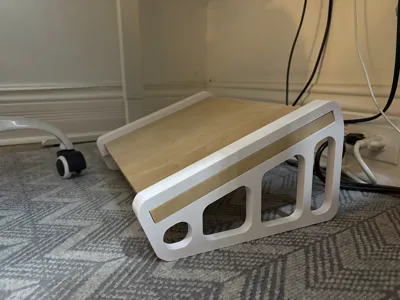
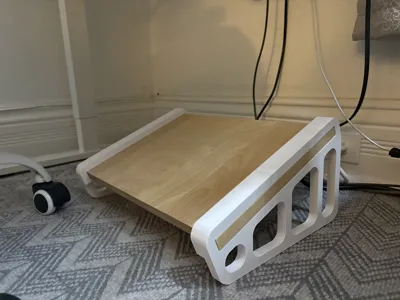
I'm really happy with how this turned out, huge improvement from the cardboard box my wife had under her desk 😂
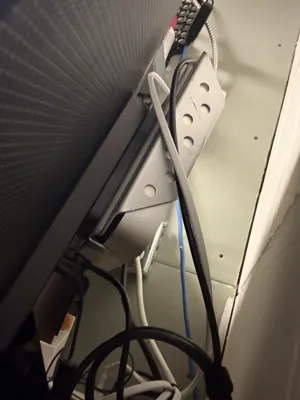
I had to resize to fit the thickness of my board. Don't forget to resize both sides as I did, now I have to make another!
Share
0
0
0
Great model and print profile. Printed 8 of these, worked really well. Nice and compact, stack well. Should have printed these a while ago. I was using a board with nails in it before this 😂

Share
0
0
0
The first few times I printed these was with the standard 0.4mm profile, and they were great. I just did the 0.6 profile, and wow! Much faster (with 0.6 HF nozzle and HF PETG). I can barely even tell the difference between the two.
Share
0
0
0
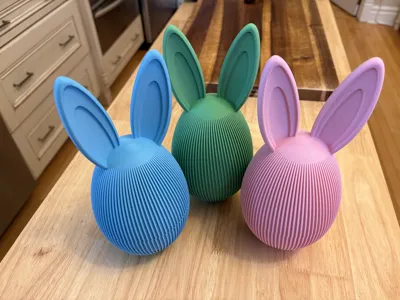
Printed really well (although they take a long time to print), definitely worth it for my nieces and nephew for easter. Printed with PLA Matte in some pastel colours, they really look great!

Share
0
0
0
This printed really well, dimensionally accurate, and very sturdy. You can barely see it in the photo, but this worked really well for mounting my Intel Mac Mini 30mm higher above this monitor. I could never make this work in the past, as the mounting bracket for the Mac covered the monitor ports. 3D printing for the win!
Share
0
0
0
Printed for my nephew, he loved it. Had to re-print the nose and one of the legs, though, as the nose fell off the build plate partway through printing. The only changes I made were adding top-layer smoothing and variable layer height for cleaner results. When re-printing the nose and leg, I added a brim, and it was fine after that. I suggest adding a raft or brim to the entire model; it would also help with removing the whole kit in one piece. I used a very clean, cool super tack plate, too.
Share
0
0
0
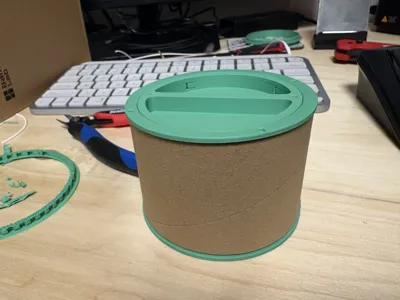
Printed really well, except that the supports on the spool lid were very difficult to remove. Not sure if I'm the only one who's had this issue. I used all the same profile settings as provided. If I were to print this again, I would give more spacing to the support interface layer for easier removal. The top insert is a little loose (the bottom one was fine). Other than that, it seems like a great design, and I'm glad I can put these cardboard spools to use.

Share
0
0
0
Perfect print on my H2D, settings on this profile are dialled in, brim removed super clean. Printed in PetG for now until I start doing higher temp materials.
Share
0
0
0
I was worried parts of this would be too thin, but it printed really well and is standing up well to having multiple pliers in it.

Share
0
0
0
A great design, printed well on the H2D. I have a variety of pills I have to carry with me in case I need them, and they all fit in the compartments nicely. I suggest modifying the design to allow a loop through the top; there's already a rectangular indent there, and lots of extra space. I used the layer height painting tool in Bambu Studio to add an inverse colour between the hexagons. This is miles better than what I could find in any pharmacy or store.

Share
0
0
0
US quarter coin Mech, printed well in Silver PLA, looks excellent. Used PETG for the gear and other internal parts. Handles Canadian quarters without any issues. I've printed 3 of these now, used 2 in Rocco's vending machine, and I'm also going to see if I can use the other in a couple of design ideas I have for a beaver-style candy machine.

Share
0
0
0
A lot of printing, lots of inserts and parts to keep track of, but 100% worth it. My most ambitious print to date, and maybe ever. But now, a 12-hour print job is nothing to me, lol. Everything went together nicely, and the instructions were clear. My only frustration was the support for the vending screws. They could have used more clearance, perhaps; they were very stubborn near the bottom and required some Dremel work to clean up.
I made a few improvements by using ironing on a few parts and using a variable layer height where it could benefit. I used Bambu Matte PLA blue and red, black PETG for any internal or moving parts, and Silver PLA for the coin mechanisms. BTW, Canadian quarters work fine in the US coin mech.
Thanks, Rocco, for such a fantastic project. My son has wanted a vending machine for years, but I haven't found any great options until now! This will be a Christmas present for him.


Share
0
0
0
Great and easy to print. Added some text for a custom name embellishment. Ironing settings were great. I did add a variable layer height on the insert, not sure if it helped with some of the curves, but it certainly didn't hurt. Printed a cover in silver PLA tough first, but that was boring. The light purple PLA with white PLA embellishment was much nicer. This was a last-minute gift, along with some cash, for someone I had no idea what to get.


Share
0
0
0
These came out pretty well. They were a bit of a pain to put together though. I printed mine out of PETG. The lids don’t fit all that well, and I got one together before I clued into the fact that there’s a left and right side, as well as a front and back (the curved front is longer than the back). Holding up alright insight the AMS though, and thankfully I’ll never have to take them apart.

Share
0
0
0
I upped the infill to 70% and did 6 walls just to be safe. Used these to hang a really heavy cupboard and didn’t want any chance of them failing. Holding up really well.
Share
0
0
0
Printed well. They were hard to clip into the spools at first, but after using once, they come out kinda easy. Haven’t had any fall off yet though.
Share
0
0
0
Printed well, only printed one for now to test.
Share
0
0
0
I have the H2D but still printed the handle version because I like the look of it. was my first print, came out pretty well but could have benefited from another solid top layer to cover a few voids.


Share
0
0
0
No more data