MODCASE HYPER - Compact ATX PC Case


Print Profile(2)


Bill of Materials


- Power Button x 1: Any ø16mm barrel type switch with PC headers are suitable. For example - https://www.aliexpress.com/item/1005003623296396.html?pdp_ext_f=%7B%22sku_id%22:%2212000026547329693%22%7D
- Power Cable x 1: For internally routing the PSU the front of the case https://www.aliexpress.com/item/33000590413.html?pdp_ext_f=%7B%22sku_id%22:%2210000001820159444%22%7D
Description
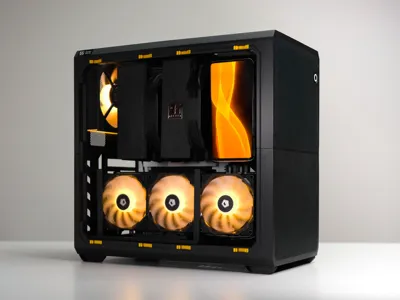
 MODCASE HYPER
HYPER is a compact 24L ATX PC case with advanced customizations and superb cooling performance.
It has minimal assembly and a per model tuned project file for a 1-Click experience.

Design Highlights
- Minimum parts - Maximum Strength
- Minimum Assembly - Minimum Screws
- All Tool-Free panels for easy access
- High Air Flow Vents on All Side + Customizable Mesh for extreme open rate
- Universal Mounts - Mount extra components with flexible layout
MODCASE's engineered simplicity brings more features in less parts, and with less parts, the case is more robust and easier to assemble.
Universal Mounts
Put PC accessories anywhere with a universal rail system on the Top, Bottom, Front of your case. You can opportunistically make use of extra space in your build.

SPECIFICATIONS
Motherboard: ATX, mATX, ITX, DTX
GPU Support: 7 PCIE Slots x 337mm Long x 165mm Tall
CPU Cooler: 168mm Max Height
PSU Support: ATX, SFX, SFX-L
IO Ports: USB-C, USB-A x2
Fans: 4x 140mm or 5x 120mm
Radiators:120, 140, 240, 280 mm
Hard Drives: 12x2.5", 4x3.5"
Dimensions: 353x338x202mm 24L 1.9KG
Print Volume: 202x200x200mm
INSTRUCTIONS
Step 1:
Assemble Front and Rear quarters with BT3x20 self tapping screws
Step 2:
Join the halves
MOTHERBOARD Installation
ATX, MATX, ITX - Mount directly using standard PC case screws.
Insert included standoffs for MATX motherboards.
GPU / PCIE Installation
PSU
Front SFX Option
Rear ATX PSU Option
More PSU positions see Parts list.
Mesh Inserts
👉Customize your mesh density and hole shape by changing your infill % and pattern.
Side Panels and Doors
4 Split side panels are included for smaller printers
Fans
120 and 140 fans are mounted on universal brackets that can be installed anywhere along the top, front and bottom of the case.
Radiators
Use the same bracket as fans.
Hard Drives
3.5” or 2.5” HDDs can be mounted on the included universal mount. Multiple plates can be used if you have room. Place anywhere along the top, front and bottom of your case.
USB and Power Button
- USB-A Cable (Link) - 👉Cut the rubber tabs (it's soft) and use standard computer screws (#6-32 -6) to secure the cable.
- USB-C Cable (Link) - Similar cables may also work.
Install POWER BUTTON (Link)
👉It is a standard Ø16mm hole, to suit commonly available 16mm round PC power buttons.
Metal Nut Inserts
M3 Square Nuts (Link) can be inserted behind holes. Captive nut insert is a backup option. Use them with M3 Machine Screws (Link).
CABLE MANAGEMENT
Slots are on the inside of the case for zip ties or 10mm wide velcro strips.

PART LIST
Included in free version:

For Full Component Library - See HYPER PREMIUM here.

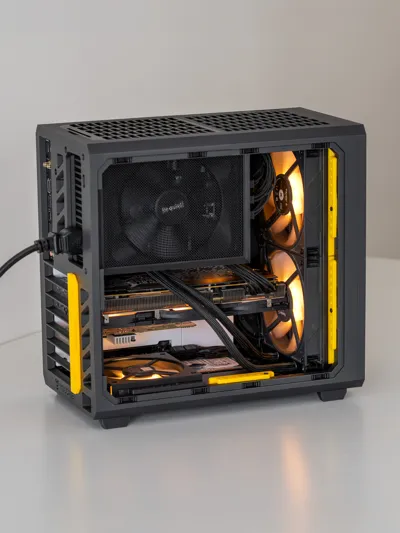
MY BUILD
- AMD Ryzen 9800X3D
- NH-D15 CPU Cooler
- Palit 5070 ti 16g GPU
- NZXT B650 N7 ATX Motherboard
- SF1000W SFX Platinum PSU
- 64GB Dominator Ram
FILAMENT
You need 2kg of PETG.
PETG-CF, ABS, ASA, PC, PAHT-CF, ASA-CF, ABS-GF, and other engineering materials also work, you just need to pay more attention to chamber temp and bed adhesion.
Raise bed temp and add an outer brim if you have adhesion issues.
Do not use PLA.
RECOMMENDATION: Dry your PETG! (65C 24hrs) |
Boost Me (for free)
Thanks for your Likes and BOOSTS! Enjoy, Haydn Bao
RELEASE NOTES:
HYPER v2.1 - 2Jun2026
- Improved Multi Color Profile (Hidden seam line on front of case)
- Improved tolerance on all side panels
- Fixed 20mm screw compatibility on 4-Split side panels
- 2 extra joining screw added to frames for additional rigidity. (Located in the middle, on the side panel side of the case.)
- Added pop-out power cable cover on frame and rear cover
HYPER v1.2 - 14Apr2026
- Added mounting holes for use with HYPER Premium* modules. (Frame_RT, Frame_RB updated)
- Improved 4 split side panel joint quality.
*HYPER Premium is live on MakerWorld Crowdfunding. See it here
HYPER v1.1 - 6Sep2025
- MultiColor Profile added
- Frame FT mesh hole size corrected
- Counter bore rear holes to allow more screw engagement on large PSUs
- Improved 120 Fan mount for greater screw and radiator compatibility
- Improved Hard Drive mount for more layout flexibility and screw compatibility
Improvement updates will come for both the FREE and Full Version of HYPER. If you spot any errors or have questions, please contact: support@modcase.com.au
ABOUT MODCASE
I'm a prototype specialist and MODCASE is my passion project. If you like it, visit modcase.com.au for more!
COMMERCIAL USE
To sell physical printed versions of MODCASE designs, you must contact support@modcase.com.au for a commercial license.
DISCLAIMER
The Files provided by the MODCASE HYPER are for experienced PC builders, as they are intended to be used with the user's own printer, computer parts, screws and cables. MODCASE is committed to ongoing development, with recommendations for maximizing print strength and reliability included for best results. However, it is the user's responsibility to source parts and cables from reputable suppliers and to observe their new PC after building, running some real-world stress tests, and ensuring that the parts are not brittle or easily delaminated. Additionally, the quality of the printed case may be affected by the filament, printer model, settings and any modifications made via CAD.
By using MODCASE files, you understand and agree that MODCASE is not responsible for any loss or damage that may result from the use of the print files. Otherwise, please do not use the files, contact support.
More from MODCASE: HYPER Premium Crowdfunding | Free HYPER | MODCASE MASS | support@modcase.com.au
License
You shall not share, sub-license, sell, rent, host, transfer, or distribute in any way the digital or 3D printed versions of this object, nor any other derivative work of this object in its digital or physical format (including - but not limited to - remixes of this object, and hosting on other digital platforms). The objects may not be used without permission in any way whatsoever in which you charge money, or collect fees.
Comment & Rating (1002)