Search models, users, collections, and posts

MTG Ability Tokens w Icons & Text - 20x20mm

Print Profile(1)

All
P1S
X1E
P1P
P2S
A1
X1
H2D Pro
H2D
H2S
X1 Carbon
H2C
X2D
A2L

Standard 0.2mm layer. Two plates with text up/down
Designer
8.2 h
6 plates
5.0(43)

Open in Bambu Studio
Boost
165
477
104
44
709
465
Released 

Bill of Materials

Bambu Filaments
Select all
Black (10101) / Refill / 1kg
Bambu Green (10501) / Refill / 1kg

Description

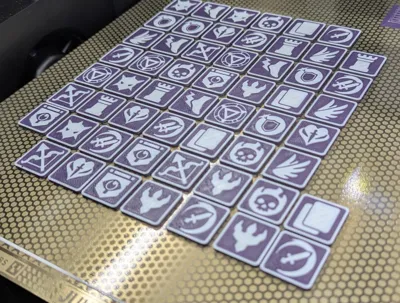
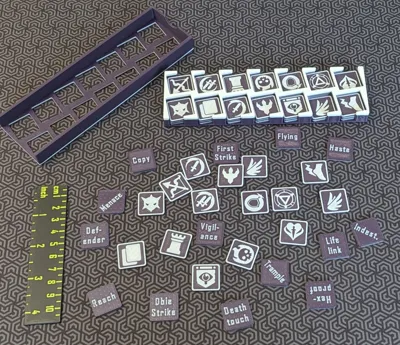
These are Ability Tokens (aka. Keyword Counters) for creatures for the Magic The Gathering (MTG) collectible card game. These tokens have the ability icon on one side and the keyword text on the other side, to help with learning/remembering the icons. The tokens are 20x20mm square and 2mm thick in two colours. This requires an AMS (or other multi-material system). 


UPDATE 2025-12-10: 

  1. Added to Plate 5: Summoning Sickness, Shield, Lore, Devotion/Vow, Finality
  2. Add a Plate 6 with blank tokens, one purely blank, the other with only the top border.

UPDATE 2025-05-15: Added the Flood token/counter to plate 05. 

UPDATE 2025-05-01: Added the Poison token/counter to plate 05. 

UPDATE 2025-04-20: Added a 5th build plate with new tokens for abilities Goad and Suspect. 


If you like my work, and you don't mind, please Rate the profile, Like this model, Follow me, and consider providing a Boost. Thanks!

Boost Me (for free)

Please boost if you can. It really helps to support designer's work. Thanks!!!


Print these in your favourite gaming colours and have your creatures look awesome as they gain abilities on the battlefield. The pictures show this compatible storage box.


This set includes the Copy ability and these 13 keywords: Deathtouch, Defender, DoubleStrike, FirstStrike, Flying, Haste, Hexproof, Indestructible, Lifelink, Menace, Reach, Trample, Vigilance.


Printing Instructions

  1. This is a 2-colour print that requires an AMS. Choose your base colour and an inlay colour for the icons, text, and borders. 
  2. Configure these in the Object view in the slicer to match your filaments in your AMS. 
  3. I recommend a fairly smooth build plate, to get crisp text or icons. The side you put down will print smoother than the top side. For these sort of prints I like to use a PEI build plate with a honeycomb pattern on it. This is mostly smooth, so the text and icons are clear (clearer than a textured plate), but the surface has some subtle texture that catches some light. 
  4. I've included two build plates; one with icons down and one with text down. Take your pick. Make as many copies as you think you need. Five of each token is a good set. 
  5. Finally, see the Tips & Tricks for Quality Prints document in the Documentation section.

Black and green filaments are linked in the BOM below. 


This model is created from scratch, but was inspired by https://makerworld.com/en/models/127040?from=search#profileId-137493. That model doesn't include the text on the back side and has 12 tokens, not 14.


Just Keep Printing!

GC3D


Documentation (1)

Other Files (1)
Tips+Tricks for Quality Prints.pdf

Comment & Rating (104)

(0/1000)

Boosted
Print Profile
Standard 0.2mm layer. Two plates with text up/down
Excellent print, thank you very much
The profile uploader has replied
Show original
0
Reply
Awesome! Thanks for the boost and the kinds words @jimminie !
0
Reply
FYI, There are now some new tokens on Plate 5 if you want to check them out.
0
Reply
Boosted
I like it, so I designed my storage solution for this kind of token! https://makerworld.com/en/models/1216027-token-organizer-fits-deckbox#profileId-1231880
0
Reply
I actually found this model after printing @rky.91 model. Sadly, the box lid and box base did not fit together. I started searching for a different box, and found this profile. I am excited to reprint the tokens with text on the back. I really liked the rky.91 box conceptually.
0
Reply
Boosted
Replying to @atanasio :
have you tried to clean the lid slot with an exacto knife? it's a tiny unsupported slot
0
Reply
Excellent tokens. I like that it has both the icon and the keyword
The designer has replied
0
Reply
Thanks again for the kind words and the boosts! All the best to you. GC3D
0
Reply
I tried to print this today, but have issue's with selecting the colour for the border. Since i dont use bambu it gives me a warning when using the 3MF file. Is there any way for me to sort it out with the stl file? Or does the 3MF work with creality? Just got into printing so not very knowledgable The print i did was amazing tho, so really want to try to get it sorted
(Edited)
The designer has replied
0
Reply
Hi, as long as you have some sort of MMS (multi-material system) in your setup, you can print these. But you definitely have to have an MMS to change colours, because both the text and the graphics/border are inlayed. With an MMS, it is easy... Each token is modeled in two separate STLs...one is the base/core and the other is the inlays (text on one side and the graphics plus border on the other side). So just set the base to one colour and the inlays to the other colour. See this pic, in which I show a) the two STLs (in Object view, in Orca Slicer) of the Goad token, and b) on the build plate, I pulled them apart so you can see that the inlays object has text+icon+border. Hope that helps!
0
Reply
Replying to @gregchwelos :
Yepp, this is the problem, i don't see it like you do in this picture, i can download 1 stl file. which doesnt give me one of each. In the 3FM file this is the case that both are seperate. But it also gives me warning not to use it since settings might harm my printer. I've tried to just colour in manually in the stl files, but there is always one token which has a broken frame so i cant fill it without the whole thing being covered. At this point in time, i guess this just isnt for me. *Edit* Refused to give up and managed to fix it using triangle fill, will see how it prints :) Thanks for the quick reply
(Edited)
designer
1
Reply
Replying to @user_242907516 :
Which token has the broken frame?
0
Reply
Print Profile
Standard 0.2mm layer. Two plates with text up/down
these are so clean and helpful to play, just makes quick glances possible to understand what is going on in a commander game
0
Reply
Any chance of a goad and suspect icon?
The designer has replied
0
Reply
I added a new build plate with tokens for Goad and Suspect. Please boost when you can. Cheers!
1
Reply
Replying to @gregchwelos :
Man thats amazing!
1
Reply
Replying to @gregchwelos :
really great work, i just printed the box looking to print the tokens now - there are no poison token/infect token as far as I can see.
0
Reply
Boosted
Any clue if Flood counter will be included? https://mtg.fandom.com/wiki/Flood_counter Or is it possible to create the tokens ourself?
The designer has replied
0
Reply
I added a Flood counter to build plate #5. Please boost when you can.
1
Reply
Of course anyone can create similar tokens themselves, if you know how to use one of the 3D CAD tools. Not difficult, but takes some time to learn. Cheers!
1
Reply
Boosted
Replying to @gregchwelos :
Awesome work! Thanks!
0
Reply
Boosted
What is the font you use for the keywords? These are awesome BTW
The designer has replied
0
Reply
Very glad you like them. The font is Agency FB bold. It's prints well and is a bit stylish.
1
Reply
Replying to @gregchwelos :
Thanks for the boost!
0
Reply
Thank you! Love this! Do you happen to have blanks? No matter what I try, I'm failing at making one.
(Edited)
The designer has replied
0
Reply
Sorry for the slow reply on this! Do you mean blank on both sides? I can certainly add that.
1
Reply
I added a 6th build plate with blanks. One is completely blank on both sides. The other has a separate frame/border on the top, with no text nor icon.
1
Reply
Really great work! Any chance for a German language version as my friends cant speak english :( Or do you know a tutorial how I could change it myself?
The designer has replied
0
Reply
Hi, I'm really glad you like the token. Please boost if/when you can. I'm sorry, but translating to German means regenerating all of the model pieces and is waaaay too much work for me. I looked at the model in the slicer, and in theory you could "hide" the English text and then add the German, using the slicer (Bamboo Studio, or better, Orca Slicer). But be warned, working with the text tool in the slicers is very tricky...very hard to get it inlaid the way the model is. Note, all of the black parts (icon parts, frame, and text) are one object (STL) in each token, and the body is another. So you have to first Split the inlay (the black parts) to Parts, then change the English text parts to the body colour, then Merge them all back together, and then add your German text. Start with the English text up on the build plate. Go ahead and give it a try but be prepared for many, many hours of work if you're new to this. Good luck!!!
0
Reply
Re tutorial, BambuLabs provides an intro to Bambu Studio, as does this Youtuber: https://www.youtube.com/watch?v=rZhy0J0mXBE. There is no tutorial that will tell you the steps to just do what you want to do (it's just one of thousands of possible 3D operations). You'll have to learn how the various tools work and then apply that knowledge to this task. Again, the text tool is very difficult to work with, so be warned. Finally, if you wanted to commission me to do this work for you, I would consider that. Cheers! GC3D
0
Reply

License

This user content is licensed under a Standard Digital File License.

You shall not share, sub-license, sell, rent, host, transfer, or distribute in any way the digital or 3D printed versions of this object, nor any other derivative work of this object in its digital or physical format (including - but not limited to - remixes of this object, and hosting on other digital platforms). The objects may not be used without permission in any way whatsoever in which you charge money, or collect fees.