Search models, users, collections, and posts

Toroidal Launcher Pro - Upgraded High RPM Launcher

GIF
GIF

Print Profile(5)

All
X1 Carbon
P1S
P1P
X1
X1E
A1
A1 mini
H2D
H2D Pro
H2S
P2S
H2C
X2D
A2L

Pro Gear Components (0.20mm Custom)
Designer
2.8 h
1 plate
4.9(106)

Housing Components (0.20mm Custom)
Designer
4.8 h
1 plate
4.9(117)

Toroidal Rings (0.16mm Balanced)
Designer
3.2 h
5 plates
4.9(90)

Lite Gear Components (0.20mm Custom)
Designer
2.8 h
1 plate
4.8(21)
Click to see more

Open in Bambu Studio
Boost
2460
5783
507
597
4.3 k
1.9 k
Released 

Bill of Materials

Maker's Supply Kits and Parts
Select all
M2x16 SHCS Machine Screw (20PCS) - AA025
6704ZZ (1PCS) - EA005
MR106ZZ (6PCS) - EA017
Bambu Filaments
Select all
Silver (10102) / Refill / 1kg
Cobalt Blue Metallic (13600) / Filament with spool / 1 kg
Translucent Teal (32501) / Refill / 1 kg
Black (70100) / Filament with spool / 0.5 kg

Description

Boost Me (for free)

Like the model and want to support the designer? Click the button to boost, it's free! 🚀

Toroidal Launcher Pro

Upgraded version of the Toroidal Launcher V2 using hardware parts from Maker's Supply for ultra-high performance! In addition to upgraded gears using 18+1 bearings this version features a knurled housing design for maximum grip and updated gear adapter for compatibility with other popular community models.

High-speed video showing 80mm propeller printed in PAHT-CF (recorded at 480 fps and slowed by 16x)

Once you've printed and assembled your launcher be sure to also checkout the Toroidal Propeller Lab and start designing your own custom propellers!

Printing Tips

  • To avoid layer adhesion issues always clean build plate using water and a light soap (wiki guide)
  • Recommended to use basic PLA, PETG or ABS/ASA for internal gear components
    • CF filament can be used for a more robust and aesthetic housing (recommend to break-in gears)
  • For best results it's highly recommended to run flow rate calibration to ensure dimensional accuracy
  • Toroidal Rings can be printed using the High Quality 0.16mm preset from Bambu Labs
    • Using ABS, ASA or PA gives a 12-15% weight reduction over PLA and PETG

Hardware Parts

The gear components can be assembled in two different versions based on the hardware parts you have available. The pro gear components uses the full set of parts listed in the Bill of Materials and available to order through Maker's Supply:

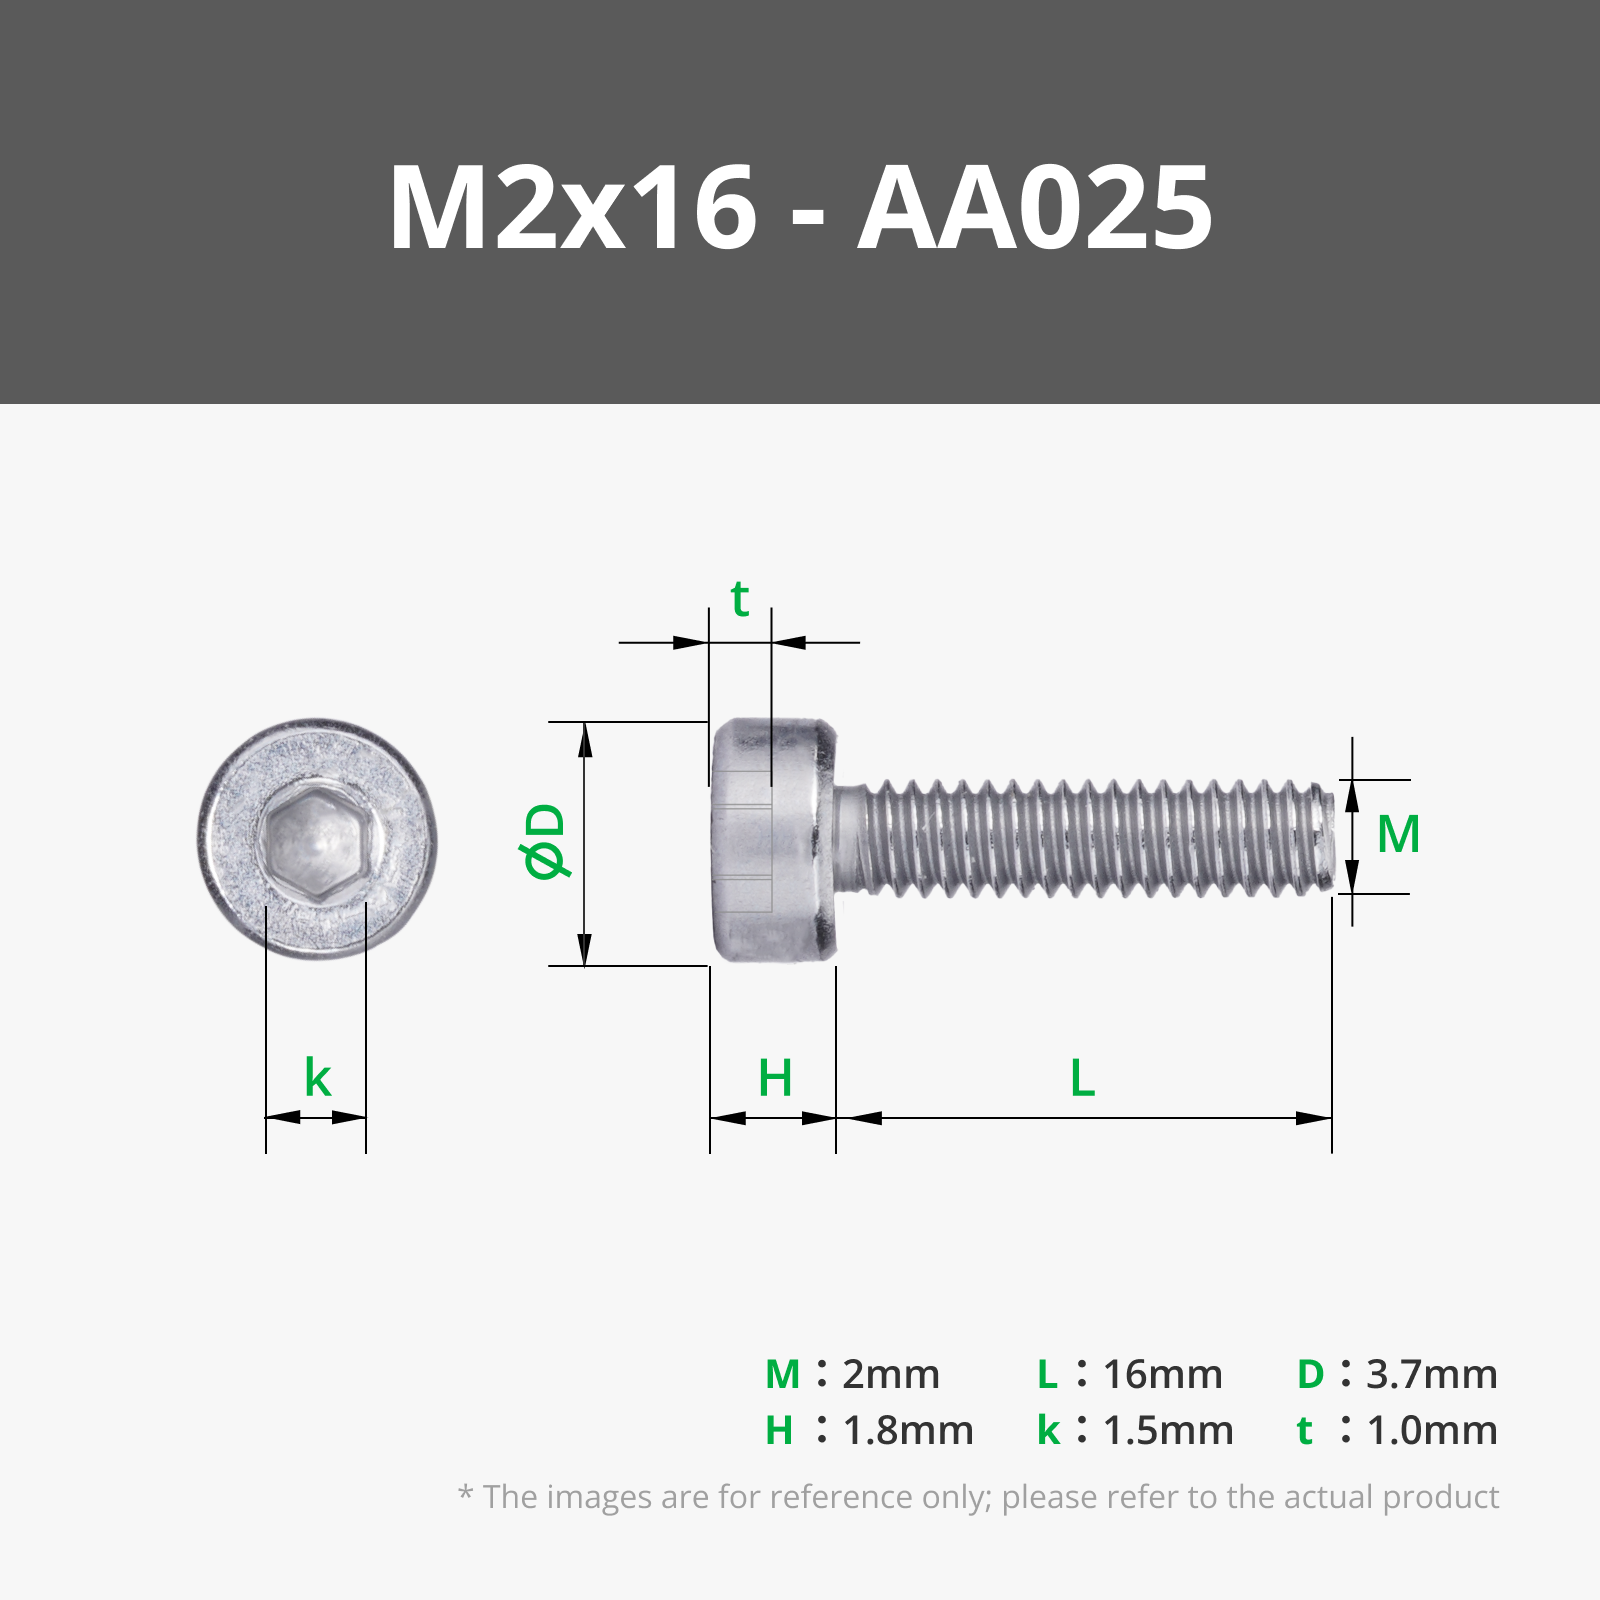
  • M2x16 Socket Head Cap Machine Screw [10x]*
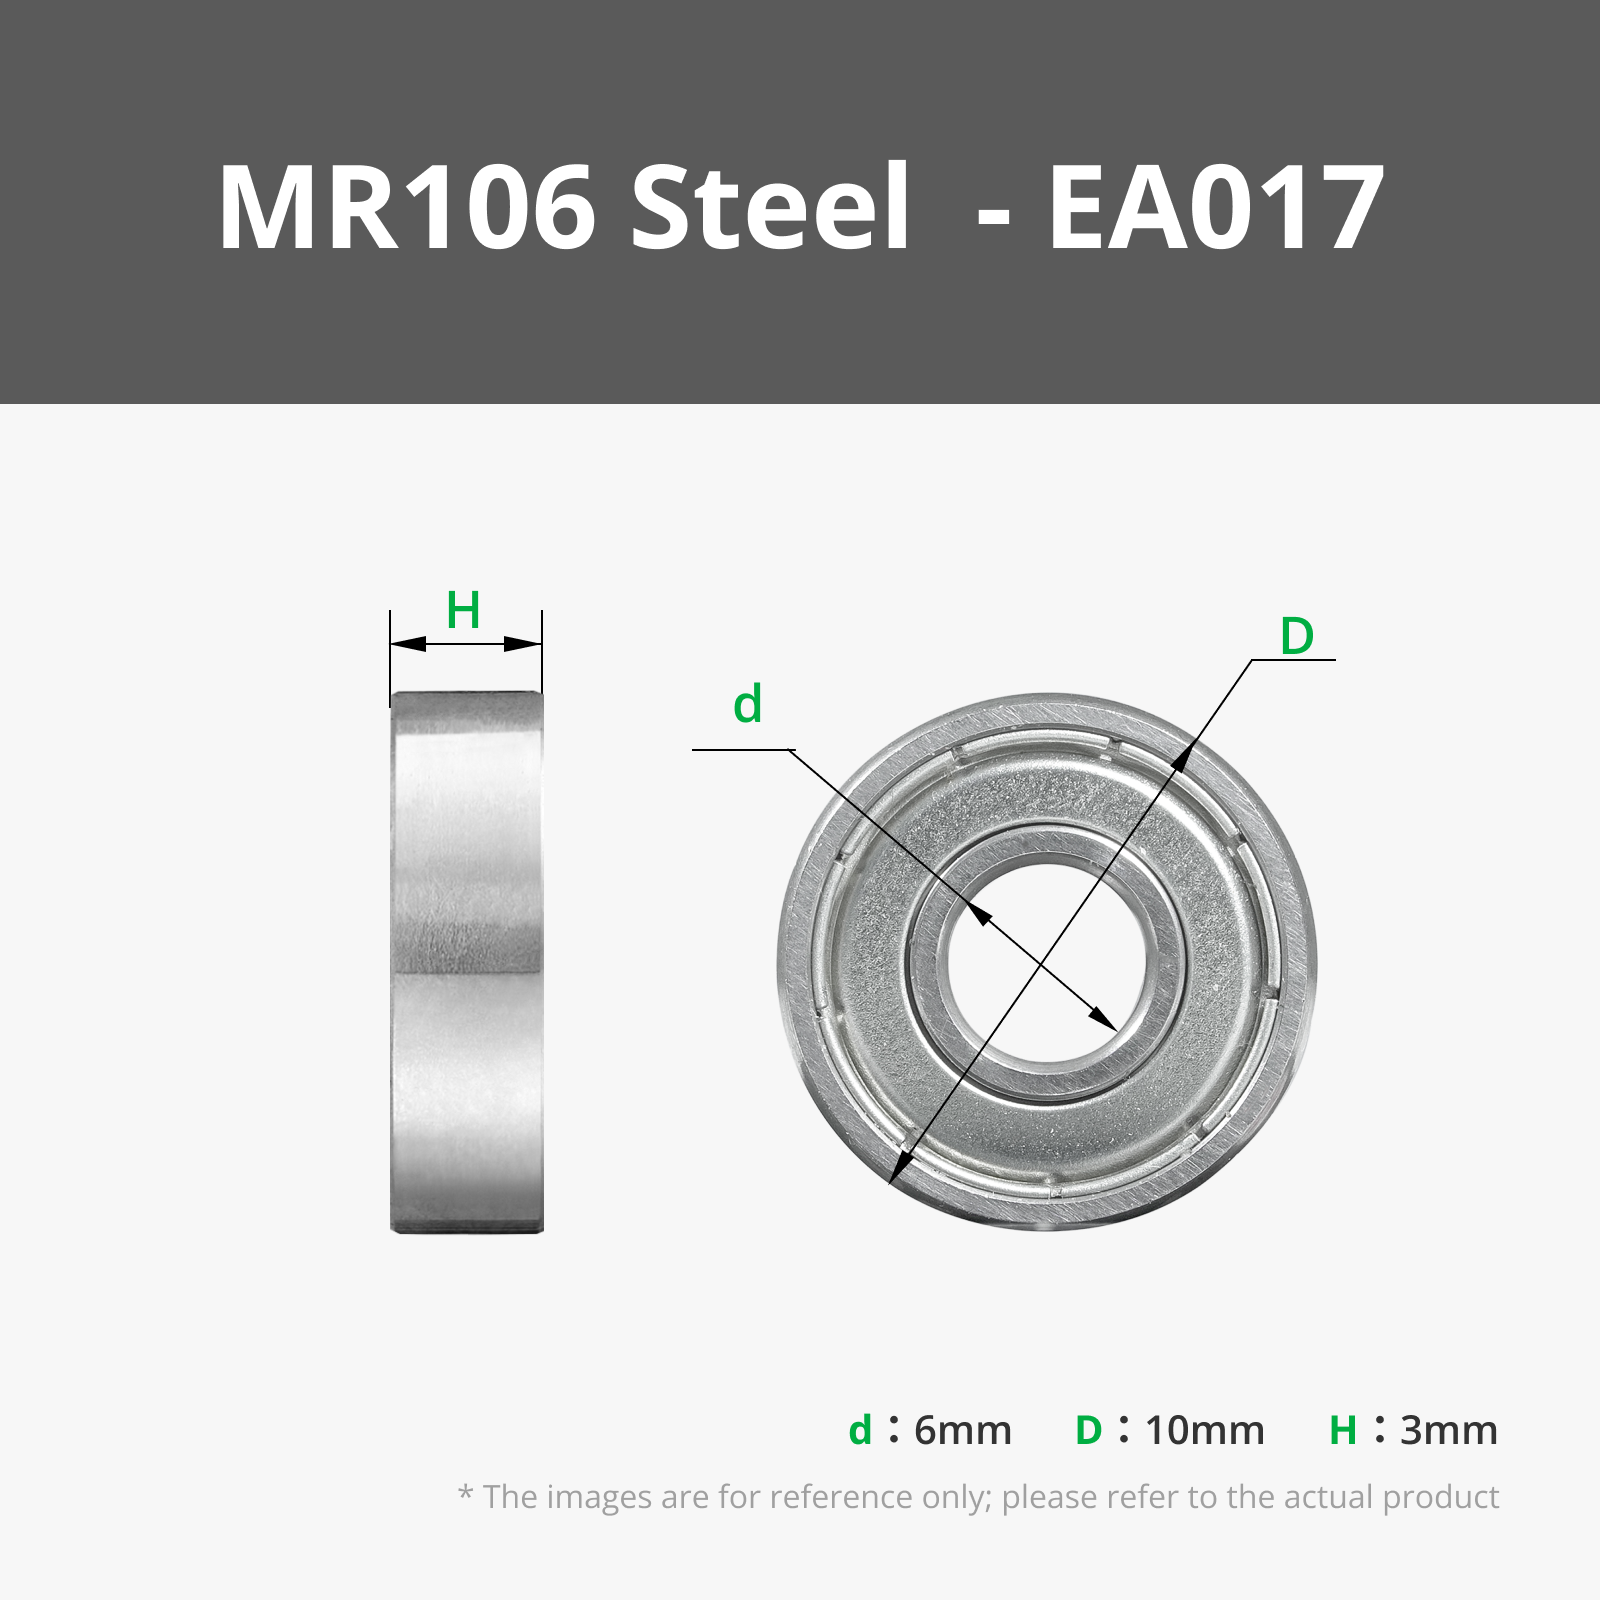
  • MR106 Deep Groove Ball Bearing [18x]
  • 6704 Deep Groove Ball Bearing [1x]

If you have limited access to hardware parts the gears can also be assembled using the lite gear components which only requires only a single 6704 bearing to assemble. If assembling the light gear components it's highly recommended to use a plastic safe lubricant (e.g. Super Lube 51004) and applying a drop to the inner surface of each gear during assembly to reduce friction.


*Note: when installing screws it's recommended to use a torque-limited driver set to a maximum of 1Nm to avoid over-tightening parts. If tightening by hand make small turns ensuring the gears still spin with minimal resistance.

Assembly Walkthrough

Assemble the third stage sun gear with included adapters and optionally secure with M2x16 screw
Prepare the planet carrier and three screw posts with M2x16 screws and bearings as shown above
Secure two of the planet gears with the assembled screw posts, making sure the gears are able to spin freely after tightening
Secure the third and final planet gear to complete the stage assembly
Repeat the previous three steps two more times to assemble all three planet carrier assemblies
Insert the large 6704 bearing into the printed insert and press down to ensure it's firmly seated
Carefully install the bearing insert into the housing by aligning the tabs and turning 60° clockwise
Insert the third stage planet carrier, making sure the gears turn freely before pressing down to secure the sun gear to the output bearing
Continue stacking gear stages making sure all previous stages can spin freely before lightly pressing down to seat the sun gear to previous stage
Complete the launcher assembly by slowly twisting the knob onto the housing until the planet carrier is engaged and the halves snap together

Frequently asked questions

Can the gears be lubricated?

Yes! It's recommended to use a lubricant that is safe for plastics such as Super Lube 51004. If assembling the lite gear components it's also highly recommended to apply a drop of lubricant to the inside part of each gear during carrier assembly to reduce friction.


I'm having trouble getting the gears to spin, what can I do?

The first step is to always try reassembling the gears and launcher housing, taking care to turn the knob and mesh the gears before snapping the two halves together. If you're certain the gears are meshed correctly and there is simply too much friction it's recommended to run flow rate calibration on all filaments used for gear components (that includes the main housing) to ensure dimensional accuracy.


Is there any way to fine-tune the gears even more?

You can try adjusting the X-Y contour compensation in Bambu Studio (under Quality → Precision) and print a single stage of the launcher gears to check the fit. Once you find the correct compensation you can print the remaining stages for the best performance.


Can I showcase the design on my YouTube/Instagram/TikTok or other social medial platform?

Of course! You're more than welcome to showcase or feature the 3D printed model in any blog, short/long form video or other content as long as you provide credit to the designer and a link to the exclusive design here on MakerWorld. Be sure to leave a comment with a link to your content and I will showcase the best videos here directly on the model page!


Can I sell the printed design or files?

The design will always be free for anyone with a 3D printer to print for themselves and gift to others but if you are interested in selling the printed models for profit I offer several options through Patreon and the MakerWorld membership program, click the button below to learn more!

Membership

Click to learn more about licensing options!

Join

Community Support

Thank you to everyone who downloads and prints the Toroidal Launcher Pro! If you would like to support my design work and the development of more fun and functional 3D printed models the easiest way is to simply click the button below and Boost the model for free.

Boost Me (for free)

Click the button to boost!! 🚀

If you would like to support even more you can purchase filament through the official Bambu Labs store using the links in the Bill of Materials or with a monthly donation through Patreon or the MakerWorld membership program linked above.

New to 3D printing or looking for your next print?

Be sure to follow my MakerWorld profile  to be notified of new model releases and check out some of my other designs which showcase some of the many possibilities of 3D printing!

Change Log

  • Jan, 15, 2025 - Updated Lite gear components, improved housing geometry and print profile
  • Jan. 13, 2025  - Restructured print profiles for the Pro and Lite gears, moved housing to new profile
  • Jan. 12, 2025 - Added print profile for a Lite version of the launcher using a single 6704 bearing
  • Jan. 10, 2025 - Improved planet carrier and screw post design; added short spacer for sun gears
  • Jan. 9, 2025 - Improved texture of bearing insert grips; simplified output gear adapter

Comment & Rating (507)

(0/1000)

Boosted
Pinned by Designer
Print Profile
Pro Gear Components (0.20mm Custom)
I loved the first one you made. when I saw this I immediately ordered the bearings and printed the parts. everything printed perfectly. really appreciate the time and effort you put into this one. thanks.
The profile uploader has replied
profile
4
Reply
Thank you for the boost and sharing a picture of your print, looks great I'm glad you enjoy it!
(Edited)
1
Reply
Boosted
Print Profile
you can print full in a1mini
Absolutely awesome! I have created a carrying case for the launcher and 5 of its default 4-blade propellers (last image). Here is the model for those interested: https://makerworld.com/en/models/1434341-toroidal-launcher-pro-carrying-case#profileId-1491990
10
Reply
Great model PLA-CF - (CREALITY) PETG BLUE - (ELEGOO) Working very good
0
Reply
Not trying to be rude, genuinely curious.... why do you use Edge at all, and especially when you also use Chrome simultaneously, while having Firefox pinned? Also, full versions of Outlook, Word, and Excel open? I'm a software developer, and have very rarely seen such things in a decade. Again, hope this doesnt come off rude.
0
Reply
Replying to @joeydoom :
i use software i want. i don t ask anyone how and what software they use.
3
Reply
you don't see but i have BRAVE & OPERA too
0
Reply
Awesome model! I get around 30-50' or so launching out in the park without the 6704 bearing. The only issue I have is high friction when using the optional 6704 bearing. I think the gear train is pushed slightly out of alignment with the housing gear mesh. I printed on a Prusa MK4S that was calibrated and everything else came out perfect so I don't think it is an extrusion rate issue. Any suggestions?
The designer has replied
designer
1
Reply
Thank you! Can you make sure the sun gears and carriers are all seated as flush as possible? After assembling the launcher with the 6704 bearing place the launcher on a flat surface and give the output drive a firm press down; there should be just enough play in the gears to seat everything while keeping the output gear snapped in place to the 6704 bearing. The drive design is one of the areas I want to improve in future revisions but I'm waiting for the right idea before I go and make sweeping changes. I'll give it some thought over the next week and may try prototyping some ideas but hopefully the above tips help you get it flying right! 👍
(Edited)
0
Reply
Replying to @BrentPeterson :
How about not using a snap for the 6704 bearing? This would allow the sun gear to have a little vertical tolerance. For my print, it runs very smooth without the bearing locked down but there is a little wobble that I want to eliminate due to small amount of play in the gears. Thanks
0
Reply
Fantastic, only the translation could be larger
The designer has replied
Show original
1
Reply
I've released a new design with longer adapters as well as customizable toroidal propellers so be sure to check it out for more options: https://makerworld.com/en/models/1033053
0
Reply
I mean the gear can be longer
0
Reply
Boosted
Print Profile
Housing Components (0.20mm Custom)
I ended up printing one with the lite gears, and one with the bearings. the lite gears were rough at first, but adding some oil (as was recommended) helped it out a lot. they both work super nicely
0
Reply
does one shoot higher than the other or about the same once gears are oiled?
0
Reply
Boosted
Replying to @SirBigSpur06 :
I'd say it's about the same
(Edited)
1
Reply
I don't see the ring for the main bearing.
The designer has replied
1
Reply
The ring shaped insert is part of the "Housing Components" print profile. I'm workin on some updates and will likely redo the assembly steps soon to match the latest versions. edit: I've updated the print profiles and assembly pictures to match
(Edited)
designer
4
Reply
This is the Best performing Launcher I have found Bar none. But it has some CONs. - One obviously it cost more since you have to buy bearings. - There is a flaw in the bottom housing STL. On multiple filaments it produces a Horizontal Line on the exterior wall. I can even see it on other people's posts. NOTE* Don't print in PLA SILK and RIP it With Force too many times (ALOT REPEATEDLY) the bottom Housing lock on the Gear train snaps; at least mine did. I Choose to adapt to the other PROP style from the HSPL only cause i liked the rotation direction all to be the same across them all. I have printed a lot of the HSPL but only cause I didn't want to buy that many bearings and the kids seem to like gripping the small diameter. But the Small HSPL cannot compare to the Toroidal Pro when it comes at launching anything bigger than 67mm propeller. Small HSPL will skip teeth and loose load transference. TORODIAL PRO, Just prints and works!! GREAT.
(Edited)
1
Reply
Boosted
Print Profile
Pro Gear Components (0.20mm Custom)
Enjoying the print with my grandson. Very happy both of us. Thanks
1
Reply
Great design. I’ve just lost one of the rings on the roof of my house 😂
The designer has replied
0
Reply
😂 Thanks for the positive review and I love the filament you used!
0
Reply
Boosted
Print Profile
Housing Components (0.20mm Custom)
The printed result is excellent, thank you for your design and sharing
Show original
1
Reply

License

If you want to use this model commercially, please join my membership.
Join Now
This user content is licensed under a Standard Digital File License.

You shall not share, sub-license, sell, rent, host, transfer, or distribute in any way the digital or 3D printed versions of this object, nor any other derivative work of this object in its digital or physical format (including - but not limited to - remixes of this object, and hosting on other digital platforms). The objects may not be used without permission in any way whatsoever in which you charge money, or collect fees.