No Extra Hardware Foldable Side Spool Holder


Print Profile(3)


Description
A carefully designed folding side spool holder that only requires the hardware included with the printer (including the leftover screws used in shipping). With 15 different versions made to best fit your printer.
Print Profile Versions:
No Extra Hardware Version:
No extra hardware requirement suitable for AMS Combo printers like the X1C Combo and P1S Combo with AMS (not AMS 2 Pro).
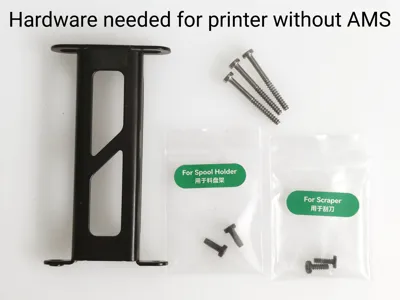
No Extra Hardware Version - With Scraper Screws:
No extra hardware requirement but uses 2 screws from the scraper kit. Suitable for X1C and P1S printers that don't ship with an AMS inside and don't include the 6 screws used to secure the AMS during shipping. AMS 2 Pro Combo printers also won't have these 6 screws.
Original hardware + 2 extra M3 screws:
Uses original hardware but requires 2 extra M3 screws to replace the original M3 mounting screws. This version is made for those who want a more heavy duty mounting to their printer. Suitable for AMS Combo printers like the X1C Combo and P1S Combo.
The angle between the back and side of the printer may not be 90 degrees so recommend printing out the tester plate with 90, 89 and 88 degree test parts. You can also just print the 89 degree test piece to estimate whether you need a larger or smaller angle.
Hardware needed:
- Original spool holder bracket
- 2x M3 screws from the original spool holder bracket (10mm/12mm/14mm M3 screws can be used instead if printing the version that needs 2 extra M3 screws)
- 3x 28mm self tapping screws used in shipping
- 6x 16mm self tapping screws used in shipping (These only come with AMS Combo printers. You may supply your own or choose the version that uses two scraper screws. Assembly instructions are in the print profile pictures)
Print guidance:
The design and print profiles have been carefully optimized for easy support-free printing with minimal overhangs. Part strength has been optimized to use more material on critical areas to ensure strength without excessive material usage. However, some problematic materials may need some extra care, so here are a list of tips before printing:
- Ensure build plate is clean to avoid adhesion issues and prints warping
- Disable aux fan to reduce unnecessary cooling which can cause warping
- For high temperature materials like ABS, part cooling fan can be disabled except for bridges and overhangs.
- Brim is enabled on the long bracket to help reduce the chance of warping. This will require removal after printing. Can be disabled if you are confident the material has good bed adhesion.
- Design has been optimized to not need supports. Enabling supports is not recommended as they'll be hard to remove.
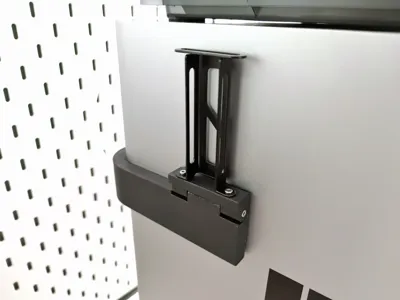
Assembly instructions:
Use 2x 16mm self tapping screws to secure the spool holder bracket

Use 2x 28mm self tapping screws to attach the end assembly to the side arm

Use 1x 28mm self tapping screw to reinforce the side arm

Use 4x 16mm self tapping screws to reinforce the mounting holes to the printer (not needed for scraper screw version)

(Optional) Add foam tape to the arm and spool bracket

Mount the whole assembly to the back of the printer using the original M3 spool holder screws. The whole assembly replaces the original metal spool holder bracket, and uses the same mounting holes labeled “Spool Holder Assembly Holes” on the printer. Installation is the same as the original spool holder in the documentation here.

(Optional) Extra holes on the bottom are to store left over M3 screws

Spare PTFE tube can also be used to help guide filament for better reliability. X1C and P1S PTFE splitters or adapters can be printed to accommodate the side spool and AMS. The one shown in the right picture is available on MakerWorld (requires additional hardware)


Designer notes:
- Main purpose of the reinforcement screws are to reduce the chances of layer delamination failure. This can happen with materials with poor layer strength from material choice or low print temperatures. Even if the walls of the parts fail, the screws will still hold onto the broken layers.
- Using longer mounting screws is recommended for the most strength, but the original spool holder bracket screws can suffice for a regular 1kg spool.
The design is recommended to be only used with 1kg spools, but it has been tested to 3kg without any obvious signs of failure. If loaded higher than 3kg, the weight will permanently bend the 28mm screws. As a safety margin, only use 1kg spools.

Boost Me (for free)
Greatly appreciate everyone's support through Boosts, as many of my designs go through many iterations and testing for reliability and compatibility. This design alone already has over 20+ parts created and optimised to ensure the best fit on your printer, and such designs takes weeks to develop and refine. So everyone's Boosts means a lot to me to create such designs.
Documentation (1)
License
You shall not share, sub-license, sell, rent, host, transfer, or distribute in any way the digital or 3D printed versions of this object, nor any other derivative work of this object in its digital or physical format (including - but not limited to - remixes of this object, and hosting on other digital platforms). The objects may not be used without permission in any way whatsoever in which you charge money, or collect fees.
Comment & Rating (624)