Search models, users, collections, and posts

Brick Saturn V invisible wall mount

Print Profile(4)

All
A1
P1S
P1P
X1 Carbon
X1E
X1
H2D
H2D Pro
H2S
P2S
H2C
X2D
A2L
A1 mini

0.2mm layer, 2 walls, 15% infill
Designer
1.8 h
1 plate
4.8(18)

A1 Mini compatible - 0.2mm layer, 2 walls, 15% infill
Designer
1.8 h
2 plates
5.0(1)

Reinforced + Lengthened Stage 3 connector
2.7 h
1 plate
4.3(4)

A1 mini - 1 single plate
1.7 h
1 plate
5.0(1)

Open in Bambu Studio
Boost
123
364
42
15
303
189
Released 

Description

An invisible wall mount for the brick NASA Apollo Saturn V rocket (92176).


Each stage is mounted separately. The mounts are attached to the wall using the “body” parts of the Universal Wall Mount by Allar3D (https://makerworld.com/en/models/459408#profileId-367627 and https://makerworld.com/en/models/464549#profileId-373195).


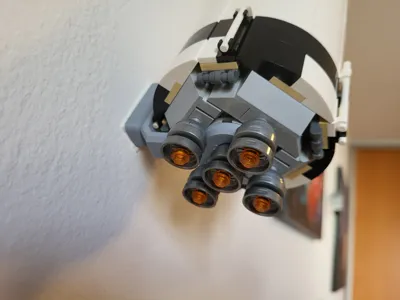
The parts are designed to be nearly invisible, either by being physically hidden by the displayed model, or by blending in with the surroundings (the engines of the first two stages). A gray filament is best for this purpose, I used AzureFilm PLA Original Gray which matches the brick colors very well. 


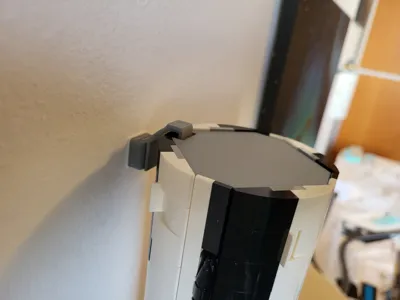
The first two stages have two mount supports each, one for the bottom between the engines, and one at the top to prevent tipping over. You will have to detach of the engines, put the supports in place, then reattach all engines. The third stage has a single support that replaces a 1x3 tile in one of the side channels, you can choose which tile to replace in order to keep the support close to the center of gravity. The CSM and the moon landing scene only have a single support each, which easily attaches to the RCS thrusters and the gray octagonal plate, respectively. If in doubt, see the full assembly instructions


Original source files are freely available on Onshape. You may use them to make your own modifications to the design.

Comment & Rating (42)

(0/1000)

Boosted
Great idea of a design that mostly works. I made some tweaks and own version of the stage 3 & 4 mounts, but I really appreciate the effort that the designer put into this.
The designer has replied
designer
4
Reply
Thank you very much. That third stage looks great, will you share your model?
2
Reply
Print Profile
0.2mm layer, 2 walls, 15% infill
I did need to resize the piece that holds the command module, but no big deal - printed a handful at 1% increases and picked the one that fit perfectly. All in all, great design work. My son loves it.
The profile uploader has replied
profile
1
Reply
Thank you, it looks great there :)
0
Reply
Print Profile
A1 Mini compatible - 0.2mm layer, 2 walls, 15% infill
Great model, I've uploaded a print profile for the A1-mini with all the parts fit in a single plate. Thank you!
(Edited)
The profile uploader has replied
profile
1
Reply
Thank you, for the rating and for the A1 Mini profile!
0
Reply
Print Profile
0.2mm layer, 2 walls, 15% infill
Fantastic, no problem with the print
Show original
0
Reply
Print Profile
0.2mm layer, 2 walls, 15% infill
One of my very first prints. Came out great!
0
Reply
can you pls make available for A1 mini
The designer has replied
0
Reply
All the parts are quite small, you can rearrange and print on A1 Mini from Bambu Studio. I will still try to create a profile that can be printed from the phone app.
0
Reply
Replying to @Problem2 :
Thank you, as I do not have the resources to use Bambu Studio. Any idea when it will be available on the mobile app?
0
Reply
Replying to @Darth_Zoravar :
Done, I added a new Mini-compatible profile. It requires a second plate for the two top cover plates.
0
Reply
stage 1 mount failed after 24 hours and snapped clean in half ☹️
The designer has replied
0
Reply
I'm sorry to hear that. Did you have to rebuild the whole first stage?
0
Reply
only a partial luckily, snapped a grid fin though. any chance this part could be strengthened?
0
Reply
Replying to @Paratax :
It can be strengthened of course, but it's always a tradeoff between strength and looking good. I would first try increasing the infill percentage for that part (you can try using the "0.20mm Strength" preset in Bambu Studio, I guess I should have used that in the default print profile) and/or printing it at an 45 degree angle (so that the cutout between the horizontal and vertical parts is lying flat on the bed). And make sure that the upper support for the stage is holding, that one relieves a lot of stress just by preventing the stage from tipping over. Mine has been hanging on the wall for six months, and never had any issues, so I can't really speak to relative strengths.
0
Reply
what sizes of the Universal wall mount are needed and in what quantaties?
The designer has replied
0
Reply
Two "medium duty" ones and five "light duty" ones. You need only the "body" part of each, the insert parts are integrated into the Saturn V mounts.
1
Reply
Replying to @Problem2 :
ok thnx :)
0
Reply
Print Profile
0.2mm layer, 2 walls, 15% infill
had to use some glue on the CM and Lander parts.
The profile uploader has replied
0
Reply
Can you share which parts you glued? In my case, the tolerances between the printed parts and the rocket parts were very tight, so no glue was needed, but of course it depends on the printer, filament, and just random chance.
0
Reply
printed great. used pla-cf for this and the mount receivers.
0
Reply