Bikefit Saddle Measurement Kit


Print Profile(1)

Bill of Materials


Description
Boost Me (for free)
Did my model help you save some bucks, which you’ve probably added to your n+1 piggy bank? If so, please help me save on filament and boost my model, so I can add to my n+1 piggy bank too!
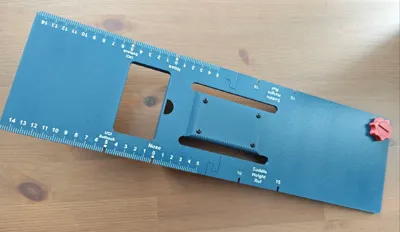
Achieve precision and consistency in your bike setup with the BikeFit Saddle Measurement Kit. A convenient tool for cyclists. Designed for accuracy and ease of use, this kit simplifies the process of measuring and replicating critical saddle dimensions, ensuring optimal performance and comfort across bikes.
Key Features:
- Saddle Height Measurement: Accurately measure the distance from the bottom bracket to the top of the saddle to achieve perfect leg extension.
- Saddle Angle: Place your smartphone on the kit and use a spirit level app to determine the perfect angle.
- Setback Alignment Tool: Determine the horizontal distance from the saddle nose to the bottom bracket for consistent fore-aft positioning.
- Reference Point Indicators: Mark and replicate key positions, such as the saddle's relation to handlebars and pedals, enabling quick and reliable transfer to another bike.
- Easy Replication Across Bikes: Ideal for multi-bike owners or DIY fitters looking to duplicate an ideal setup.
The pictured red HollowTech Cap Tool & Center Measure - 2 in 1 can be found here: Link
Assembly is easy and requires only 4 Heat-Inserts (M3x5x4) as well as 4 Screws (M3x8). A connector plate with countersunk holes is also included in the profile.
Assembly Step 1:
Add Heat-Inserts using a soldering iron to the front and back plate.

Assembly Step 2:
Connect the front and back plate and screw the connector plate on top by using 4 screws (M3x8).

Usage remarks:
- Make sure the floor and bike is level
- Ideally use the tool with both wheels attached
- If using the tool while the bike is mounted on a smart trainer, measure center axle front and back to the floor and make sure they are equal (level)
Disclaimer:
This tool is heavily inspired by the Abbey Bike Tools Fit Kit. I designed the tool to be used by hobbyists and cyclist who would like to tweak and adjust their personal fit without spending big money on the professional Fit Kit. If you are a professional fitter, you should be using and investing in professional equipment.
If you are having bigger issues on the bike or pain and don't really know anything about bikefitting, please consider getting a professional bikefit done.
License
You shall not share, sub-license, sell, rent, host, transfer, or distribute in any way the digital or 3D printed versions of this object, nor any other derivative work of this object in its digital or physical format (including - but not limited to - remixes of this object, and hosting on other digital platforms). The objects may not be used without permission in any way whatsoever in which you charge money, or collect fees.
Comment & Rating (39)