Woodworking Pipe Clamp for 1/2″ Pipe - 35 mm Jaws


Print Profile(1)

Bill of Materials
- 1/2″ threaded water pipe x 1: anylength
Description
A fully 3D-printable pipe clamp for woodworking and other purposes. Just bring a piece threaded pipe!
If you need a larger clamp, also check out the ¾ inch version (Link)
Pipe clamps are awesome! But they are also pricey. This version is completely 3D printed, so you can have as many as you want. The only hardware you need is the steel pipe itself. You will need some ½ inch (21.3 mm) threaded steel pipe of any length (Choose what fits your specific needs). It should fit both European style pipe (BSPT thread) as well as the American style (NPT thread).
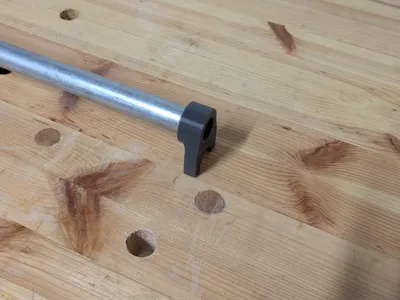
The jaws are about 35 mm (width) × 40 mm. The sliding jaw can be easily locked and unlocked using a set screw with a handle.
Even when printed in PLA, the clamp is surprisingly sturdy and strong. While testing, I even got it to so tight that is left crush marks on spruce. Still, PETG or ABS might be even stronger options.
Boost Me (for free)
I really enjoyed making this model. If you like it, give me a boost or leave a like!
Assembly Guide
What you need:
- A piece of ½ inch (21.3 mm) threaded pipe (usually sold as water pipe). This pipe is commonly available in Europe and the US in most hardware stores. In Germany you can get them e.g. at OBI, Hornbach, etc.
Assembly:
(technically optional but highly recommended) Cut out a 3x3 cm piece of medium grit sandpaper (I use 180 grit) and glue it into the bottom half of the pipe guide of the sliding jaw. This will make sure that the jaw stays firmly in place when tightened.

Screw the short set screw into the sliding jaw until its just about to poke out the bottom. Then, gently press the small teardrop-shaped handle onto the screw.

- Slide the sliding jaw onto the pipe from the end.
Slide the moving jaw with the ball mount onto the pipe.

Screw the fixed part onto the end of the pipe. Make sure its firmly seated.

Insert the main screw into the fixed part (from the pipe side).

Push the main handle onto the main screw until its firmly seated.

Push the moving jaw onto the main screw until it slightly clicks into place.

Screw on the end feet (or just the end cap if you prefer) on the other end of the pipe.

License
You shall not share, sub-license, sell, rent, host, transfer, or distribute in any way the digital or 3D printed versions of this object, nor any other derivative work of this object in its digital or physical format (including - but not limited to - remixes of this object, and hosting on other digital platforms). The objects may not be used without permission in any way whatsoever in which you charge money, or collect fees.
Comment & Rating (15)