Mechanically Locking Gift Card Box


Print Profile(19)


Description

UPDATE 12/17/24 - Added a non-holiday knob and container. Now this can be used for any occasion!
UPDATE 12/14/24 - Added a second knob. You can now choose between the original snowflake or the new holly knob!
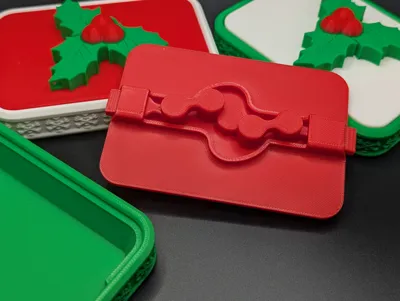
This gift box uses a double slider-crank mechanism to lock its lid in place. The mechanism is a simpler version of my Mechanically Locking Container, but with a gift-giving spin (pun intended) that was inspired by frikarte3D. Just turn the knob to unlock the gift inside!
Check out the rest of my Christmas models here!
Files needed:
- Lid
- Container (Christmas or Plain)
- Outer Linkage (Print 2)
- Mid Linkage (Print 2)
- Inner Linkage
- Knob (Snowflake, Holly or Knurled)
Print Settings
No supports necessary. Print all pieces in the orientation that they come. Be sure to print 2 mid and outer linkage pieces. If you have issues with mid linkages breaking, PETG may be a better option.
Lid Assembly Instructions
With the lid upside down, insert the inner and outer linkages. The orientation of the outer linkages matter. One face is flat, while the opposite has a slight taper. The flat side should be against the lid. The tapered side should face the container.

With the inner linkage in a horizontal orientation and the outer linkages sticking out about 5mm past the outer edge of the lid, the mid linkages should snap into each piece. Some force is required. Be sure that you press them straight down - if they are tilted during pressing, they may snap.

The knob will need to be glued in place on top of the inner linkage. Place the knob onto the inner linkage and ensure that the linkage moves smoothly. Once happy with everything, use a small amount of glue to permanently connect the knob and inner linkage. If you use too much, it may run out onto the lid and lock everything in place.
Tip: If you flip over the entire assembly while drying, glue cannot leak out.

The following filaments were used in the pictures above:
- Bambu Lab Matte Ivory White PLA
- Bambu Lab Matte Scarlet Red PLA
- Bambu Lab Matte Dark Red PLA
- Bambu Lab Crimson Red Sparkle PLA
- Bambu Lab Matte Dark Green PLA
- Bambu Lab Basic Bambu Green PLA
- Bambu Lab Silk Gold PLA
- Bambu Lab Basic Red PLA
- Bambu Lab Basic Magenta PLA
- Bambu Lab Basic Orange PLA
Membership
Are you looking for a Commercial License for all JamesThePrinter models?
Comment & Rating (2166)