Search models, users, collections, and posts

A1 Mini Cable Chain - Model 1

Print Profile(3)

All
A1 mini
X1E
X1
H2C
H2S
H2D Pro
P2S
P1S
X1 Carbon
A1
P1P
H2D
X2D
A2L

A1 Mini Cable Chain - Model 1.1
Designer
7.8 h
3 plates
4.7(295)

Different lower support
1 h
1 plate
4.9(16)

Bottom Mount Mod
Bottom Mount Mod
2.2 h
1 plate
4.8(10)

Open in Bambu Studio
Boost
2135
5075
513
326
4.9 k
2.8 k
Released 

Description

A1 Mini Cable Chain - Model 1

Update: A new version of the top mount is now available - Model 1.1

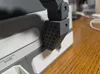
The cable chain system for a 3D printer is a practical solution that allows for neat cable management. The chain encloses the cables, keeping them organized and protecting them from mechanical wear during the printer's movements. Additionally, it enhances the overall appearance of the setup, giving it a professional and tidy look.


The complete set consists of:

- Bottom Mount
- Chain
- Top Mount
- Screw Socket


The files are print-ready, optimized, and intentionally positioned to enhance both durability and appearance.


You can choose which mounting option to use. The options include an M3 nut-and-bolt mount or a mount designed for wood screws.


Check out my other upgrades for the A1 Mini as well!


Comment & Rating (513)

(0/1000)

Man i wish there is a external material requirement list and step by step instructions of assemble. I am too paranoid for me to spent 8 hours printing this and it not working. Can anyone tell the installation instructions?
(Edited)
The designer has replied
11
Reply
Please describe the problem in more detail, I will try to help. Which part does not fit? I didn't expect that it would require instructions
1
Reply
Boosted
It's pretty much straight forward, external material: Just a short M3 bolt screw with nut. You remove the original cover with the "A1 Mini" font, snap in the printed top mount, put the cover back on. Put the M3 nut into the printed screw socket, there is a hole in the printed bottom mount, put the M3 screw through it and attach the screw socket to it, don't tighten it just a few rounds to stay in position. The nut got to be on the opposing side. Attach the bottom mount to the printer as shown on the images, the screw socket you just connected to the bottom mount gets into the z-rail profile. Get a finger into the profile, turn the screw socket 90 degrees so it points to the back of the printer, tighten the screw...it squeezes the profile between the socket and the bottom mount. Assemble the chain links, connect the bottom to the top mount with that chain, put the cable inside the chain during assembly, Each chain link got 2 small holes, press all clips in, done. You could use a wood screw as well instead of the M3 bolt screw+nut. It's harder to explain than assemble :D
designer
9
Reply
Replying to @Megatiks :
I am not smart enough to understand what external materials is required for the chain by just looking at model I also don't know how to remove the cover for installing the top mount and bottom mount.
2
Reply
The print profile is no longer public
Perfect, thank you!
The profile uploader has replied
Show original
profile
6
Reply
You put it on backwards :p
(Edited)
2
Reply
Replying to @Megatiks :
I cannot remove the top cap
Show original
0
Reply
How did you get the little locking plate to stay in place? It doesn't stay in place at all for me and it all comes loose.
(Edited)
1
Reply
Boosted
Some issues and as others have stated, significant post processing required. my biggest irritation though is all the unnecessary printing that just needs to be scraped off the bed. literally printed a scraper, because of this print.. Otherwise, looks lovely once on. some minor issues around the top part. Some reorientation on the bed would simplify and fix a few of these issues. e.g. the pin clips laying flat on the bed. Also as opposed to others, I alternated the chain and it looks quite nice 👍
The designer has replied
designer
4
Reply
It's true that the orientation of the parts may look odd or suboptimal, and in some cases, it generates additional supports. However, this was a deliberate decision. The strongest part of a 3D print is along the layer lines, while the weakest point is the bonding between layers. For this reason, the chain link caps are not laid flat because the pins in that orientation are very prone to breaking.I ran tests, which led me to this design choice. Before creating this chain, I tried versions from other creators where the parts prioritized filament savings over durability. The chain caps in those designs would break in my hands when I tried to press them in because the material separated along the layer bonds. In this model, areas requiring post-processing are intentionally placed in spots that are not visible
5
Reply
Boosted
Replying to @Megatiks :
🙏 Thank you for your reply. very good point regarding durability. I love the model overall, will add a picture of the alternating links soon. Any reason for the extra printing around the parts? e.g. large flat single layer areas?
2
Reply
Replying to @Stacky :
Yes, without the border, the prints turn out poorly. In the photo, you can see an example of chain links without the border. Because the initial layers contain less material than the ones above, the material shrinks, causing the part to deform. Additionally, printing a semicircle is challenging in the initial stages, and the border provides support for those elements
2
Reply
Print Profile
A1 Mini Cable Chain - Model 1.1
This was a challenging print, and a few of the covers for the chain didn't adhere, and I reprinted them. I tried to speed things up by printing them flat, but due to the layering of the pegs, they snapped right off, so I reprinted them how it was originally oriented. Since it took me a while to identify how to attach the base piece, I made a GIF showing how it mounts.
GIF
4
Reply
man I wish I woulda seen this earlier. I’ve had no idea how to install that part and it’s been loose on my printer for at least a month
(Edited)
1
Reply
ok so what’s the other little part for? there’s 2 little ones, one has a spot for a nut and the other doesn’t.
0
Reply
Replying to @A_Spartan_Ghost :
If you're talking about the small piece that has the nut part missing, the print directions say it's for a wood screw, which means that the threading would keep it in place. You only need to print one of the two options.
0
Reply
Print Profile
A1 Mini Cable Chain - Model 1.1
A great first print after unboxing a new printer! Not only does it make my A1 mini look a little more stylish, it does a great job keeping my wires tucked in tight. This drag chain pairs well with the heatbed drag chain the creator has also uploaded, and the ability to cap it with the original (or a custom) faceplate is a huge plus. The hexagon motif not present on other similar drag chain models is exactly what I'm looking for to match other A1 mini additions and modifications, too.
The profile uploader has replied
profile
6
Reply
Thanks, bro, for your feedback! 🙌
(Edited)
1
Reply
Print Profile
A1 Mini Cable Chain - Model 1.1
Significant post-processing is required, but printing this model is absolutely worthwhile Whether it truly helps remains to be seen, as the printer is quite new, but aesthetically it's undoubtedly improved, and the cable is guided in a specific direction This is a definite advantage, especially with narrow enclosures
Show original
profile
4
Reply
Boosted
The print profile is no longer public
perfect fit, seems durable I had a bed adhesion problem with the top mount, but this fault should be on my side.
The profile uploader has replied
profile
1
Reply
Transparent! Please let me know what filament it is exactly :)
0
Reply
Boosted
Replying to @Megatiks :
it is JAYO PLA+ clear
(Edited)
profile
1
Reply
Print Profile
A1 Mini Cable Chain - Model 1.1
great print
The profile uploader has replied
profile
2
Reply
looks amazing in white
0
Reply
The print profile is no longer public
Need 100% infill, its fragile in important place
The profile uploader has replied
1
Reply
I think your printer has some problem, the object is not even and nice. There are lots of jagged edges. I printed three such mounts. They came out nice and strong. I don't know why it went so wrong in your case
(Edited)
1
Reply
Boosted
Seems there is something wrong with your printer, filament or settings...i just printed the attached profile on A1 and Mini and it came out perfectly fine. Greetings
(Edited)
0
Reply
Boosted
Print Profile
A1 Mini Cable Chain - Model 1.1
works perfectly and prints great I had a bit of stringing but I think that's more due to my filament
0
Reply
Bro you put that thing on backwards! 😆
0
Reply
Boosted
Replying to @captain_olimar :
Hey wellll it still works XD
0
Reply

License

This user content is licensed under a Standard Digital File License.

You shall not share, sub-license, sell, rent, host, transfer, or distribute in any way the digital or 3D printed versions of this object, nor any other derivative work of this object in its digital or physical format (including - but not limited to - remixes of this object, and hosting on other digital platforms). The objects may not be used without permission in any way whatsoever in which you charge money, or collect fees.