Search models, users, collections, and posts

V2 Modular Magnet Dispenser holder HSW Skadis 3-12
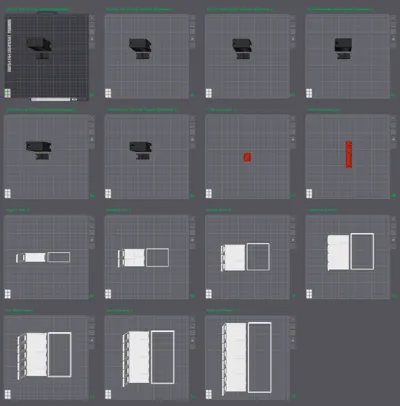
GIF

Print Profile(2)

All
P1S
P1P
X1
X1 Carbon
X1E
A1
H2D
H2D Pro
H2S
P2S
H2C
X2D
A2L
A1 mini

V2 print profile 0.2mm layer, 3 walls, object based infill
Designer
46.1 h
30 plates
4.7(63)

printprofil for A1 mini without Seat 8
50 h
29 plates
4.3(4)

Open in Bambu Studio
Boost
297
886
145
68
614
286
Released 

Bill of Materials

List other parts
  • rubber-band x 1: 25mm or bigger

Description

Update V2 06.10.2024 

Print Profile V2 and STLS have been updated !!!

  • Updated Slider geometry, Updated Body geometry, 
  • Magnet hole tolerances from +0,4mm to +0,6mm to allow better gravity feed and accept higer range of magnet tolleraces.
  • Remooved extra gap and made the Sliders thickness speciffically to every magnet height
  • Added Magnet Sizes: 3x1, 3x2, 4x1, 5x1, 6x1
  • Changed Text to full Magnet size before: (4,5,6) now (4x1 4x2, 4x3, 5x1 5x2 5x3….)

If you wish to update to V2 you will need to reprint Body and Slider, the other parts (seat and Frame) remain the same. 


Boost Me (for free)

By now this Model is the most sucessful but also most time consuming. it took a few updates to get to this point. I believe that the Model is only so good as its support in the long run  
If you wish to support me on my yourney, A Boost, comment or make would be highly appreciated.

Thank you 


Hey guys,


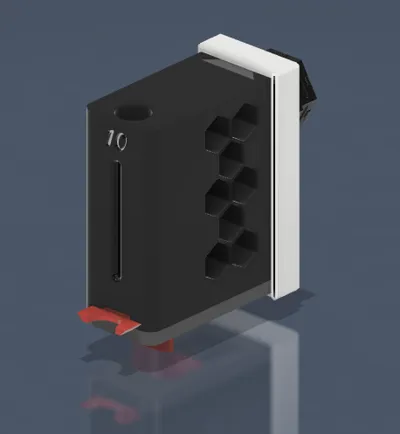
I was not happy with any of the Magnet holders out there so i made one myself.

It is compatible with HSW as well as IKEA skadis, it is modular you can use one as a single unit or stack them up up to 8 units in total.


the trigger is suspended by a rubber band and will return to its resting position after pulling.

one pull produces one magnet at a time.


Magnet compatibility as follows:

  • 3x1mm 3x2mm   (new)
  • 4x1mm, 4x2mm  (new)
  • 5x1mm, 5x2mm and (new)
  • 6x1mm, 6x2mm and 6x3mm
  • 7x2mm 7x3mm   (new)
  • 8x2mm and 8x3mm
  • 9x2mm 9x3mm   (new)
  • 10x2mm and 10x3mm
  • 11x2mm 11x3mm   (new)
  • 12x2mm and 12x3mm
  • stores up to 30 Magnets at 2mm thickness or 20Magnets at 3mm thickness. 

I also made another Version which holds 14mm to 20mm Magnets, the “BIG BOY” you can find on my main Page here:

https://makerworld.com/en/models/655938#profileId-582939


have fun with either of theese and if you like it feel free to like comment, rate or even hit that boost:


Installation:

you will require one regular rubber band per unit, preferably around 30mm in diameter, others will work to, as you can tie a knot to shorten them.
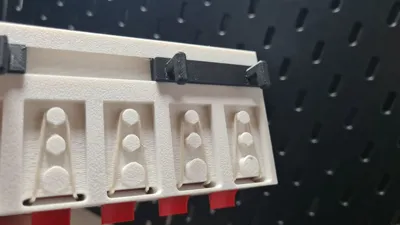
 

  1. Print all parts.

    1. you will need Dispenser(s), Slider(s), connector(s), and a frame according to the quanities of the amount you would like to stack.


  2. slide the first dispensers onto the frame, and up so you have access to the slider section between.
  3. Insert the rubber band through the back of the frame
  4. Insert the slider into the dovetail from the front
  5. place the rubber band over the trigger of the slider.
  6. slide the dispenser into its final position while making sure not to pich the rubber band.
  7. loop the rubber band around one of the tree tensioning points. again checking the band to prevent exessive drillup
  8. repeat steps 2-7 untill all dispensers are on the frame
  9. install your prefered connecter to the dovetail of the frame
  10. slide the outer frame over the back of the unit to prefent the dispensers to come loose.

Load the Magnets and off you go.

(make sure to keep the polarity the same way around for every dispenser else the magnets might influence each other, especially on the 8-12mm sizes.)


Issue tracking:

due to its tight tolerances different printers might produce slightly different results especially on the dove tail of the slider. or the smaller 4mm hole. things like elephant foot or line skips can cause issues. here is what i found useful:


The slider:

the slider needs to run freely in the dove tail, i designed it with enough clearance however if you still have an issue you can give it a slight touch with some fine grid sandpaper at its tips.


4mm magnet hole:

again the clearance of all the holes is propotional so there should be enough room for the magnets to always fall to the bottom by gravity on its own. if its not then clean out the hole using a 4mm drill, twisting it inside the hole a couple times. that did the trick for me.


If you experiance any issues please let me know, i might have advise.

also this was a extended weekend design and surely can use some twaeking.

im currently optimizing the sliger.


so if you have any recommendations do not hesitate to let me know i will look into it.


Comment & Rating (145)

(0/1000)

Boosted
Print Profile
V2 print profile 0.2mm layer, 3 walls, object based infill
Good print. Unfortunately, it's highly dependent on the supplier of your magnets if this device will actually work good or not! My magnet supplier sent me the correct diameter, but when ordering by height they were off by 0.25 inches, and instead of 2" they were 1.75" ... This causes the mechanism to jam... It will stack 1 magnet + 1/4 of the next one, which means the magnets have to be pushed upwards to dispense out - and with something hanging loosely, that's very hard to do...
The profile uploader has replied
profile
2
Reply
thanks for your reply, you are right the height of the magnets is crucial. Ist was quite difficult to adjust it so it fits most cases. this issue also more often occurs on the smaller magnets. the smaller the more precice it has to be. I hope you find a solution that works for you. if this was a complete fail for you im sorry. I wish i could have everyone have a good experiance with the print. If you cant make it work at all i hope you at least got some creative input to make something awesome in the future. once again thank you for the feedback it might help others.
(Edited)
1
Reply
with a piece of adhesive Alcantara placed at the base of the dispenser aligned with the extraction tab, thus solving the problem of magnet thickness discrepancy :-)
Show original
0
Reply
Boosted
Print Profile
V2 print profile 0.2mm layer, 3 walls, object based infill
Brilliant design. Love this thing. Ordered more sizes magnets just so i can print more of these.
The profile uploader has replied
profile
1
Reply
🤣👍👍 I did the same when I started all this. I'm happy you like it. and thanks for the rating man. much appreciated. your print looks super clean and nice choice of colors
(Edited)
1
Reply
thanks for the boost appreciate the support
(Edited)
1
Reply
Print Profile
V2 print profile 0.2mm layer, 3 walls, object based infill
Super Druck. Danke.
The profile uploader has replied
profile
1
Reply
Gladly
Show original
0
Reply
Brilliant - was just what I was looking for and work fantastic. Thank you. Would love a 5 x 3.
The designer has replied
designer
1
Reply
i was a bit inactive the past months but im picking up where i left off. i have a few recommendations collected and will take yours into consideration for an updated version but it will take me some time. stay tuned for version 3 and follow me 😁😏
0
Reply
Print Profile
V2 print profile 0.2mm layer, 3 walls, object based infill
great work
The profile uploader has replied
profile
1
Reply
thank you for your kind words. much appreciated! have fun using it.
0
Reply
Print Profile
V2 print profile 0.2mm layer, 3 walls, object based infill
perfect
The profile uploader has replied
profile
1
Reply
happy you like it, and thank you for taking your time to share a picture and the Rating. much appreciated
0
Reply
This is great can you make me a 15x5 one
The designer has replied
Show original
designer
1
Reply
I'll see if I can extend the range of diameter to 15 or 16, I have not done that yet because I wanted the elements to have the same thickness and making them wider would have been waste of material. I'll check if I can make a second wider tear for magnets 12-20mm on the weekend. I'll need a bit of time because that requires widening the entire body not just the hole. anyway I'll check and drop you a message on Monday latest.
0
Reply
Replying to @Zimmi :
Thank you so much
Show original
designer
1
Reply
Replying to @user_3196806515 :
how many magnets should fit in for the 15x5mm magnets? 10? 20? 30?
(Edited)
0
Reply
I loved the idea and immediately printed two of the holders Unfortunately, I then discovered that, at least in my case, they were not dimensionally accurate In short, they had too much play, so that when removing one magnet, the second magnet blocked the removal A real shame, as I really liked the design and the execution is also excellent work I printed in PETG and never had any problems with this filament regarding shrinkage My magnets were also measured, they are 3mm thick as they should be Such a pity
Show original
1
Reply
Print Profile
V2 print profile 0.2mm layer, 3 walls, object based infill
Fun project. Prints nicely.
The profile uploader has replied
0
Reply
thank you for the 5 Star rating. much appreciated
0
Reply
am i missing something? i cant seem to find the v2 update files with the additional sizes.
The designer has replied
designer
1
Reply
Hi im sorry my bad. I added all the stl files but when updating the 3mf i acidentally picked the v1 3mf. I just uploaded the V2 3mf too so you know have access to the V2 version throughout the bambulab direct open or download. give it a couple minutes for Bambulab to verify.
(Edited)
0
Reply
Replying to @Zimmi :
thanks so much exited to print the model
designer
1
Reply
Replying to @CliffDiveFPV :
yet I'm looking at the new file and for example the 5x3 size is not listed there. Would the 5x2 work like the previous file says?
0
Reply

License

This user content is licensed under a Standard Digital File License.

You shall not share, sub-license, sell, rent, host, transfer, or distribute in any way the digital or 3D printed versions of this object, nor any other derivative work of this object in its digital or physical format (including - but not limited to - remixes of this object, and hosting on other digital platforms). The objects may not be used without permission in any way whatsoever in which you charge money, or collect fees.