Mario Kart 64 Diorama Set - The Battle Maps


Print Profile(6)


Description
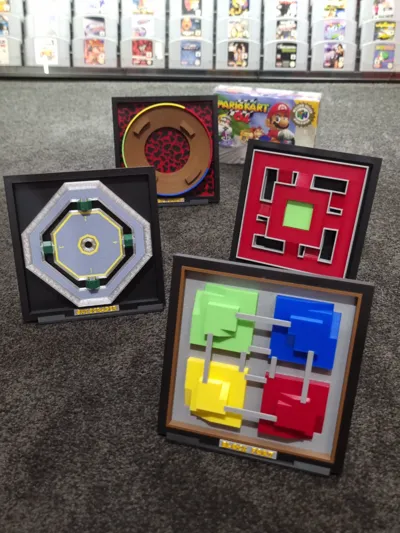
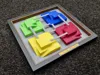
Mario Kart 64 - The Battle Maps
I've always loved Mario Kart 64, So this was a bit of a passion project for me.
I was inspired by Fletch, their designs for Zelda and Mario kickstarted my desire to make Mini Versions of the 4 Mario Kart 64 Battle Maps.
Each had its own design challenges (Looking at you Double Deck) however I believe I was able to match the overall feel and style of the original maps while simplifying it for printing and building.
I'm stoked with how they came out, and I hope you will enjoy them too!
Profiles are available for individual Stand's and also a Wall Mounting Kit to combine the whole set!
Below is a basic insight into the build for each model
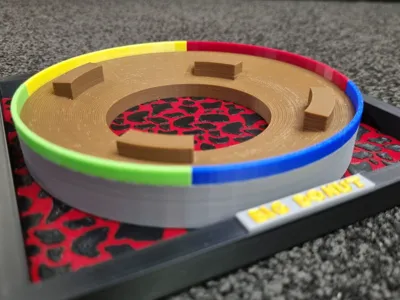
Big Donut
- Place the Lava and Donut into the frame
- Slide the external ring down around the Donut, it should sit flush with the top of the donut. Be sure to have the side with the rebate facing up
- Insert the coloured Barriers
- Enjoy your Big Donut!
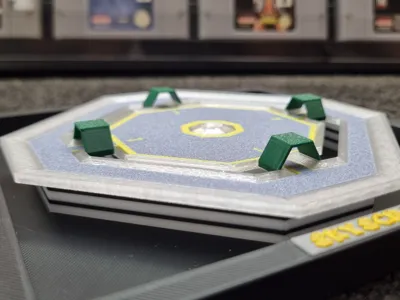
Skyscraper
- Place the External and Internal Mesh pieces. These inserts have small ridges and just push into place. The 4 matching internal inserts can be tricky but they will go!
- Place the Skyscraper onto the Pins on the frame
- Place the tunnels over the bridges, these don't need much force and just sit in place
- Don’t fall off the edge!
Notes:
- The Tower is printed upside down for a nicer finish on the Numbering and lines. Also a nicer finish on the bridges
- I printed the “Mesh” (its Metal Grate or similar in game) in transparent filament
- Blue Grey Filament used for the Skyscraper Top
- This print has the most filament changes (11) due to the yellow lines and number on top
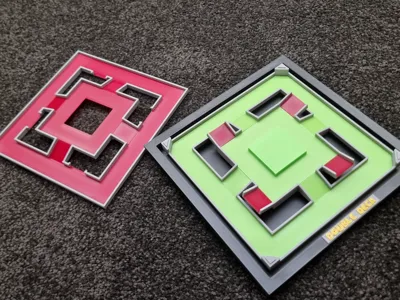
Double Deck
- Its Easier to build the bottom layer prior to placing on the Frame
- Insert the Green bottom layer and work your way up. The Ramps only fit one way, they will be snug and should sit in place nicely. (They are slightly rectangular, so too big one way)
- The Small red ramps finish off the Bottom levels, now place the bottom layer onto the Frame Pegs
- The Top layer is much the same, Start with the Red Bottom layer, then ramps (once again only fit one way) then top layer.
- Now place the top layer on the bottom layer, it should be a good fit, and is designed to be able to be removed to check out the bottom levels!
- No screen cheating!
Notes:
- I initially designed this to have no supports, but due to the layout of the level I had to use supports or it became far too complicated and fiddly. This was a really difficult design (for me) to get right!
- Wait for the print to cool and start removing the supports from the ramps, they might need a little clean-up but should come off ok!
- In game the red and green are both 2 different shades. I tried this but wasn't happy with the look of it, depending on Filament shades you have you might like the mixed look!
- Using a brighter green on the lower levels helps a little with being able to see it with the top layer in place.
Block Fort
- Push the Block forts into the bottom layer, they should sit flush, now place the bottom layer with forts in place into the frame
- Place the brick Surround down on top of the bottom layer, this locks it in place
- Push the bridges into place, these should be snug and sit flush with the levels of the forts
- Watch out for those fake item boxes!
Notes:
- Depending on the tolerances of your machine the bridges might need a tiny dab of glue to hold in place
Frame Stand
A simple angled stand for each frame, great for displaying them on a shelf
Wall Mount Bracket Kit
A set of Parts that clip onto each corner, connecting all 4 levels together for display as wall art. The top piece has a hole for mounting onto a screw or nail. There is a small slot in the back of each corner for locating and securing the clips.
Overall Project Notes:
- Filament changes are kept to a minimum using separate pieces rather than mixed colours where possible. However an AMS is Highly recommended. With some creative pausing printing would be possible with skyscraper having the most filament changes
- The builds are designed to push into place and stay however due to tolerances some small dabs of Super Glue might be helpful. Be sure to press down on edges to make sure they are all the way in!
- I used Grey and Gold for the Name Plaques. If you don’t want the Plaques just remove them prior to printing!
Boost Me (for free)
If you enjoy my work, boosting me helps motivate me to make more. Thank you!
License
You shall not share, sub-license, sell, rent, host, transfer, or distribute in any way the digital or 3D printed versions of this object, nor any other derivative work of this object in its digital or physical format (including - but not limited to - remixes of this object, and hosting on other digital platforms). The objects may not be used without permission in any way whatsoever in which you charge money, or collect fees.
Comment & Rating (22)