Search models, users, collections, and posts
A1 Sewer Line Upgrade - Poop Chute - 9in w/ Fin
Remixed by
IP Report


Print Profile(1)

PETG w/ PLA Supp Interface 0.2mm layer, 6 walls, 25% infill
Designer
4.8 h
3 plates
Open in Bambu Studio
Boost
187
357
28
21
283
175
Released
Bill of Materials
Maker's Supply Kits and Parts
Select all

Description
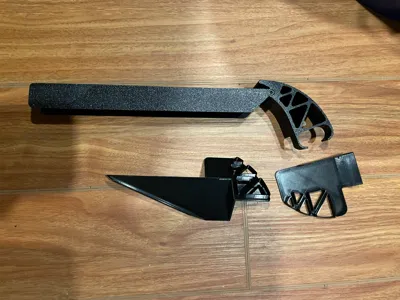
Improved upon the Bambu A1 Sewer Line from Adam Weber.
Improvements made:
- 50% longer chute
- Added Right Fin for when A1 wipes to the right
- PETG print with PLA as support interface (PETG is required for printing PLA on A1)
- Reason: If printed in PLA it has a tendency to get stuck to the walls as the poop can be hot. When in PETG, it does not stick.
- Note: I printed the PETG on my X1C for my A1 as PETG can be difficult if it gets wet, but the profile will work the same on either provided the PETG is dry.
This design is setup so that you can put a 5 gallon bucket or larger container on the floor and just have the chute feed into that bucket without having to constantly dump/watch the poop. The Z axis as the print continues raises and causes the filament to slide down the slide.
Assembly Instructions
Assembly is still relatively simple and requires just 2 M3x10 or M3x8 screws with socket heads.
- Start by Snapping the slide together
- Insert the ramp into the Structure/Holder
- Screw 2x M3 screws (length 10 or 8) into the holes on either side of the structure connecting into the slide.
- Set the mechanism with its right side down and gently push the side shroud on the left side. It should just pop-on with a little force
- Next Assemble the Right Side (don't attach to the main structure yet)
- Take the Right Side Mount and the Fin
- Line up the triangle like bump outs from the Fin to the right side mount top 2 holes
- Ensure the Fin is resting on top of the Mount's bump out and push to connect the bump outs into the triangle like holes.
- Note: this may take a little effort as it is a snug fit.
- Next attach the Right Side to the Structure by gently press fitting it.
- Now that assembly is complete, simply press-fit the top of the device onto the A1's filament ejection mechanism on the left side
This remix is based on

License
This user content is licensed under a
Creative Commons Attribution-Noncommercial
Comment & Rating (28)