Complete Solar System model 1:1'188'500'000 scale


Print Profile(3)

Bill of Materials


- 3 mm (~0,11811 inches ) diameter wooden, plastic skewer or similar x 16: To thread into the planets as a support or to glue smaller ones on top of them always as a support. Can be made of wood, colored plastic (white, black, ...) or transparent
- Sheets of paper, white cardboard or transparent plastic sheet for Saturn and Uranus rings x 2: To make the rings of Saturn and Uranus by inserting between the two hemispheres. Draw or print the rings on the sheets of paper or transparent plastic sheet. If made on paper I suggest laminating them to stiffen them and have transparency effect.
- Acrylic paints or other paints suitable for painting plastic x 1: To paint the planets and recreate the textures and shades of their atmospheres. Basic colours needed: black, white, yellow, red, blue, green. It may be useful to already have orange, grey, light blue, dark blue and ochre.
- Sandpaper x 1: fine grain, to remove small smudges and imperfections from the surface of the planets and moons
Description
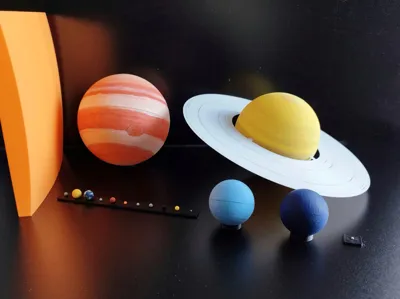
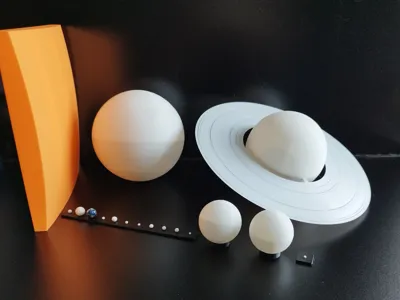
Complete Solar system model in scale 1 : 1'188'500'000 with all planets and major moons
Main features in brief
This is a Solar system model with all parts in linear scale 1 : 1'188'500'000 with the Sun, all planets and all major moons scientifically accurate and designed as both an educational and decorative model. Available resources, data and files to download.
Contents and specifications:
- All 8 Planets of the Solar System (Mercury, Venus, Earth, Mars, Jupiter, Saturn, Uranus, Neptune)
- Pluto (dwarf planet but a must-have in a model😊)
- 7 major moons: our Moon, Callisto, Europa, Ganymede, Io, Titan, Triton
- Generic small moon pieces to represent moons and objects smaller than Pluto
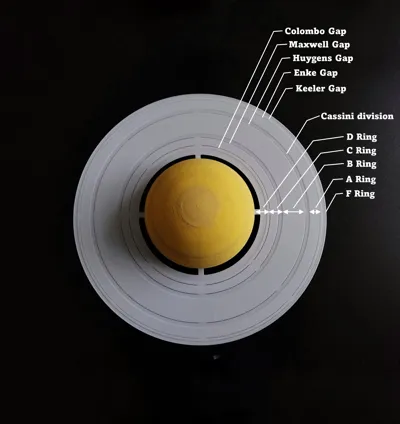
- Saturn's rings in 3D relief and with gaps (see the comparison image of the 3D model and the actual rings in section below)
- Sun portion/slice in same scale as other pieces of the model
A complete Sun circumference model downloadable is available on Makerworld in this add-on model page https://makerworld.com/en/models/2650813-sun-add-on-complete-solar-system-model
Stands to hold in place and display non skewer version of planets and moons
Model linear scale: 1 : 1'188'500'000 for all parts ensuring accurate and realistic representation in true scale and comparison
Data source for the model: NASA's Planetary data
Model data files: with real and scaled values in PDF + spreadsheet excel file (more info in description below)
2D paper printable reference template silhouettes in pdf to visualize sizes and shape/contour of the planets and the complete Sun with same scale and dimensions as the model if printed in 100% scale in A4 sheet before printing or as educational reference extra sheet .
Data used for the model: provided as pdf and editable excel sheet with build-in calculators and custom scale conversion calculations
The model is ideal for: educational and school projects, astronomy enthusiasts and space lovers, educational purposes, astronomy lessons, gift, DIY projects, space-themed bedroom or living room decoration.
Suitable for printing with both small and large plates: best with a 250x250 mm plate, but can be used with plates 180x180 mm and larger; see print profiles for different plate versions
- Method of display and assembly: suitable for display with planets on skewers (model style as styrofoam balls but more precise and accurate) or with included stands.


Model contents in details
All bodies are at a linear scale of 1 : 1'188'500'000 in the form of separated STL files + 3MF Bambustudio print profile file.
Planets and moons parts are available in: a V1 version named also “only skewer version” and in a V3 in hybrid mode called non skewer version. More details on the differences between the two versions below.
In detail this set includes in order of distance from the Sun:
- Sun ☀️
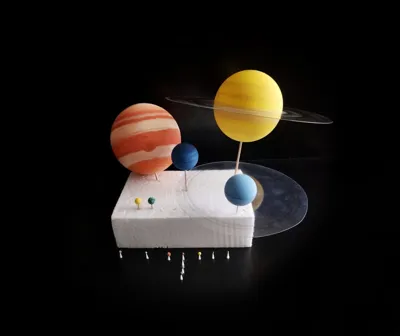
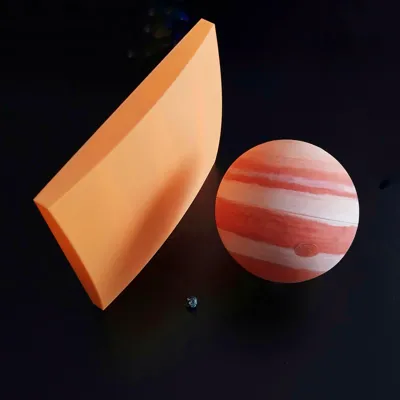
- Portion of 20 x 20 cm (7.874 x 7.874 inches), thickness about 3 cm (1.18 inches) in same scale as other planets and moon, largest non planetary/moons object to print, suitable for single part print or to cut ant print in 4 pieces), enough to appreciate the curvature of the Sun's surface and get an idea of how the Sun compares to everything else
- The complete sun circumference to scale printable in 18 or 36 parts is available in another page here https://makerworld.com/en/models/2650813-sun-add-on-complete-solar-system-model
- Mercury
- Venus
- Earth (1.07 cm, 0.42 inch ∅ diameter)
- Moon
- Mars
- Jupiter (largest planet object to print, 12.03 cm, 4.73 inch ∅ diameter) with moons:
- Ganymede
- Callisto
- Europa
- Io
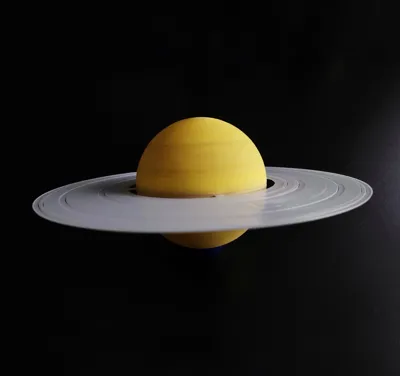
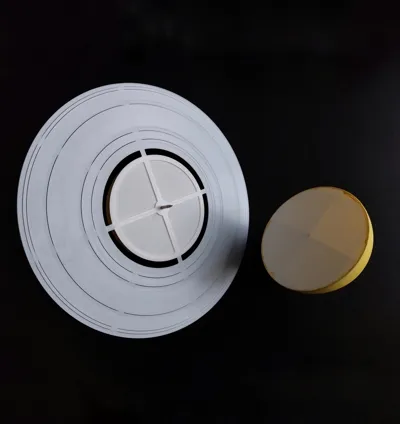
- Saturn
- Rings in relief and with gaps 🪐
- Titan
- Uranus
- Neptune with moon:
- Triton
Pluto (smallest object to print, 2 mm, 0.078 inch ∅ diameter)
- Also included are generic 1, 1.5, and 2 mm spheres/hemispheres for creating moons and dwarf planets or asteroids smaller than Pluto, to be used either as individual hemispheres to be glued onto something or to be added around planets (for example to represent Haumea, Makemake, Enceladus, Rhea, Mimas, Dione, Tethys, ...)
Basic stands:
- Circular stand for Jupiter, Saturn, Uranus and Neptune
- Stand for all other planets and moons equipped with holes of a specific diameter to keep the planet or moon in place. The order of the planets and moons position is as follows: Mercury, Venus, Earth, Moon, Mars, Ganymede, Callisto, Europa, Io, Titan, Triton
- Stand for Pluto, separated
- Note: These stands are discreet and minimalist so they won't stand out when placing planets against a solid dark background
Documentation files
See model section at the end of the description to view and download all files. Files provided:
- “Read Me” pdf file
- 2D paper printable reference template
- In pdf for the sizes of the planets with same scale and dimensions as the model if printed in 100% scale in A4 sheet, in color and black-white version showing only the outlines of the planets and Moon. It is also useful for determining the dimensions of parts to be 3D-printed and check plate fit before start printing.
- Solar system model datasheet files with:
- Scaled and real data used: all real-world and model scale dimensions and distances of planets and rings, provided in both metric and imperial units, included as a PDF file and original Excel table (without 3D images due to maximum upload size limits)
- Editable Excel Spreadsheet: easily calculate your own custom scale for planetary distances using the editable Excel sheet included and build in calculators to help you determine which scale to use based on the space you have available (backyard, bedroom, table, shelf, etc.), and it also includes a distance converter from model scale to actual scale
- SunToScaleInkscape.pdf:
- Contains a circular shape representing the Sun, scaled consistently with the rest of the model. It should be printed as a poster (or mosaic print, see your printer settings page) on paper or colored cardstock using (tested and works on Adobe Acrobat Reader free or Foxit Reader PDF free but also other free PDF readers) with buildin poster print option to print a big file in several single sheets.
When printing, set an overlap margin of 5 mm and enable labels (automatic numbering of the parts to reconstruct correctly the positions of all the sheets). The result will be a layout of 7 × 5 = 35 A4 sheets; cut along two sides of each sheet and assemble them by aligning and gluing them together following the printed guide lines to form the complete circle.
- Contains a circular shape representing the Sun, scaled consistently with the rest of the model. It should be printed as a poster (or mosaic print, see your printer settings page) on paper or colored cardstock using (tested and works on Adobe Acrobat Reader free or Foxit Reader PDF free but also other free PDF readers) with buildin poster print option to print a big file in several single sheets.
Model assembly
With convenient assembly for the skewer version of the pieces, simply place the planets on a base using a 3-mm diameter wood skewer or similar and put planets onto a skewer using the hole provided or, for the smallest ones glue them on top.
If using the non-skewer parts, attach the two hemispheres together and place the planet/moon on the designated stand.
Additionally, these model pieces can be arranged to reflect the order of the planets and their relative distances, providing a dimensional and spatially accurate representation.
Values for a recommended compact distance scale of 1 : 2'398'373'983'739 are already in the included PDF file. This scale allows you to line up the planets in their order over a length of less than 2.5 metres (98.42 inches), which is sufficient to space them out and avoid collisions between them, keeping them clearly separated and distinguishable in a smaller space. Use the included excel sheet to calculate the desired custom scale if this default one is not suitable for you.
Experimenting with different scales adds another layer of authenticity to your model, offering a dynamic and educational experience for enthusiasts of all ages.
Description of parts
Skewer version (V1) parts
The larger model pieces, provided with a central hole for the skewer, can be 3D printed in two hemispheres. This facilitates printing and allows the structure of the Saturn and Uranus rings to be threaded between the two halves.
In the smaller pieces of the model, which cannot be threaded onto the skewer and are much smaller in size than the skewer, the pointed end tip of the skewer is already part of the piece itself; they should be glued on top of a skewer without a tip.
Non skewer version/hybrid (V3) parts
The small planets and moons do not have a skewer hole, and the large planets do not have a skewer hole by default. However, Jupiter, Saturn, Neptune, and Uranus do have a central hole that is covered by the final layers of the print. If you need a hole, simply break through the final few layers where necessary to position the large planets on a skewer. Large planets printed as two hemispheres should be assembled together as a skewer version as described above.
V1 VS V2 differences
- V1: Original version designed for use with a skewer. All the moons and small planets already have a sort of spike attached for support.
- V2: The small planets and moons do not have skewers attached; they are simply spheres to be printed in two hemispheres and glued together. Large planets such as Jupiter, Saturn, Neptune, and Uranus have a central hole for a skewer to connect the two hemispheres, but in addition, the hole goes all the way through and is covered by just a few layers to hide it; however, if needed, you can pierce it and insert a skewer that goes all the way through or only halfway, or thread a transparent fishing line through it to suspend the planets from above.
Using V1 and V3 together
It is possible to use parts from both V1 and V3. Note that Saturn’s rings, the sun portion, and the stands are only included in the files and print profile for V3.
Why create a new version:
Because not everyone wants to skewer the planets on a skewer but might prefer to rest them on stands or hang them from the ceiling. All the planets and moons can be printed as two hemispheres, and a fishing line can be threaded through the gap between the two parts or through the pre-existing holes that need to be “opened.” Sometimes the hole is visible if not skewered, which can be annoying and needs to be covered; by default, no hole is visible now.
In any case, everyone—even those who already have a V1—can add the new parts or print the non-skewer version of the small moons and planets if they prefer.
Thanks to the positive reception and great feedback I’ve received, and after taking the time to revise the model, I’ve decided that both the basic and extended versions will now be available as a single free version for everyone, and I’ve decided to provide the datasheets and additional files!
Whether you're a hobbyist, educator, or space enthusiast, this complete version enhances both the scientific accuracy and the visual impact of your model.
Note: There is no V2 version as an intermediate version; the latest and final version is V3, which allows you to use some parts of V1 if you prefer.
Steps for building the model from start to finish
Here is the to-do list. Read through it before you begin and adapt the steps to suit your needs:
- Choose one of the 2 model style versions you want to build:
- Skewer style (polystyrene-ball style):
- All planets are aligned on a skewer stick. Smaller planets and moons already include a built-in pointed connector and only need to be glued onto a wooden skewer from the flat side.
- So download and use Print Profile V1.
- Standalone sphere style: Print only the planet spheres without skewers.
- These can be displayed on the included stand bases or hung using hidden internal pass-through holes for thread or wire.
- So download and use Print Profile V3 (Depending on whether you have a small or large printing plate, choose the standard version or the A1 mini / small plate version)
- Skewer style (polystyrene-ball style):
- Decide whether to print the Sun and Saturn’s rings:
- If you downloaded Print Profile V3, these parts are already included.
- If you downloaded Print Profile V1, download V3 as well and print only the additional parts you need (e.g., Sun or Rings).
- Prepare the 3D printer:
- Install the correct smooth build plate for the chosen material (PLA, ABS, ecc)
- Use a smooth build plate surface for best results.
- Read section at the end named “3D PRINTING SETTINGS” with other important notes and indications!
- Start printing the parts:
- Print from the smallest planets to the largest ones.
- Consider whether to print at the original scale or enlarge the planets (apply to all same factor to preserve scale!)
- If you enlarge the models, note that some parts may no longer fit as a single piece and might need to be printed in multiple sections.
- If you reduce the scale, some parts may become too small or no longer printable properly. Adjust the extruder diameter (maybe a 0.2 mm nozzle), or don't print the smaller parts you don't need
- Adjust print speed for small parts:
- Use a reduced print speed (around 50%) and acceleration for the smallest planets and moons to improve print quality and reduce issues.
- Print extra copies of small planets if necessary (moons and small planets):
- If the printer, the filament or build plate is not perfectly calibrated, very small parts may deform or print poorly.
- Printing multiple copies allows you to select the best finished parts.
- Keep track of printed parts:
- As you print, track which planets/moons have already been completed.
- Remove parts individually from the build plate to avoid mixing them.
- In the print profile, clicking on a part shows its name and position, which helps identify it.
- Clean the printed parts:
- Once all parts are printed, remove small imperfections using fine sandpaper.
- Assembly preparation tip:
- Do not glue the planet halves yet if you plan to insert rings or additional parts between them.
- Insert alignment rods for larger planets:
- For Jupiter, Saturn, Uranus, and Neptune, insert a small piece of skewer inside the sphere between the two halves.
- This acts as a central guide and alignment pin.
- Choose the right glue:
- Use a slow-setting glue so you can adjust alignment before it fully cures or at least not a super-fast glue
- Fast glues may cause the hemispheres to misalign or create an offset, if it isn't corrected in time or if the parts are not properly aligned
- UV-curing or sunlight-curing adhesives work well.
- Prefer clear glue that remains transparent when dry and bonds well with very thin layers.
- Do not apply too much glue, or a visible gap may appear between the hemispheres.
- If you're familiar with or have experience using rapid-setting glue, go ahead and use it, but be careful
- Glue the small planets and moons:
- Glue the two hemispheres together.
- Glue cutted parts
- If you've printed parts that have been cut into smaller pieces, such as the Sun or Saturn's rings, glue the pieces together following the instructions and tips provided in the description
- Paint the planets, moons and the Sun:
- Paint them according to your preference and follow suggested tips provided in the description
- Several coats may be necessary.
- A good technique is:
- Start with a dark base coat using the dominant color of the planet.
- Add lighter colors, highlights, and shading to create texture and effects.
- More details on painting in dedicated section below
- Install planetary rings:
- For planets with rings (e.g., Saturn), insert the rings between the hemispheres at this stage.
- Decide whether to glue the rings permanently or keep them removable.
- Final step:
- Your Solar System model is now complete! 🌞🪐
- Add and print the complete Sun circumference in scale to replicate the complete circumference of the Sun
- Model available here on Makerworld in this model page: https://makerworld.com/en/models/2650813-sun-add-on-complete-solar-system-model
Add Saturn and Uranus' iconic rings
To add Saturn and Uranus' iconic rings between the two halves, you can create them using either cardstock or by laminating a printed image onto paper to create a transparency effects.
This simple yet effective technique allows you to replicate the distinctive rings with ease, enhancing the overall authenticity of your Solar System model. It also provides good transparency of certain areas of the rings allowing you to see through the planet.
Suggestions for Uranus
Create a paper annulus with an inner radius of 3.20 cm (1.26 inches) and an outer radius of 8.25 cm (3.25 inches). Note: radius, not diameter!

Suggestions for Saturn
Rings non 3D printed version
Create a paper/transparent sheet annulus with an inner radius of 5.66 cm (2.23 inches) ( = beginning of the inner D ring) and an outer radius of 11.80 cm (4.65 inches) ( = end of the outermost visible F ring).
Rings 3D printed version (part provided and optimal suggested option!)
For Saturn, you can use the includes Saturn's rings in 3D with the A, B, C, D and F rings, gaps and Cassini division designed to fit perfectly into the two halves of Saturn.
Rings are printable in one piece with a 25x25 cm plate, or can be divided in 4 different pieces to fit smaller plates.
It is preferable to print the part as a single piece. If deburring is required, divide it into four parts, glue the parts together, and add additional supports, or create them using a sheet of clear plastic or paper.
If you encounter problems joining the parts, print the rings twice and glue one piece on top of the other, with the top piece slightly rotated or offset (ex 45°) so that each top piece has a bottom piece underneath it to serve as a support and the joint does not have to bear the entire weight.


Notes for Saturn and Uranus rings
The recommended paper annulus dimensions and the 3D printable version of the rings include the main and most visible rings but may need to be adjusted depending on what inner and outer rings you want to consider. Matching these dimensions to pictures, or to a drawing, or simply colouring these paper annulus with colors will get you complete rings and should result in nice scaled representations.
In the solar system model, the thickness of Saturn’s rings has not been reproduced to scale, because doing so would make them effectively impossible to see or construct. In reality, the rings have an order of magnitude thickness of about 10-100 meters (tens to hundreds of meters), while at the chosen scale they would shrink to an order of magnitude of about tens of nanometers. Such dimensions are far below what can be practically manufactured or perceived by the human eye, so the rings are intentionally represented thicker in the model to ensure they are 3D printable, durable, visible and meaningful to the observer.
The Sun
The complete Sun sphere isn't included in model because it would need a lot of material to print and to be too large to scale 117 cm (46,063 inches) in diameter.
A complete sphere isn’t ideal to make, but you can print this add-on model of a full circumference of the sun, which can be printed in multiple pieces to be assembled into 18 or 36 identical pieces, resulting in a perfectly scaled circle.
You can view and download the add-on 3D printed model of a full circumference of the Sun to scale here on MakerWorld:
https://makerworld.com/en/models/2650813-sun-add-on-complete-solar-system-model
Other variations and options for the sun include combinations with the previous ones, such as use a large sphere, a large white/orange/red fitness ball or a LED lamp to represent it or the portion included in the model which is sufficient and not too bulky or you can make it by stacking sheets of paper, drawing a circle with the correct diameter, and cutting out the template with scissors (see pdf resources with complete Sun circumference file to print on paper as a poster with multiple sheet of paper to join) to place underneath or next to the 3D pieces or use a round rug of similar diameter size.


Model colouring + texturing resources and tools
Enhance the realism of the moons and planets with acrylic colors. With the planets held securely in place by the skewer or on the painting support, you can easily add texture and detail following references from the web, achieving a more lifelike appearance.
Suggested website link with image reference, textures and real planetary images:
- High resolution textures of ALL planets in 2D: https://www.solarsystemscope.com/textures/ (free and highly recommended)
- NASA JPL images: https://space.jpl.nasa.gov/tmaps/
- Planetarium and sky map: https://stellarium.org/
Colouring and dry tools and tips:
For colouring and to dry planets or smaller moons use this handy stand I created especially that you can also use for other DIY activities downloadable here on Maker World:
⬇️https://makerworld.com/en/models/1316417-painting-support-small-spherical-pieces#profileId-1351677.

Genesis of the project and goals
This is an original project designed and developed by me that uses the principle of models made from Styrofoam spheres. As they could not be found in the right diameter they were designed to be 3D printed accurately. As I could not find models that also included some moons, I added those as well.
Not trusting the directions given in other similar models online that say they are “to scale” but are not, or that do not even say what scale they used, or use logarithmic scales in which Jupiter is little larger than Earth providing a distorted view of reality, I wanted to create my own model with a well-defined scale.
The goal is to create a complete model that includes all the most important and basic components to build your own complete miniature Solar System. It is designed with a clearly defined and precise scale, so you only need to focus on coloring, adding textures, and choosing how to best present or use the model.
Additionally, the inclusion of reference data supports the scale choices, ensuring that the sizes and distances are not arbitrary but carefully calculated and scientifically grounded especially when used in educational or scientific contexts.
Strengths and advantages of the model
Understanding the dimensions of space with a linear scale model you can make with your own hands, which you can touch, is definitely an interesting educational experience and really allows you to see with your own eyes what is around us in the universe.
In many solar system models you will find on the net, few provide the sources and data they used.
Often many models do not have all the planets at the same scale, or do not provide any indication of scale, or use a logarithmic scale providing a distorted view of reality. This model, on the other hand, has only one linear scale and the data is verified and provided!
Furthermore, this model is geared towards practical use as it does not just contain simple spheres, but pieces that have holes and supports for assembly, making the pieces ready to use, only to be coloured and positioned without the need to drill holes or damage the parts.
Few similar models give importance to moons when building a model of the solar system. They only make all planets and the Moon often without considering Pluto. The other moons of the other planets are also important and give a more complete view.
Suggested educational activities to do with the model
Here are some activities, questions, insights, and ideas that I recommend you try, which you can adapt to your needs depending on people's age and familiarity with the subject . If you take inspiration from any of my suggestions, let me know in the comments and tell me about your experience!
- Analyze the distances between the planets on a scale model, first on a small scale and then on a larger scale (e.g., in a schoolyard or hallway), comparing their positions based on criteria such as “habitable planets,” surface temperatures, etc. using the editable Excel sheet provided with all data to calculate right distances
- Arrange the planets in the correct order of average distance from the Sun, using a folding ruler and string to mark distances and transfer them, for example, outdoors to use a larger scale
- Create fact sheets for each planet and moon and present them during an outdoor “walk” where, arranged in scale order, participants move from one planet to the next, starting from the Sun by experimenting with scale (perhaps ending with a scaled-down summary so you can see all the nearest planets at a glance)
- Take Earth and Jupiter—how much is bigger?
- Why is there no life on Venus, even though it’s very similar in size and distance from the Sun compared to Earth?
- Which planet is closest to the Sun, which is farthest, which is the hottest/coldest, densest, heaviest, lightest, or has the greatest temperature excursion range?
- Where is the tallest mountain in the solar system?
- Which star is closest to us? Proxima Centauri? No The Sun, our Sun!
- Analyze and depict the textures and colors of the planets resulting from their atmospheres and atmospheric phenomena
- Analyze the planets’ distance - rotation speed around the Sun and rotation on its own axis and superficial temperature / wheatear
- Create a mock / funny but plausible weather forecast for one of the planets, for example: “High levels of carbon dioxide today on Venus. On Neptune chance of diamond showers!”
- Ask yourself: how long is a year or a day on... Mercury? And on Pluto? What is a day? What is or what defines a year?
- Ask yourself: What is a star? A planet? A dwarf planet? A moon? A comet? An asteroid? A solar system? A galaxy? How many are there in the universe?
- Analyze differences in the planets’ size, mass, density, and composition (gaseous, rocky, etc.)
- Analyze Saturn’s ring system, divisions, and gaps, thickness (10-100 m)
- Position the Moon to scale with the Earth to visualize the scale of size and equal distance (about 32.34 cm or 12.73 inches)
- Analyze the time it took for the Apollo missions to reach the Moon and the route they took, and analyze the methods used to determine the Moon's distance from Earth
- Simulate the asteroid belt using pebbles or gravel
- Create a paper outline of the Sun to the same scale as the planets by cutting out a circle from several sheets of paper stacked together
- Ask yourself: How big are we compared to the rest of the universe? What lies beyond Pluto? What is the asteroid belt, and what is inside it?
- Analyze Kupier's belt region contents
Combine this model with my model “Moon Phase Model and educational game” to use a mini globe to simulate the moon's phases, the moon's rotation around the Earth, and the Earth's rotation around the Sun, and to understand the alternation of day and night and the cycle of the seasons depending on where you are
Use Google Earth ruler tool and my Excel spreadsheet provided to determine the scale at which to arrange the planets, for example, as shown here in the image. Use a school yard, soccer field or a fairly straight path or pedestrian road to place the printed planets to better visualize the distances of the planets from the sun and from one another while walking, feel free to add moons, the asteroid belt, and elements beyond Pluto.
An example: i use the length of a public school soccer field of about 100 m, calculate the scale with the calculator inside the excell sheet, replace the scale in the sheet, the sheet recalculates the new distances and then space the planets at a scale of 1:59,000,000,000.
To estimate the space occupied and spaced at a distance, use Google Earth and the measure distance function.Ensure that the location chosen is suitable, authorized and safe from traffic and other means for these educational purposes.
In addition to placing the planets in scale, you can choose people or students from the class who study aspects of a specific planet or moon and present them to the others. For example, there is the Sun person who soothes the sun, then we move forward and the person who presents Mercury, etc., making the activity more interesting and everyone participates!
If you want to arrange the model with the same size scale as the distance scale, you need to find a road, path or street (perhaps running alongside a river or canal or a sea or a lake) of about 5 km. This could be an interesting activity to do over the course of a full day with breaks/lessons in between to do in nature. Use Maps or Google Earth to estimate where to place the planets and plan your trip!


Combinable and complementary models
This model can be combined with this all in one piece solar system caliper model to have in one piece the dimensions of all the planets to scale. The scale used is the same as the model and perfectly compatible. This model can also be used as a reference to create a solar system made of coloured modelling clay and to check that the spheres are the correct diameter.
This model is suitable for creating the planet spheres with precise diameter with modelling paste or clay using it as a reference for the spheres to be created or as a “summary” all in one piece of solar System planets dimensions in linear 1 : 1'188'500'000 scale
Discover and download the model “Solar System Modelling Clay Template Gauge Caliper” for free here on MakerWorld:
➡️ https://makerworld.com/en/models/697460#profileId-626479


Discover and download the model “Moon Phase Model and educational game” for free here on MakerWorld:
➡️ https://makerworld.com/en/models/1837364-moon-phase-model-and-educational-game

Model notes
- While care has been taken in creating the model, dimensions used should be considered approximate. They may vary depending on source references, interpretation of measurements, and differences in 3D printing methods and machines used to print
- The black supports shown in the images are included in the downloadable 3D files. Originally designed to help keep the planets and moons in place during photography, they are also useful for display purposes and can help prevent parts from rolling away. They can also be handy while painting—so feel free to use them!
3D PRINTING SETTINGS
Material
White PLA filament is recommended; it is better to paint or otherwise use a filament color similar to that of the planet to be made so that you have a base color already in place.
Saturn's rings also print very well with white PLA, but it might be interesting to print them in transparent PLA, transparent PETG, or other materials, in any case, the finish is matte and doesn't differ much from white. Do not expose parts that can bend or flex to direct sunlight or high temperatures. Use alternative filaments such as ABS, PETG, or others if heat resistance is essential.
Indication for Mercury, Mars, Moon, Pluto and other moons in skewer version:
Printing height: 0.08-0.1 mm (keep minimum as possible)
Fill percentage: 80-100%
Brims: YES
Support: NO
Indication for Venus, Earth, Saturn, Jupiter, Uranus, Neptune:
Printing height: 0.08-0.2 mm
Fill percentage: 2-5% grid pattern
Slicing: slice in 2 equal parts the spheres
Support: NO, if sliced in 2 parts
Other parts not cited: see print profile
Finishing
It may be helpful to go over with some files or fine sandpaper to remove visible layers and for better color grip on the parts.
Tests and results
All result in the images printed with jade white, orange and black Bambulab PLA basic filament with printer Bambulab P1S, 0.4 nozzle, Cool Plate / PLA Plate, 50% speed, AUX fan OFF.
ℹ️ More details about the model slice: see the model print profile.
📌I recommend using my included print profile with the suggested settings.
Important printing notes⚠️
- Use a smooth plate to have an inconspicuous joint of the two hemispheres
- Use a reduced printing speed to achieve better results and avoid printing imperfections due to inaccuracies at high speed. I recommend printing at 50% speed. This increases the printing time but the result is better and more accurate.
- If you experience problems printing with Pluto or the Moon or other small parts, consider trying to print these small parts without operating the printer's aux fan, which I've noticed sometimes if it blows too much it flexes the small parts during printing and creates strands of material!
To identify and distinguish parts on the print plate—especially small ones like moons or planets—click on any object in the Bambu Studio slicer. The bottom-right corner will show the STL filename and, if applicable, whether it’s part A or B (for split hemispheres). Since physical labels aren’t printed, you’ll need to recognize parts based on placement, prior knowledge, or by comparing their dimensions.
Tip: Don’t remove all parts at once after printing. Instead, detach them one by one and label them immediately—e.g., by sticking them to a sheet of paper and writing their names beside them. Parts are grouped by similarity on the plate, not in hierarchical order, to optimize printing
- Read the READ ME FILE in the section below with the documentation before printing!
- I remind you to respect the directions of the model licence regarding the use and permissions for use of the model!
Info, contact and questions
For more information, for project and educational collaborations, details, support, tips, report issues, request possible additions to the solar system model that you would like to have and other suggestions write a comment below in the model comment section or contact me via the message page of Makerworld (I will reply as soon as possible).
To avoid misunderstandings, prefer English in communications otherwise I'll try to translate what's written, but there may be some misunderstandings.
Update history in brief and work in progress
- Now: waiting feedback and work in progress on some additions to the model
- 13 April 2026: added A1 mini print profile and added Saturn rings image comparison with real images, updated model description
- 12 April 2026: added complete Sun circumference model reference, updated and added images in the description
- 15 March 2026: uploaded V3 complete version,
- 14 March 2026: Added data files and paper 2D printable version
- December 2025: reached 500+ downloads!
- (…) Other minor description and images updates and documentation modifications
- 28 April 2024: Initial model publication
If you liked this model or found it useful, please consider to leave a Comment, a Like, a Boost and rate the print profile ⭐!
If you have any questions, suggestions or requests regarding my designs, please leave a comment!
Your feedback is very important to me! Thank you so much ❤️!
See my other creations here on https://makerworld.com/@Elektrooon/upload or click the image below!

Boost Me (for free)
If you liked my model or enjoy using it, please consider making a Boost 🚀❗ Your support helps me keep creating and improving models like this, with new upgrades and enhancements that you can benefit from too! Thank you very much! ❤️ Elektrooon 🦝

Documentation (6)
License
You shall not share, sub-license, sell, rent, host, transfer, or distribute in any way the digital or 3D printed versions of this object, nor any other derivative work of this object in its digital or physical format (including - but not limited to - remixes of this object, and hosting on other digital platforms). The objects may not be used without permission in any way whatsoever in which you charge money, or collect fees.
Comment & Rating (67)