Search models, users, collections, and posts

V-Spooler Easy Motor Drive

Print Profile(3)

All
P1S
P1P
X1
X1 Carbon
X1E
A1
H2D
H2D Pro
H2S
P2S
H2C
X2D
A2L
A1 mini

Release 1.0 @ 15% infill (30% drive axle & gear)
Designer
14.2 h
4 plates
5.0(27)

VSpooler v1.0 updated parts
Designer
1.6 h
1 plate
5.0(5)

0.2mm layer, 6 walls, 25% infill
1.3 h
1 plate
5.0(3)

Open in Bambu Studio
Boost
134
263
108
58
351
186
Released 

Description

Boost Me (for free)

If you like the model a boost would be appreciated!

IMPORTANT The provided links below are for REFERENCE.  It's your job to make sure they are the correct items.  The stepper motor I used as mentioned below is a creality 4240 that I had laying around.  If you buy one from Aliexpress, it may or may not use the same electrical settings.  The amazon link below is a creality stepper 4240, that's your best bet.


ALSO IMPORTANT  With the release of 1.0 of the V-Spooler, the creator changes the axle/engagement dimenision of the spooler, there is a second profile here with the updated parts you will need if using v1.0 of the V-Spooler.


The motor drive options for the V-Spooler that are out there are great, but for me they are a bit more than I am interested in spending. I wanted something that was lower cost, and in fact, had a few parts laying around like a creality stepper motor, cable, and 40mm fan that I had laying around. There are also a couple nice options folks have come up with to quiet the V-Spooler down, should check them out here on Makerworld.


Disclaimer #1: I’m not a mechanical designer, but this seems to work well so far.

I bought the following, and there are links for it from Amazon, or AliExpress, depending on how fast you want the parts and how much you want to pay.


Disclaimer #2: As mentioned, I used a Creality 42-40 Stepper Motor that I had, a cable I had, and 40mm fan I had. The links below are for reference, there are a lot of alternatives. I didn’t use/purchase anything other than the DC Stepper Motor Driver with Control Module and the 12vdc power supply (though the power supply was bought a while ago for my filament dryer)


Total from Amazon: ~$61 USD

Total from AliExpress: ~$35 USD
(and it’s likely the exact same stuff from Amazon)


DC Stepper Motor Driver with Integrated Control Module

$26 on Amazon

DC Stepper Motor Driver with Controller Integrated Board DC 5~30V 4A Forward/Reverse Pulse Speed Angle Control Module Programmable PLC Serial Communication SMC02 Drive All-in-One for 42 57 Motor: Amazon.com: Industrial & Scientific

$17 on AliExpress
Drive Integrated 42 57 Stepper Motor Driver Controller Forward Reverse Control Driver Angle Pulse Speed PLC Serial Communication - AliExpress


Stepper Motor Cable (cut the non-motor end connector off to wire it)

$9 on Amazon

Amazon.com: 3Pcs 3D Printer Stepper Motor Cables Lead Wire HX2.54 4 Pin to 6 Pin, Stepper Motor Wires 1.5M for Ender 3, Ender 3 V2, Ender 3 Pro, Ender 5 Pro 3D Printer Nema 17 Stepper Motor, : Industrial & Scientific

$1.69 on AliExpress


4240 Creality Stepper Motor (Nema 17)

$12.00 on amazon

https://a.co/d/ea7iTWw


40mm 12vdc Fan

$9 on Amazon (4 pack)

Amazon.com: MakerFocus 4pcs 3D Printer Fan 12V, 40mm 12 Volt Fan 0.08A DC Mini Quiet Cooling Fan 40X40X10mm with 28cm Cable for 3D Printer, DVR and Other Small Appliances Series Repair Replacement : Electronics

$1.37 on AliExpress

New 4010 Fan 40MM 4CM 40*40*10mm Fan For South and North Bridge Chip Graphics Card Cooling Fan DC5V 12V 24V 2pin 3pin - AliExpress


120vac to 12vdc power supply

$9 on Amazon

Amazon.com: Arkare 12V 3A Power Supply Adapter 36W ac/dc Charger AC 100V-240V to DC 12Volt 3amp Power Cord 12V 2.5A 2A 1.5A 1A 800mA 500mA for Security Camera BT Speaker GPS Webcam Microphone Receiver with 10TIPS : Electronics


AliExpress

There are countless. Just be sure it’s 12vdc, 3amp, and has flying leads (red/black) to connect to the Stepper Motor Driver/Controller.

Other parts used were: M3 barrel head hex screws and heat sets. None of the screws are longer than 10mm, most were 5mm.


Pictures

  • There are two versions of each piece, one with chamfers on the holes and one without.
     

Design & Cooling

The fan drives air upwards at an angle around the stepper motor and out through the bottom where the air passes by the electronics on its way out the back.


Wiring

12vdc power to the back of the DC Motor Controller, also connect the red/black lead from the FAN to the same screw down connector/terminal.

The connections from the DC Motor controller to the motor


The following diagram outlines the connections. Note that the cables might not perfectly line up but it’s important that A+ is to A+, etc. If you’re not sure, look it up before connecting and powering up the system.


A diagram of a machineDescription automatically generatedA close-up of a batteryDescription automatically generated


Remixed Drive Axle & Motor Drive Gear

I printed everything but the drive axle and drive gear with PLA. That said, PLA will NOT be able to handle the torque, maybe PLA+, but I printed with PETG and it’s more than strong enough to withstand the stress/torque of the stepper motor.


Note: Depending on your printer settings, you may have to slightly increase the size of the drive axle (1%) to accommodate variances in printing. It should already have enough clearance for the drive gear to float a little in the axle, but not overmuch causing slop or wear.


If you’ve already printed and assembled the V-Spooler, you’ll need to do a little disassembly around this piece to use the new drive axle.


I used a heatset on the screw hole in the drive gear (attaches to motor shaft). You will also want to put a heatset in the end of the drive axle as described in the original V-Spooler instructions.

A black plastic object with holesDescription automatically generated

Drive Axle remixed from V-Spooler Remixable Parts by Fyrby Additive | Download free STL model | Printables.com


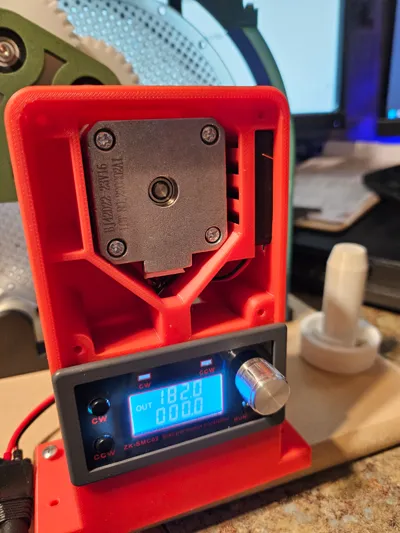
Settings on DC Motor Controller

Subdivision set to 4 or the stepper motor may vibrate and make excessive noise. This might vary depending on the stepper motor make, but this creality was clean with 4. I would expect this to be common among Nema 17 stepper motors, but I’m no expert so some experimentation might be needed if 4 doesn’t work for you.


Amp setting rotary selector, I left this at the default.


I think that is everything, any questions, don't hesitate to ask. 

Comment & Rating (108)

(0/1000)

Thanks for the great design! It took me a bit of tinkering to get it all working! I made a few mods along the way: 1. I made an a drive adapter so that I could use the stock V-spooler square drive rather than replacing the entire shaft. This way I can still use the hand crank if need be. My first attemp was a rigid connection, but that caused the motor to bind. I learned about the "Oldham Coupling" the designer used and why its the right mechanism for this. Thanks! 2. I added a 'D-Flat' to the Motor Drive Gear to fit my creality stepper motor drive shaft 3. I added another cut out for the fan wires as my fan (not sure where I got it) wires route better this way 4. I added an 11mm hole to fit the DC power supply 5.5 x 2.1 plug Notes: My stepper motor and controller wiring was very different than the designers.thanks to @Mike2541 for the (A+ B+ A- B-) hint. Also 16 subdivisions seem to work best for me (4 didn't work at all). The last thing I want to do is incorporate my filament runout shutoff. I printed my gears in PETG-CF, which at first printed to big. I spent today doing full calibration and using the new Bambu Super Tack cool plate it got the PETG-CF tolerances down where the should and the parts all fit perfectly. Let me know if there is interest in my mods and i'll upload the model, stl, etc.
(Edited)
2
Reply
Hey @LongracksLabs, would you mind sharing the 'D-Flat' to the Motor Drive Gear file?
0
Reply
Replying to @b.schraad :
I'm happy to just know that I had to really fiddle around with my tolerances to get it to fit my particular shaft diameter and printer still a combo. It was kind of a pain. I did it in free had so I'll see if I can maybe export a step file in addition to the 3MF? I'll do what I can and hopefully it'll get you what you're looking for.
0
Reply
Replying to @b.schraad :
ok I uploaded a profile with the d-flat for the Creality stepper motor and the latest v-spooler square drive.
0
Reply
Thanks for this awesome Design. One little thing, the Aliexpress Link of the "ZK-SMC01 Stepper Motor Controller" is just a Controller without a Driver. The Description of the Product on AliExpress is wrong, but the Pictures etc.. Shows the right Product. In my Case it was not a problem, i just needed to spend a little bit more time and throw in a Driver and a Stepdown, glad there is more than enough space. Works great :)
(Edited)
The designer has replied
designer
2
Reply
Glad it works for you! Good catch on the ali-express screwed up listing, I've updated my link above to one that has both components.
1
Reply
Do you have the STL file for that bracket that's keeping everything together?
0
Reply
Hello! Just following up if you posted that mount anywhere :-) Edit: Whoops just saw it on your profile. Thanks for sharing it!
(Edited)
0
Reply
Print Profile
Release 1.0 @ 15% infill (30% drive axle & gear)
What a great design! I was struggling with another design that just kept overheating and stalling, it would take me ages to get a cardboard spool re-spooled but this design has worked flawlessly I glued a little power socket holder onto the back side of the print just to make it easier to connect a power adapter to it.
The profile uploader has replied
profile
1
Reply
Awesome! I'm glad to hear that! Thanks for the pictures!
(Edited)
1
Reply
Replying to @JeffSmith :
If you know of anybody looking for a power spooling drive, I always appreciate a recommendation.
(Edited)
1
Reply
Hello I am still having problems with the heat on the stepper... which stepper are you using Best regards
Show original
0
Reply
Thanks for sharing this, I have a problem that you may be able to shed some light on. I have the creality 42-40 stepper motor, the SMC02 Stepper Motor Driver Controller Integrated Board Forward / Reverse Control Drive Angle Pulse Speed PLC Serial Communication, DC 5~30V/4A,as well as the 1.5M Stepper Motor Cables XH2.54 4Pin to 6Pin Terminal Motor Wires,  Pin1-black(A+), 3-green (A-), 4 -blue (B-), 6-Red (B+) as well as the recommended Fan and power supply. I am connecting the wires from the cable to the stepper motor in order, and the dip switches are set for 4 (off, off, on). I get nothing but a loud buzzing, and or. a buzzing and a partial rotation and can't seem to figure out what I am doing wrong or is there any programming of the controller that needs to be done. ANY THOUGHTS? Please
The designer has replied
0
Reply
No programming of the controller, other than the switches. When you put a meter on the output of the controller, what do you see?
0
Reply
Replying to @JeffSmith :
I solved the issue, the mapping in your diagram was A+. A- B- B+, the Controller Map was the same, Then logic kicked in, I took a closer look at the connectors I realized that the connector (the one that was cut off) would be flipped if it was being connected to a female receiver, there for the pins would be B+ B- A- A+. Therefore, the Diagram you posted perhaps should have looked like this. Regardless Great Job, its working like a charm with no hitches, regardless of how fast I go
0
Reply
Replying to @user_3508734278 :
Great job and congrats! Glad you like it!
0
Reply
Am I the only one who wonders about the reversed direction of the gearing
(Edited)
The designer has replied
Show original
0
Reply
Haven't had anybody mention an issue, I can only assume the author of the v-spooler changed that orientation at some point as the gray is a remix of their original shaft.
0
Reply
Replying to @JeffSmith :
All is well, I was just confused ;-) I thought V1 was the correct one because it belonged to the V1 spooler My mistake I saw too late that there are updated parts for the V1 spooler here
Show original
0
Reply
Easy to print, outstanding instructions. Thank you!
The designer has replied
0
Reply
Awesome! Glad you like it!
0
Reply
Boosted
Excellent design for v-spooler. Everything went very smooth. I also printed base plate to integrate/assemble v-spooler and this motor case as a single unit. Everything works as expected. If you did not receive motor controller manual, you can find it online. Just google with key words (my controller model), "zk smc 02 speed controller manual". It takes few min to understand instructions on how to operate speed controller and then it is all good.
The designer has replied
0
Reply
Glad it works well for you!
0
Reply
Great design, did buy a motor from alixpress and was too deep for rear cover to fit, my bad so bought the creality one. Have a suggestion or two if welcome. Maybe the option to fit something similar to this dc port so it can be easy plugged in without being hardwired. on one of the sides. Maybe a push fit panel with slotted vents to hide the wiring and still allow airflow out at the back.
(Edited)
The designer has replied
0
Reply
Thanks for the feedback. Several folks have added connectors to the back, it's easy enough to drill a hole to whatever size is needed on the side like Stonefx83 did in this picture he left with his review. Chris Mayhew did the same thing, only slightly different than Stone (his pic is below).
(Edited)
0
Reply
Boosted
Print Profile
Release 1.0 @ 15% infill (30% drive axle & gear)
I printed in Bambu PLA-CF. It is working great! The fan is pushing enough air through to keep the motor cooler and the PLA from deforming.
The profile uploader has replied
0
Reply
awesome! glad to hear it's working for you!
0
Reply
The motor extension is brilliant After building the V-spooler and initial tests with a hand crank (immediately set aside) and cordless screwdriver (internal hex replaced with a 13mm external hex), the desire for a directly integrated drive was immediate A few notes on the design The countersinks for the screws are too small Countersunk M3 screws protrude significantly The display does not sit securely in the housing with the snap-fit features The gear that slides onto the motor shaft does not hold and the axle spins through However, there is an alternative where the round hole is replaced by a D-profile, preventing the axle from spinning through But all in all, I am really thrilled with this part
Show original
0
Reply

License

This user content is licensed under a Standard Digital File License.

You shall not share, sub-license, sell, rent, host, transfer, or distribute in any way the digital or 3D printed versions of this object, nor any other derivative work of this object in its digital or physical format (including - but not limited to - remixes of this object, and hosting on other digital platforms). The objects may not be used without permission in any way whatsoever in which you charge money, or collect fees.