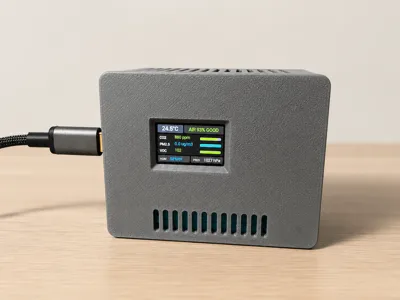
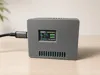
Mini AQ Station


Print Profile(1)
Bill of Materials


- SHT40 x 1: Humidity and temperature sensors
- SGP40 x 1: VOC (volatile organic compounds) sensor
- SCD40 x 1: NDIR CO2 sensor
- BME680 x 1: Temperature, humidity, barometric pressure, and volatile organic compound (VOC) sensor
- PMS7003 x 1: Laser dust sensor (PM1.0, PM2.5, and PM10)
Description
A compact 3D-printable enclosure for building a desktop air-quality station with a LILYGO TTGO T-Display (ESP32), PMS7003 particle sensor, and optional environmental sensor modules.
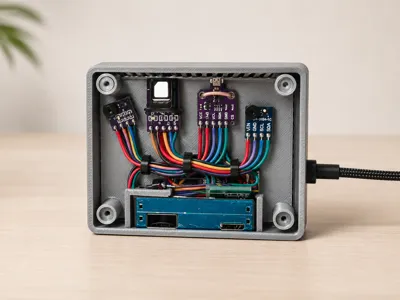
The design uses a separate internal sensor carrier board, so you can build the station with only the sensors you need, or install the full supported sensor set.
Supported hardware
Main board
Designed for:
- LILYGO® TTGO T-Display ESP32
- 1.14" ST7789V IPS LCD
- Basic Version / CH9102F / 16MB variant
Particle sensor
Optional environmental sensors
The separate sensor board supports:
- SHT40 - temperature and humidity
- SGP40 - VOC / air quality signal
- SCD40 - CO₂, temperature, humidity
- BME680 - temperature, humidity, pressure, gas/VOC signal
You can install one sensor, several sensors, or the full set depending on your build.
Should support different sensor generations. For example, SHT41 and SHT45 are direct replacements for SHT40. Same goes for all the other sensors (except the PMS7003).
Features
- Compact desktop air-quality station enclosure
- Front display opening for the TTGO T-Display
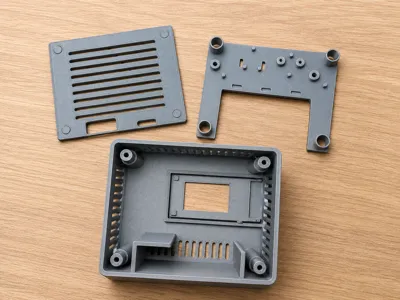
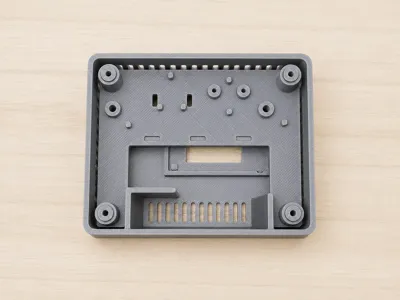
- Dedicated internal space for the PMS7003
- Separate modular sensor board
- Top, front, side and back ventilation
- Screw-mounted enclosure
- Clean layout for sensor experiments
- Suitable for ESPHome, Home Assistant, Arduino, and custom firmware projects
Why this design?
Many DIY air-quality projects end up as loose boards, jumper wires, and sensors sitting on a desk. This enclosure is meant to make the build cleaner, more repeatable, and easier to modify.
The separate sensor board is useful if you want to test different sensor combinations without redesigning the whole case.
Assembly notes
- Print all enclosure parts.
- Test-fit the TTGO T-Display before installing the rest of the electronics.
- Install the PMS7003 and make sure its airflow path is not blocked.
- Mount your selected sensor modules on the sensor carrier board.
- Wire and test the electronics before closing the enclosure (see the “Wiring and sensor board assembly” doc).
- Close the case and confirm that no wires are pinched or blocking the vents.
- Flash the ESPHome firmware from this repo.
- Enjoy.
Bill of materials
Electronics are not included.
You will need:
- Printed enclosure parts
- LILYGO TTGO T-Display ESP32
- PMS7003 sensor
- Optional SHT40 / SGP40 / SCD40 / BME680 modules
- Wiring
- USB power cable
- Screws or fasteners for the enclosure
Compatibility note
This model was designed around the specific board and sensor modules shown in the photos/renders. Different breakout boards from different sellers may have small differences in size, hole placement, or connector position.
Check your parts before final assembly.
This setup requires soldering.
Important note
This is a DIY electronics enclosure, not a certified air-quality instrument. Sensor readings depend on the sensors, firmware, calibration, airflow, placement, and internal heat.
Good for
- DIY air-quality monitoring
- ESPHome sensor nodes
- Home Assistant dashboards
- Sensor testing
- CO₂ / VOC / PM monitoring experiments
- Desktop environmental displays
- Educational electronics projects
Comment & Rating (0)