Mini Cryo Chamber – Sci-Fi Vial Humidifier


Print Profile(1)
Bill of Materials
- Glass Vial x 1: 30mL
- Humidifier Module x 1: Aliexpress
Description
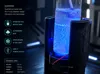
Mini Cryo Chamber – Sci-Fi Vial Humidifier
A tiny sci-fi desktop humidifier inspired by cryo chambers, lab equipment, and futuristic vial reactors.
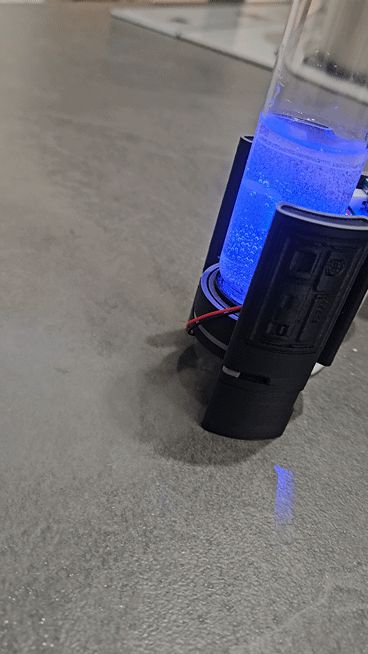
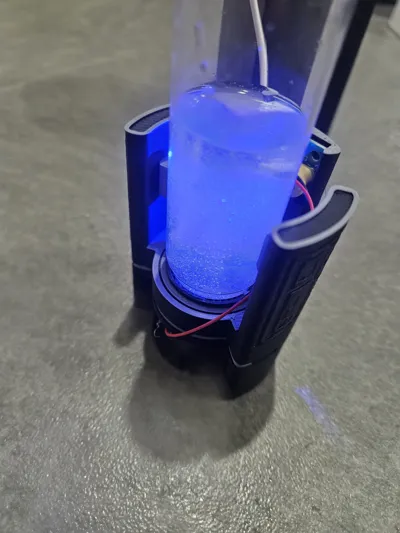
This model uses an inverted glass vial as the water tank, making the whole device look like a miniature cryogenic reactor or sci-fi lab module. The blue LED from the humidifier module shines through the water and bubbles, creating a very cool “cryo fluid” effect.
I designed this as a compact decorative humidifier for a desk, workbench, display shelf, or maker setup.
Key Features
- Sci-fi cryo chamber style design
- Inverted vial water tank
- Compact desktop size
- Uses a very cheap ultrasonic humidifier module
- No soldering required
- Blue LED glow effect through the vial
- Technical panel details on the side walls
- Easy to customize with different vial sizes
- Great for cyberpunk, lab, sci-fi, or gadget-themed desk setups
Vial Compatibility
I used a 30 mL glass vial for this build.
However, you do not have to use the exact same vial. You can adapt the model to fit whatever small vial, tube, bottle, or container you have available. The design works best with a long transparent vial because it makes the “cryo chamber” effect much stronger.
If your vial has a different diameter, simply scale or modify the holder area to match your container.
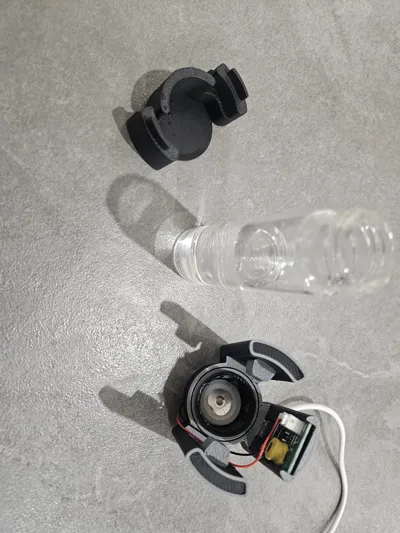
Humidifier Module
This build uses a small DC 5V ultrasonic humidifier module.
These modules are commonly available on AliExpress for around 0.99 USD, depending on the seller and shipping option.
Link : https://ko.aliexpress.com/item/1005009136560983.html?spm=a2g0o.productlist.main.3.595a4543Ts66hI&algo_pvid=74efd84a-4fed-4976-90db-e4aff979188a&algo_exp_id=74efd84a-4fed-4976-90db-e4aff979188a-2&pdp_ext_f=%7B%22order%22%3A%223764%22%2C%22spu_best_type%22%3A%22price%22%2C%22eval%22%3A%221%22%2C%22fromPage%22%3A%22search%22%7D&pdp_npi=6%40dis%21KRW%212580%212580%21%21%2111.06%2111.06%21%40212a6e2917822230974482714e7a3b%2112000048046657243%21sea%21KR%211627814460%21X%211%210%21n_tag%3A-29919%3Bd%3A958f62d%3Bm03_new_user%3A-29895&curPageLogUid=uBLW8Q5gN0rz&utparam-url=scene%3Asearch%7Cquery_from%3A%7Cx_object_id%3A1005009136560983%7C_p_origin_prod%3A
Typical module specs:
- DC 5V input
- Around 300 mA
- 1.5–2 W
- Ultrasonic frequency around 108–110 kHz
- Small PCB module
- Built-in LED on many modules
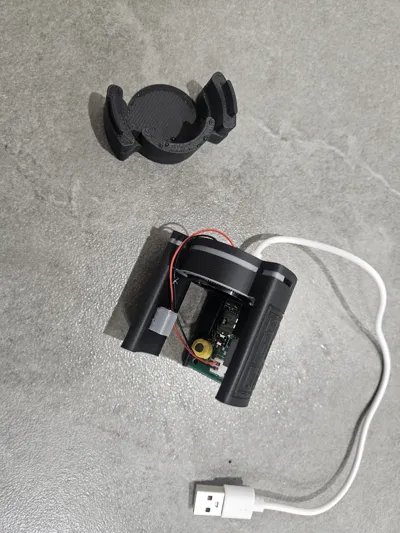
The best part: no soldering is required if you buy a ready-to-use USB humidifier module with cable attached.
Just install the module, place the wick into the vial, connect USB power, and enjoy the mist.
Assembly Notes
- Print the main body and side wall parts.
- Insert the ultrasonic humidifier module into the lower chamber.
- Place the cotton wick or water absorbent stick through the center.
- Fill the glass vial with clean water.
- Insert the vial upside down into the holder.
- Make sure the wick reaches the water properly.
- Connect the USB power cable.
- Check for leaks before long-term use.
Important Safety Notes
- Use only clean water.
- Do not use essential oils unless your humidifier module specifically supports them.
- Keep the electronics separated from direct water exposure.
- Test the device on a waterproof surface first.
- Do not leave it running unattended for a long time.
- Make sure the vial is securely held before use.
Printing Suggestions
Recommended material:
- PLA, PLA+, PETG
Suggested settings:
- Layer height: 0.16–0.20 mm
- Infill: 15–25%
- Walls: 2–3
- Supports: depends on orientation
- Color recommendation: black, dark gray, white, silver, or transparent blue accents
For the best sci-fi look, I recommend:
- Black body
- Gray or white side panels
- Blue LED module
- Transparent glass vial
Design Idea
The goal of this model was not just to make a normal humidifier holder, but to turn a cheap mini humidifier module and a simple glass vial into a futuristic desktop object.
The inverted vial acts like a “cryo fluid tank,” while the side panels create a protective chamber frame. When the LED turns on and the mist starts flowing, the whole device looks like a miniature sci-fi reactor.
Parts Needed
- 3D printed parts
- 30 mL glass vial or similar transparent vial
- Mini USB ultrasonic humidifier module
- Cotton wick / absorbent stick
- USB 5V power source
- Optional: silicone gasket or small O-ring for better sealing
Boost Me
Boost Me (for free)
If you like this tiny sci-fi cryo chamber humidifier, please consider giving it a boost!
Your support helps me keep designing more fun, practical, and unusual 3D printed gadgets.
Thank you for downloading, printing, and sharing your makes!
License
You may create derivative works based on this object, provided that all such derivative works are published exclusively on the MakerWorld platform and include proper attribution to the original creator. You may not share, upload, host, distribute, or publish this object—or any derivative work of this object—on any other digital platform, marketplace, or distribution channel. Commercial use of this object and any derivative works is strictly prohibited. This includes, but is not limited to, selling, renting, sublicensing, or using the object in any context in which you receive monetary compensation or other financial benefits.
Comment & Rating (0)