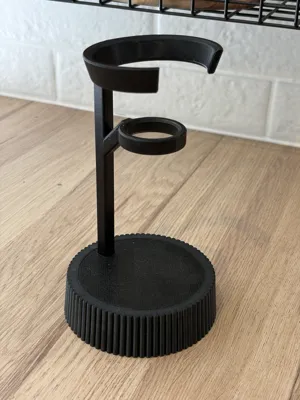
Soap Saver: Last Drop Stand


Print Profile(2)


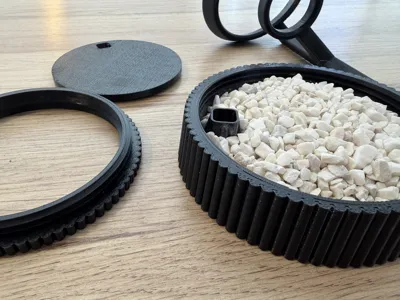
Bill of Materials
Description
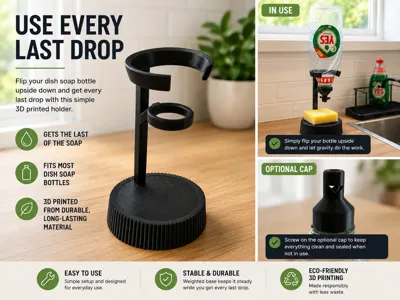
Tired of waiting forever for dish soap to slowly slide from the bottom of the bottle?
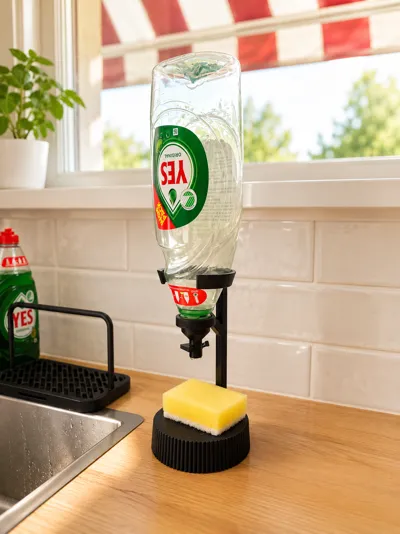
The Last Drop Dock keeps your dish soap bottle upside down during the final weeks of use, so gravity does the work for you. Instead of shaking, squeezing, or balancing the bottle awkwardly near the sink, just place it in the holder and let every last drop collect near the cap.
This is perfect for almost-empty dish soap bottles that still have plenty left inside but are annoying to use. It helps reduce waste, keeps the bottle ready to dispense, and makes your kitchen setup cleaner and more practical.
Why You’ll Like It
- Helps you use every last drop of dish soap
- Keeps the bottle upside down without balancing it awkwardly
- Great for the final weeks of a soap bottle
- Stable weighted base design
- Clean countertop-friendly look
- Useful for dish soap, hand soap, and similar bottles
- Easy to assemble
- Optional cap helps keep things clean when not in use
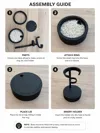
Assembly Guide
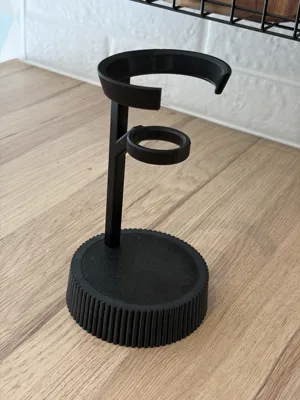
This model is designed as a simple multi-part print for easy assembly and extra stability.
1. Check the Parts
Make sure you have all printed parts:
- Base
- Screw-on ring
- Lid
- Vertical holder
- Optional cap, if included
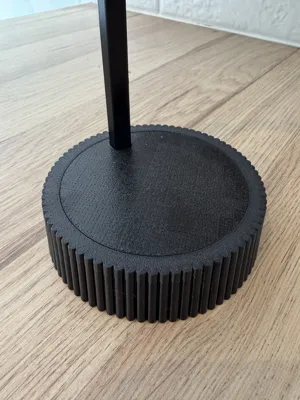
2. Fill the Base
Fill the base with a heavy material to prevent tipping.
Recommended fillers:
- Small rocks
- Aquarium gravel
- Pebbles
- Sand
- Metal washers or nuts
This step is important because the bottle sits high above the base when in use.
3. Attach the Ring
Screw the small ring onto the base until it is secure.
4. Place the Lid
Place the lid on top of the base, fitting it inside the ring.
5. Insert the Holder
Insert the vertical holder into the hole in the lid until it is fully seated.
6. Add the Bottle
Place your dish soap bottle upside down into the top holder and let gravity pull the remaining soap toward the cap.
Recommended Print Settings
- Material: PLA or PETG
- Layer height: 0.2 mm
- Infill: 15–25%
- Walls: 3+ recommended
- Supports:
- Base, ring, lid, and cap: No supports required
- Vertical holder: Supports recommended, because it should be printed laying down for better layer strength
- Build plate adhesion: Brim optional for the vertical holder
For kitchen or sink use, PETG is recommended because it handles moisture better than PLA.
Optional CAP
This model also includes an optional screw-on dispenser cap for standard PET-style bottle threads.
The cap is designed to keep the bottle cleaner and more controlled when used upside down. Instead of leaving the original bottle cap open, you can screw on this printed cap and use the included insert pieces to help control the soap flow.
Cap Features
- Screws onto standard PET bottle threads
- Helps prevent soap from spilling or dripping when stored upside down
- Includes a cut plastic disc that acts as a flexible flow membrane
- Small internal ring holds the disc securely in place
- Removable flow limiter insert helps stop soap from running out when not in use
- Great for keeping the holder cleaner during long-term use
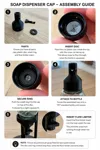
Cap Assembly
- Check the parts
Make sure you have the cap, cut plastic disc, small ring, and flow limiter insert. - Insert the plastic disc
Place the cut plastic disc inside the cap with the cross cut facing up. This allows soap to flow through when the bottle is squeezed. - Secure the ring
Push the small ring into the cap on top of the plastic disc. It should be a tight squeeze fit. - Attach to the bottle
Screw the assembled cap onto a standard PET bottle until secure. - Insert the flow limiter
Insert the flow limiter into the hole under the cap. This helps prevent soap from dripping or running through when not in use.
Documentation (2)
License
You shall not share, sub-license, sell, rent, host, transfer, or distribute in any way the digital or 3D printed versions of this object, nor any other derivative work of this object in its digital or physical format (including - but not limited to - remixes of this object, and hosting on other digital platforms). The objects may not be used without permission in any way whatsoever in which you charge money, or collect fees.
Comment & Rating (2)