LSI 9300-16i HBA Cooling Fan Split Shroud


Print Profile(1)
Bill of Materials


Description
Description
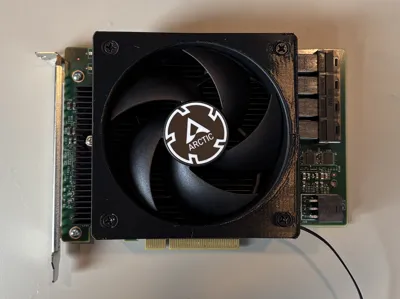
This is a modification to the fan adapter for a LSI 9300 16i SATA/SAS controller
designed by briancmoses on printables, thank you for your work, link below.
I have modified the design to split it into two pieces. The design has three overhanging areas requiring supports which I found broke off when the support were removed, this is due to there being sharp corners and stress concentrations which lead to the part splitting along the layer lines. I also did not have much confidence in the distance that the hooks had to bend to get over the heatsink.
I have split the model in two, with the fan being used to secure them back together when assembled over the heatsink.
Source:
https://www.printables.com/model/1046107-lsi-9300-16i-hba-cooling-fan-shroud
Here is the original description for the maker on printables:
The LSI 9300-16i HBA is a wonderful choice for DIY NAS enthusiasts, but outside of data center with frigid climate control and numerous fans pushing air over its heatsink, it tends to get warm. This shroud clips around the LSI 9300-16i's heatsink and adequately cools the HBA by pushing air across the heat stink. There are STLs for four different fan sizes in the original model. This upload is for the 92x92x25mm one though I may upload more.
- 92mm x 92mm x 15mm
- 92mm x 92mm x 25mm
- 80mm x 80mm x 15mm
- 80mm x 80mm x 25mm
The fan shroud clips to the HBA's heatsink and are positioned in a way that they do not interfere with any of the components on the HBA's circuit board.
Slicing/Printing Tips:
- Enable supports
- Set perimeters/walls to 4
- Recommended filament: PETG, Support for PETG
- Tested filaments: PETG
Installation Tips:
- Route the fans connector through the shroud's hole before installing the fan.
Orient the fan so it is pushing air towards the heatsink, and screw it to the part with the cable relief.

Position this on the heatsink, engaging the hooks under the metal.

Engage the other piece under the heatsink and over the fan and screw to the fan.

Suggested fans:
- Noctua NF-A9x14
- Thermalright TL-9015
- Thermalright TL-8015
- Arctic P9 Silent
- Use a different fan? Share it in the comments to get it added to the list.
License
You shall not share, sub-license, sell, rent, host, transfer, or distribute in any way the digital or 3D printed versions of this object, nor any other derivative work of this object in its digital or physical format (including - but not limited to - remixes of this object, and hosting on other digital platforms). The objects may not be used without permission in any way whatsoever in which you charge money, or collect fees.
Comment & Rating (1)