Puppet Theater with puppets and scenery


Print Profile(2)

Bill of Materials

Description

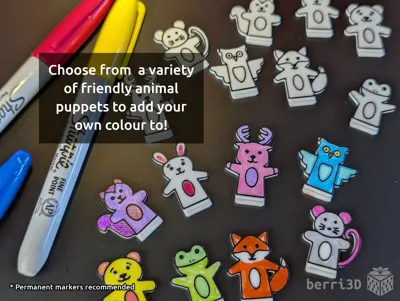
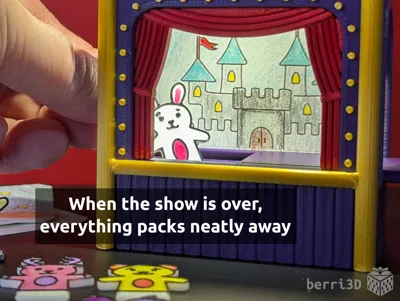
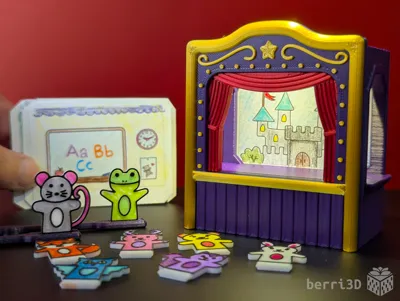
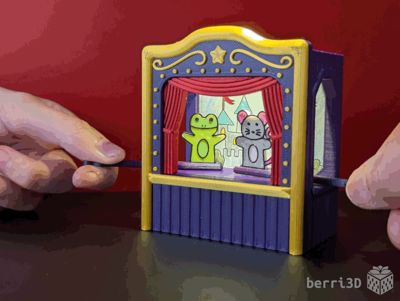
This pocket-sized puppet theatre has everything needed to put on a fun pint-size puppet show. Not only that, but your little stage manager has full creative control with colour-your-own puppets and scenery backdrops. Great for gifts, party favours, or even as screen-free entertainment while travelling.
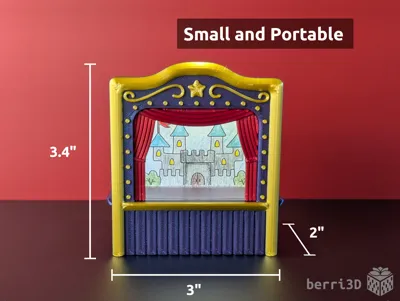
- Portable: fits in the palm of your hand
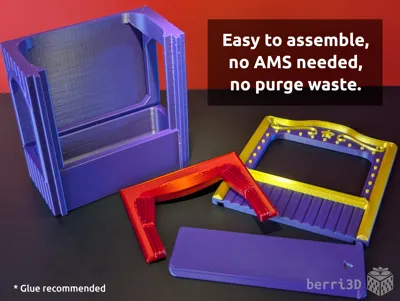
- No purge waste: all parts print using filament swaps (no AMS needed)
- Quick and easy print: tested until perfect, the whole model (puppets and theatre) prints in only 3.5h
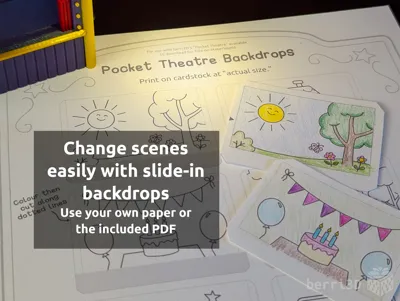
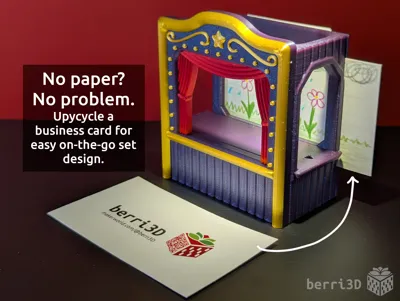
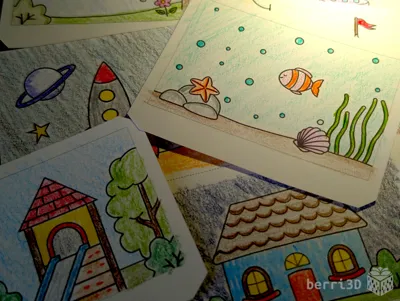
- Backdrop slot for quick scenery changes: upcycle a business card* or use the PDF of ready-to-colour scenes (see Downloads)
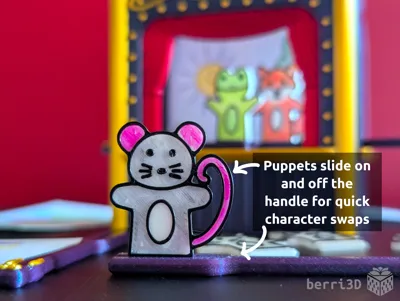
- Packs away completely: puppets stow inside the stage while backdrops go in the rear pocket.
- Customizable: add your own text to a special name plate (see below for more information)
* Why business cards? They're a common and easy-to-find source of sturdy paper. The slot is specifically designed to fit any one of the many different sizes used around the world.


Table of Contents
- Special Considerations (important information please read)
- Before You Print (overview and suggested filaments)
- Theatre Assembly (step-by-step guide)
- Detailed Print Guide (in-depth answers and settings)
- Filament Swap Printing
- Text Customization
- Process Settings
- Adjusting Fit of Parts
- About (design inspiration, commercial licensing, etc.)
1. Special Considerations – please read first
- ⚠️ Small parts. Choking hazard. Not suitable for very young children. Adult supervision is highly recommended and enjoyable.
- ⚠️ Glue required. The stage front should be glued on with an appropriate adhesive. I use gel CA glue (aka super glue) and find that it works for my purposes. However, I'd rather you did your own research to make an informed choice. Just don't use hot glue :)
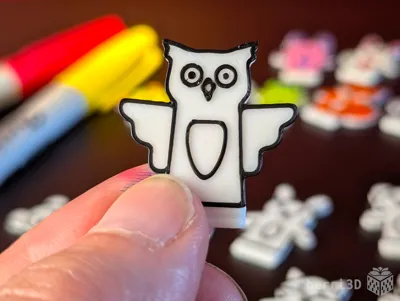
- ⚠️ Permanent marker works best for colouring the puppets. Pencil crayons are also “okay” with the caveat that they can rub off in areas and aren't as bright. Water-based markers are NOT recommended. They smear, run, remain sticky, and just generally make a mess. Consider pre-colouring puppets if this will be a gift to a child that is old enough for the theatre but not so old that they will ink themselves up :)
- ⚠️ Clean build plate required. Small details will get dragged if the plate isn't clean. Print profiles contain settings which will help adhesion but cannot perform miracles 😥. Please see this wiki article for correct plate washing procedure.
- If you scale up the models yourself, I make no guarantees of model quality or fit as I haven't tested it myself. Additionally, you will need to edit the filament swap settings to take in to account any changes to scale.
2. Before You Print
Printing is fairly straight-forward but there are a few things to keep in mind.
- ⚠️Multicolour parts use filament swaps and NOT the paint bucket. See and edit colour changes in Studio NOT Handy (the app). Be sure to select the right plate or profile for your setting. They will be marked as follows:
- “AMS Only” → AMS will auto change filament.
- “Manual Swap” → printer will pause and wait for user to change filament.
- Unfamiliar with filament swap printing? See Detailed Print Guide below.
- A1, A1 Mini or other bed slinger style printers: the theatre is taller than its footprint is wide and may be susceptible to coming loose. If in doubt, use the “with brim” plate in the profile.
- Plate type: Textured. While you can use a smooth plate, the fit of the parts may be affected.
- Theatre Body: can be customized with a name; download the special 3mf using the “Download STL/CAD Files” button and edit in Studio.
- Lid: Print in Regular size to start. If fit is too tight or loose, reprint using one of the other sizes if needed. Still not fitting? More info below.
Suggested Filaments
The models in the photos were primarily printed using Bambu PLA Basic (Indigo Purple) and PLA Galaxy (Purple). Curtain was printed in Overture PLA Silk (Christmas Red) and the gold accents in CC3D Silk PLA (Glorious Gold).
Test prints were made using the below filaments using default profiles on a Bambu X1C and were found to have a good fit between parts. The only difference that I found for part fitting was the lid which is why there are alternative sizes. Your results may differ due to filament colour/type/brand, and printer.
| Brand | Type |
Colour(s) |
|---|---|---|
| Bambu | PLA Basic |
|
| Bambu | PLA Galaxy |
|
| Bambu | PLA Sparkle |
|
| Overture | PLA Silk |
|
| CC3D | PLA Silk |
|
| Spectrum | PLA Silk |
|

3. Theatre Assembly
- Install curtain: Snap curtain into the back of the stage opening. Ensure both sides of the curtain are fully snapped in.
- Test fit: Slide the stage opening (with curtain installed) on to the front of the theatre. Fit should be snug and neither too loose or too tight.
- Glue stage opening to theater: Slide opening up part way and add a small touch of glue along the front of the rails. Slide down again and let glue dry until fully cured.
- Insert Lid: be sure to push all the way in so that the lip snaps flush against the body.

Apply glue sparingly to avoid squeeze out.

4. Detailed Print Guide
Generally, you won't need to know all this, but I find that it's better to have it here so people can get answers quickly instead of waiting for me to answer 🤗
Filament Swap Printing (with and without an AMS)
The two colour effect of the stage opening, the puppets, and the puppet handle are accomplished by using a slicer command to swap filament at a certain height. This technique works with and without an AMS and results in a part that looks the same regardless of how it was printed. How a filament swap is accomplished is functionally different between the two setups.
- No AMS → Printer will pause and wait for you to change the filament. If you've never done this before, this video is a quick primer on how to do it.
- AMS → The AMS will swap colours for you. Note, the colour change command can only be seen on the Preview tab in Studio. If you are using the app, you won't see the change but it WILL ask you to map 2 colours. There is no need to paint these parts.
I've set up my print profiles to trigger the swaps at the appropriate layer height. All you need to do is either load both colours in the AMS or be on hand to make the swap manually.
Text Customization
To add a name to the back of the theatre, download the special “Theatre with Name Plate” 3mf using the “Download STL/CAD Files” button and open in Studio. It already has a text object applied and positioned correctly; all you need to do is edit it. If you've never edited text before, this video is a good all-round primer on how to do it. Just remember to check the Preview tab to see how the sliced font looks. If it doesn't look good on-screen, it won't print any better 😥
⚠️ Important! Leave the Thickness set to 0.6mm; any bigger and the bottoms of the text will droop. Multicolour printing the text is NOT recommended; the wall it is on is very thin and the text may delaminate.

🖨️ Print Process Settings
Models were prototyped on a Bambu X1C with a 0.4mm nozzle. These are the process settings I used and which are contained as part of the print profiles.
⚠️ NOTE: There is a ~10mm bridge at the top of each window. It prints decently on my X1C (not perfect but also not awful). Adding support increased print time about 10 minutes and resulted in marginally better bridges. I've left them disabled as I found the small gain wasn't worth the extra print time and filament. There are techniques to get better bridges, but I'll leave it up to the user as it's printer dependent.
| Setting | Value | Reason |
|---|---|---|
| Layer height | 0.2 | Part fit and colour swaps were designed with this value. Changing this value will throw off colour changes and part fit. |
| X/Y Contour Compensation (Tighter and Looser Lids only) | ±0.03 | Reduces/increases outer contour without affecting layer height. Used to provide alternate sizes. |
| Wall generator | Classic | Prototyped with this generator. Changing to Arachne may make parts not fit. |
| Wall order (first layer modifier only applied to puppets) | outer/inner | Printing the outer wall first gives any tiny inner walls something to stick to. Only applied to the first layer as it's inadvisable to use for the entire model. |
| Bridge Flow | 1.1 | Increased flow for better bridges. May need tweaking for your own filament/printer. |
| Only one wall on top surfaces (curtain and stage front only) | Not Applied
| Results in a nicer top surface for these two parts |
| Wall loops | 3 | Overall increased strength. |
| Sparse infill density/type | 10% / gyroid | Capped at 10% because the strength mainly comes from the increased wall loops. |
| Initial layer speed | 20 mm/s | Slower speed allows complicated first layers enough time to cool and adhere. This setting is specifically for the puppets and handles but as I cannot limit it to just those plates, it needs to be a global setting. It doesn't impact print time of the bigger parts by much. |
| Outer wall speed | 100 mm/s | Slower outer wall speed is better for overhangs and overall surface quality. You can increase this speed but the quality may not be as nice. |
| Bridge speed | 20 mm/s | Slower speed results in a better (but not perfect) bridge. May need tweaking for your own filament/printer. |
| Purge Tower | Disabled | Filament swaps generally do not need a purge tower. All my prototyping has been done with it disabled and I found no discernable drop in quality. If you notice print quality issues, you may want to re-enable it. |
Adjusting Fit
If two parts are not fitting well together, adjust one (not both) of the parts in Studio using X-Y contour compensation.
- Too tight → -0.03 mm (decrease)
- Too loose → 0.03mm (increase)
Note: these values are guidelines only and may need further tweaking. The alternate lid sizes have this setting already applied but they can be adjusted further if they still are not fitting for you.

5. About
This puppet theatre was designed for Pieksekisten and was in the planning stages even before the contest was announced. I was incredibly moved by Pascal's story of loss and resilience and knew I needed to do something, no matter how small. While my kit cards are well-liked by kids and are a fun thing to build together with their adults, I knew that they'd be problematic in a hospital setting with leftover sharp-tipped sprues. So I set to work designing something that would be more appropriate but would still be enjoyable as a shared experience between both caregiver and child.
Within minutes of deciding to build a model for Pascal, I knew that “something” would be a puppet theatre. Storytelling is transportive, interactive, and unlimited. Puppetry makes it accessible to both the child and the caregiver as both can tell stories through them. It could be for a laugh, a momentary retreat from the world to some place fantastical, or even as a way to explore emotions that may be difficult to express.
It was a long few weeks of prototyping to create this little theatre. I had a lot of requirements to be sure it would be easy to print, accessible, interactive, self-contained, AND be small enough to fit inside a Pieksekisten. I'm fairly confident I succeeded. At least I hope I did! If you're at all interested in the prototyping process, check out this deep dive. Believe me when I say every little detail from big to small was chosen with deliberate care 😅
Regardless of whether or not my theatre will be part of Pascal's project, I hope it will bring smiles to whoever prints it. It was a labour of love made with the hope that it would bring a small spark of joy wherever it goes ❤️
🥰 How to Support me
If you appreciate the work I did to bring this model to you, please consider supporting me on Ko-fi. Even a small tip will help offset the cost of prototyping filaments. Alternatively, a like or a boost is another easy way to say “hey, you don't entirely suck.”

⭐ Licensing
If you wish to sell my models, you may purchase licensing rights through my official Ko-fi page.
This model is shared using my own Personal-Use License which supplements (but does not replace) MakerWorld’s Standard Digital License. My license is fundamentally the same (no public remixes, no file sharing, no selling) but includes specific exceptions and allowances not covered by the Standard Digital License.
Licenses offered through third-party websites (e.g. Cubee3D) are not authorized and are not valid.
Boost Me (for free)
🚀= 💪🐹 👍 = 🦵🐹 My models are created on a smoking hot Compy386 powered by Hunrod the Unusually Swole Hamster™. Every boost and like makes Hunrod stronger.
Documentation (2)
License
You shall not share, sub-license, sell, rent, host, transfer, or distribute in any way the digital or 3D printed versions of this object, nor any other derivative work of this object in its digital or physical format (including - but not limited to - remixes of this object, and hosting on other digital platforms). The objects may not be used without permission in any way whatsoever in which you charge money, or collect fees.
Comment & Rating (28)