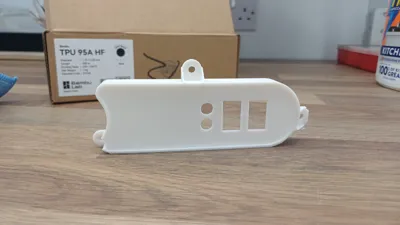
Switch and Button Panel for Nissan Qashqai J10


Print Profile(1)
Description
Designed for controlling beacon lights and an air horn on my 2013 J10 Nissan Qashqai, Originally based off of FABIO's Phone Slot to get the mounting holes, then hollowed it out to allow me to create a switch panel.
I used components found on AliExpress (listed below) Connections are up to you so i will not go into depth.
Installation Guide:
!ALWAYS DISCONNECT BATTERY WHEN DOING ANYTHING ELECTRICITY RELATED!
- If disconnecting the battery and you are using the standard Nissan connect radio, make sure to get the radio code for when you reconnect the battery, this can be found either on a sticker in your glove box, in your owners manual or written directly on your radio unit. If you do not have one you can get one generated given that you can provide its: serial number, device number and date (NOTE THAT THIS MAY REQUIRE PURCHASE)
- ALWAYS DISCONNECT THE - NEGATIVE TERMINAL ON THE BATTERY FIRST.
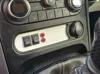
- Remove plastic from around the heater/aircon controls using a trim remover (should just pop off), then remove the top section around the radio, if you're lucky enough it will come off as one piece, and disconnect the hazard light switch (and camera switch with the 360 models)
- Remove the 3 screws holding the original cubby in using a Philips screwdriver.
- Remove the old part and install switch panel using the same screws as before, at this point it may also be useful to remove the heater/aircon controls to make access behind the dashboard easier for connecting the switches and connectors, especially if you have the 360 model and have accidentally pushed the cable behind (its easier than you think to do that)
- Reinstall plastic trim (Should just snap into place), just make sure to do the top half first, and you're good to go!
- Don't forget to reconnect the battery.
8mm Push Buttons:
Switches:
If you are a fan of my work and would like to support a small creator, i would appreciate if you were to send a boost over!
Boost Me (for free)
If you already have boosted thanks for supporting!
This remix is based on

License
You shall not share, sub-license, sell, rent, host, transfer, or distribute in any way the digital or 3D printed versions of this object, nor any other derivative work of this object in its digital or physical format (including, but not limited to, publishing derivative works outside the Makerworld platform or hosting on other digital platforms). The objects may not be used without permission in any way whatsoever in which you charge money or collect fees. Subject to the above restrictions, derivative works may be published only within the Makerworld platform, and all such derivative works must be licensed under the same SDFL‑C license, without modification or additional terms. You may download the digital versions of this object, 3D print it, and display images, videos, or usage demonstrations of 3D printed versions of the object on personal social media platforms or Makerworld official channels, provided that no digital versions of the object are shared or distributed.
Comment & Rating (0)