Search models, users, collections, and posts

PTFE Tube Cutter Silicone Rubber | Bowden Puck Pro

IP Report
GIF

Print Profile(6)

All
X1 Carbon
P1S
P1P
X1
X1E
A1 mini
A1
H2D
H2D Pro
P2S
X2D
H2S

P1 & X series printers, 0.2mm layer, 3 walls, 8% infill
Designer
7.4 h
5 plates
5.0(3)

A1 printers, 0.2mm layer, 3 walls, 8% infill
Designer
8.2 h
5 plates
5.0(2)

H2D printer, 0.2mm layer, 3 walls, 8% infill
Designer
7.9 h
5 plates
5.0(2)

P2S printer, 0.2mm layer, 3 walls, 8% infill
Designer
7.4 h
5 plates
5.0(1)
Click to see more

Open in Bambu Studio
Boost
64
278
40
11
116
75
Released 

Bill of Materials

Bambu Filaments
Select all
Sunflower Yellow (10402) / Refill / 1kg
Black (10101) / Refill / 1kg
List other parts
  • Double edge razor blade x 1:

Description

Snap-together PTFE/rubber/silicone tube cutter that’s precise, safe, and seriously satisfying

It’s been about a year since I designed the original Bowden Puck. While it has become very popular, back then I was just getting started with 3D printing and CAD.


Now? I know a bit more, so it felt like time for an upgrade.


Enter: The Bowden Puck Pro.


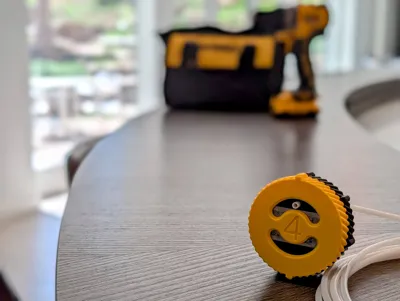
It’s smarter, grippier, more versatile—and still slices PTFE tubes like a hot knife through butter. Only now it also handles other small-diameter tubing like rubber and silicone.


In short: it’s better in (almost) every way.


If you liked the original, this is everything it should’ve been the first time around.

What’s New?

  • Easier alignment – Guide hole and blade alignment now lock in with satisfying snaps
  • More stable operation – No more wandering; alignment stays put
  • More sizes – Supports tubing from 3–7.9mm OD
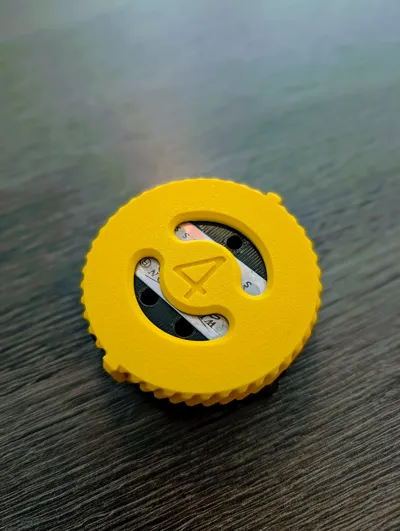
  • Clearly labeled – Size markings on both top and bottom
  • Even grippier – Aggressive diagonal knurling = serious grip (gloves welcome)
  • Smarter knurling – Optimized for actual direction of force
  • More consistent prints – Tweaked models and profiles for better reliability
  • Easier blade removal – Side notches allow use of a flathead (10mm / SL10) for separation

Features

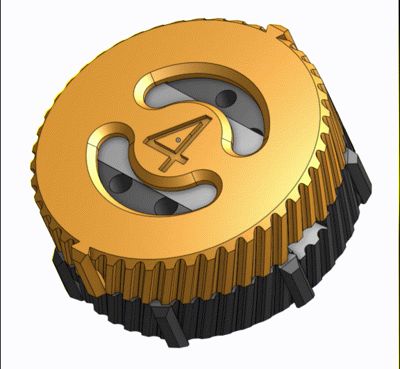
  • Safe – Blade is enclosed and not directly accessible to fingers (Note: exposure increases with larger tube sizes)
  • Grippy –No slipping, even under pressure
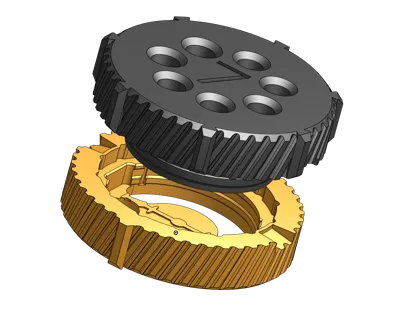
  • No screws – Snap-fit assembly, just the way it should be
  • Multi-size design – Each puck includes 7 guide holes (the 12 o’clock hole is the labeled size and each subsequent hole increases by +0.15mm clockwise)
  • Clearly labeled sizing – Example: “4” = 4.0–4.9mm range
  • Actually looks good – This is a tool you won’t hide in a drawer
  • Standard blades – Uses common safety razors you can find anywhere

Important Printing Notes

  • The guide includes long overhangs – Bambu Studio may warn about a floating cantilever; this is safe to ignore as it won’t affect function
  • Print time estimates – Profile includes five different sizes on five plates, but a single puck for PTFE is a ~90 minute print
  • Tolerances are intentionally tight – Make sure your printer is dialed in
  • The guide has a break-in period – Rotation will get smoother with use over time
  • Avoid brittle filaments like PLA Matte – The spring mechanism of the guide needs durability

Assembly

  1. Choose your size (e.g., 4mm puck = 4.0–4.9mm range and is ideal for Bambu's PTFE tubes)
  2. Print both halves
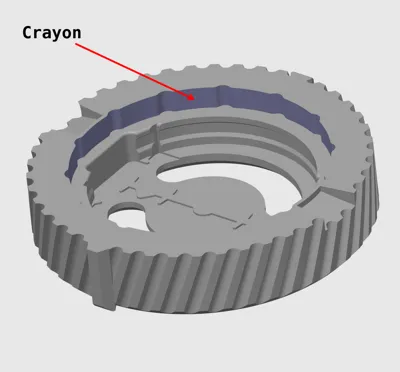
  3. Rub a crayon along the guide’s detent wall (Yes, really. It makes a huge difference in smoothness and there's an illustration in the model's photos. No crayon? Just borrow one from a neighbor’s kid.)
  4. Carefully insert a new razor blade
  5. Press the halves together (You may need to press hard, and please watch your fingers.)
  6. (Optional) Admire your work, and the tool
  7. Rotate a few times to break it in
  8. Test fit your tube across a few holes from the outside of the guide
  9. Align the guide/holder protrusions
  10. Insert the tube fully through the guide and eyelet
  11. Rotate to cut
  12. Optional: mark your most-used hole with a permanent marker along the guide hole chamfer and/or its protrusion

Tube Fit & Tuning

You’re aiming for a slight friction fit.


If needed:

  • Too tight? +0.025mm X-Y Hole Compensation
  • Too loose? −0.025mm

Reprint the guide until it feels just right.


Important: adjust Hole Compensation, not Contour Compensation


More info: Bambu Studio: X-Y Hole Compensation


Changelog:
April 30, 2026: Improve closeness of cut (thank you @boggisthecat for investigating!)

Comment & Rating (40)

(0/1000)

Pinned by Designer
It’s great! Getting those tubes perfectly straight is tough, this does the trick. Tight in the hole is key.
The designer has replied
0
Reply
Thanks for sharing the awesome macro photos, and the boost! I agree; a sight friction fit works best!
0
Reply
Print Profile
H2D printer, 0.2mm layer, 3 walls, 8% infill
This is a great collection of useful tools. The only issue I have is the blades I have are very thin, so there is a little bit of play that results in a cut that isn’t completely flat.
The profile uploader has replied
0
Reply
Appreciate the great feedback, the photo upload, and, of course, the boost. Would you say the amount of play in the blade is the same for both versions? Also, would you mind sharing which filaments you used as some filaments shrink more than others? Thank you!
(Edited)
0
Reply
Replying to @bink3d :
Filament was Bambu Lab PLA Metal (gold colour) and PLA Matte (red) for the top. My H2C is calibrated so X and Y should be accurate. Play is about the same in each design. I think that extruding the floor where the blade rests by 0.2 mm would work, but there is going to be a trade-off between retention of the blade and having it more firmly held. I may try gluing a blade in. Edit: Razor blades I have are 0.12 mm thick. It appears that your model has an indent around 0.5 mm. My guess is that I only need 0.2 mm or thereabout to secure the blades I have. Edit2: I made a (fairly rough) mod to reduce the depth of the indent to 0.2 mm. This is still enough to hold the blade, and improved the cut — photos attached; the cuts are difficult to capture on camera, the original is rougher.
(Edited)
0
Reply
Replying to @boggisthecat :
Thanks for the detail and I appreciate your efforts here! I will look into this in more detail on my end and report back!
0
Reply
I don't suppose you have a version of this that takes either of these two style razor blades, do you?
The designer has replied
0
Reply
Not at this time, but I might consider this for a future version.
0
Reply
Replying to @bink3d :
Unfortunate. I'm in the US and I've got literally hundreds upon hundreds of both of the razor blades pictured. I'd say they're far more common over here than those safety razors. Here those predominately get used for vintage style face shaver type devices and very few people still use those as compared to the disposable style. Not sure if this a non-US thing but I would assume that this would be wildly popular with at least one other option give different options other than that safety-razor-only version. I, for one, would rather not buy even more razor blades when I already have what amounts to three lifetimes worth of the two pictured. For me, I'll just keep doing it by hand which is a shame because i really like your design and looked forward to using it.
0
Reply
Replying to @Ostrichsak :
I totally understand, and that's completely fair feedback. In general, I tend to design around what works best for me personally and then hope others can benefit from it too, but sometimes that ends up not matching everyone's setup or preferences. One nice thing about the DE blades, at least, is that they're very inexpensive and, since they have two cutting edges, they tend to last quite a long time. That said, your feedback is genuinely helpful, and it definitely gives me something to think about for future versions.
0
Reply
Print Profile
P1 & X series printers, 0.2mm layer, 3 walls, 8% infill
I just needed to cut my PTFE tube once. Because of how satisfying this is, I think I’m going to run through at least 100 more before just because of satisfaction!! I’ve seen this model around Makerworld, and not until the other day I actually needed it. I was debating whether I should print the Magnetic version or Pro version, and I decided to go with the pro because the description said it was the best one yet. So a suggestion: you should make a magnetic pro version. Otherwise, super satisfying! It cuts so well that you can’t even tell that you cut it!! Keep up the good work!!
(Edited)
The profile uploader has replied
profile
1
Reply
Couldn't have asked for a better review! I really made the magnetic version because there was no super easy way to replace the blade in the original, and, well, magnets are fun and I thought what the heck/they'd be a neat solution to the problem! The truth is, outside of cutting plenty of PTFE for the prototypes for this model, I don't need to cut that much PTFE! I am still using the same blade from a year ago! So, while I did add a way to separate the halves in this Pro version, it's unlikely you'll ever have to unless you run through a few hundred more! That said, the magnetic version does have its own level of satisfying, and some have found it akin to a fidget toy, but the Pro really is the best version yet! Regardless, I will keep a magnetic version of this upgrade in mind! Cheers! And thanks for sharing the excellent pictures!
0
Reply
I really don’t cut Ptfe tubes 😂 but I still like this model a lot. keep it up! 👍
(Edited)
profile
1
Reply
I want to print this, what blade do I use?? just a traditional double edged razor blade?
(Edited)
The designer has replied
0
Reply
Yep! The one in your picture is good to go!
0
Reply
Thanks!! I will leave a review once I print it
(Edited)
designer
1
Reply
Print Profile
P1 & X series printers, 0.2mm layer, 3 walls, 8% infill
Never have my PTFE cuts been so clean!
The profile uploader has replied
profile
1
Reply
Win! Thanks for the all the stars!
0
Reply
perfect
The designer has replied
1
Reply
Cheers!
0
Reply
Print Profile
A1 printers, 0.2mm layer, 3 walls, 8% infill
The profile uploader has replied
profile
1
Reply
Appreciate the stars, and boost!
0
Reply
Boosted
Print Profile
P1 & X series printers, 0.2mm layer, 3 walls, 8% infill
The profile uploader has replied
profile
1
Reply
Thank you for the awesome rating, and boost!
0
Reply
Print Profile
A1 printers, 0.2mm layer, 3 walls, 8% infill
The profile uploader has replied
0
Reply
Appreciate the stars!
0
Reply
Print Profile
X2D printer, 0.2mm layer, 3 walls, 8% infill
The profile uploader has replied
0
Reply
Thanks for the awesome rating!
0
Reply

License

This user content is licensed under a Standard Digital File License.

You shall not share, sub-license, sell, rent, host, transfer, or distribute in any way the digital or 3D printed versions of this object, nor any other derivative work of this object in its digital or physical format (including - but not limited to - remixes of this object, and hosting on other digital platforms). The objects may not be used without permission in any way whatsoever in which you charge money, or collect fees.