Search models, users, collections, and posts

Custom Cruise Duck Magnet (Editable Text)

IP Report

Print Profile(1)

All
P2S
X1E
H2S
P1P
A1
X1
A1 mini
P1S
H2D Pro
H2D
X1 Carbon
H2C
X2D
A2L

0.2mm layer, 2 walls, 15% infill
Designer
32 min
1 plate
4.9(10)

Open in Bambu Studio
Boost
100
320
25
3
177
96
Released 

Bill of Materials

Bambu Filaments
Select all
Sunflower Yellow (10402) / Refill / 1kg
Orange (10300) / Refill / 1kg
Black (10101) / Refill / 1kg
Jade White (10100) / Refill / 1kg
List other parts
  • 8x2mm - Disc Magnets x 1: https://a.co/d/06esPK4W

Description

Customizable cruise duck magnet with editable ship name and cruise dates. Perfect for hiding ducks on cruise ships or decorating your stateroom door.

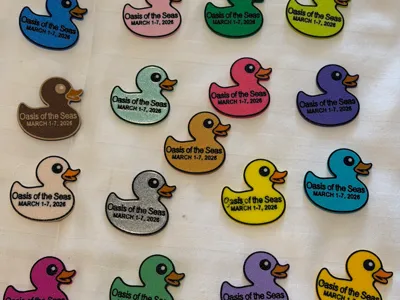
Customizable Cruise Duck Magnet

These customizable cruise duck magnets are perfect for remembering your trip or participating in the popular tradition of hiding ducks on cruise ships.


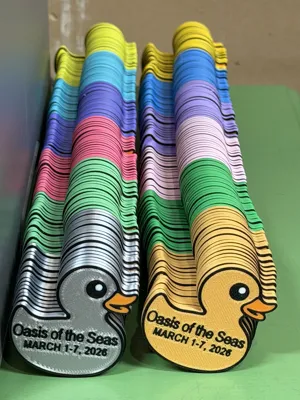
I originally designed these for our Oasis of the Seas sailing (March 1–7, 2026), but the model allows you to edit the ship name and date directly in Bambu Studio, making it easy to personalize for any cruise or event.


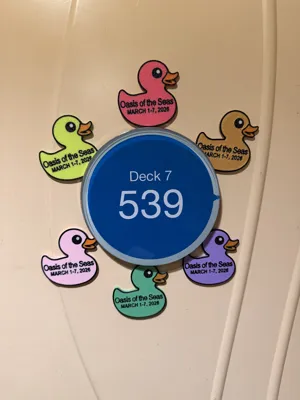
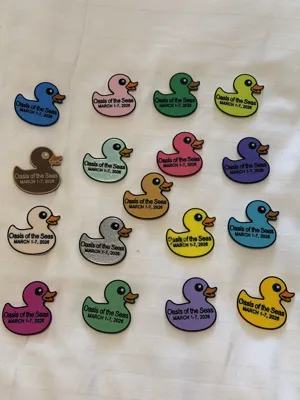
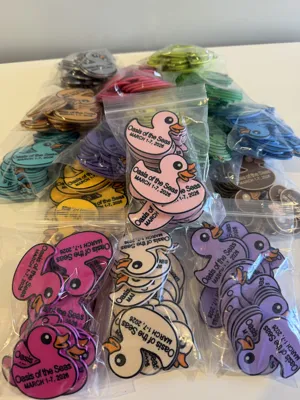
We printed several hundred  of these in many different colors to hide around the ship for others to find. They were also great for decorating our stateroom door and gifting to other cruisers.


Because they’re small, quick to print, and colorful, they’re perfect for batch printing before your cruise.

Model Size

Approximately:

51 mm x 51 mm x 2.2 mm

Compact and lightweight for travel.

Print Orientation

The duck is designed to print upside down, with the text side facing the build plate.

Benefits of this orientation:

  • Smooth front surface
  • Crisp lettering
  • Clean multicolor layers

Multicolor Design

The model uses 4 colors, so an AMS or similar multicolor system is required.

To speed up printing:

  • Color changes only occur in the first 2 layers
  • Only 8 color changes total

This keeps purge waste low and makes batch printing efficient.

Print Time

Approximate print times using a 0.2 mm layer height:

Single duck
~30 minutes

Batch of 20 ducks
~3 hours

Magnet Installation

The model includes a pause in the print to allow magnets to be inserted.

Magnet size used:

8 mm × 2 mm round magnets

Example magnets used:
https://a.co/d/06esPK4W

The magnets I used measured about 1.7 mm thick, so the magnet pocket in the model is 1.8 mm deep.

During testing:

  • Magnets attached firmly to the build plate
  • The print head did not pick up the magnets
  • No glue was required

This makes installation simple and clean.

If you scale the model up, you may need larger or additional magnets.

Editable Text

The following fields can be edited in Bambu Studio:

  • Ship name
  • Cruise dates

This makes the model perfect for:

  • Cruise groups
  • Family trips
  • Cruise reunions
  • Special sailings

Suggested Uses

These magnets are great for:

  • Decorating your stateroom door
  • Hiding ducks around the ship for others to find
  • Gifts for fellow cruisers
  • Cruise group activities
  • Trip keepsakes

Many cruisers enjoy the fun tradition of duck hunting on cruise ships. These magnets are a fun twist on that tradition.

Comment & Rating (25)

(0/1000)

Print Profile
0.2mm layer, 2 walls, 15% infill
it came out great! can’t wait to make more 🥰
(Edited)
The profile uploader has replied
profile
1
Reply
Wonderful! Enjoy your cruise!
0
Reply
Replying to @joshcuzzort :
thank you 😊
0
Reply
The print is great and easy to customize with the ship name/date. Unfortunately, the magnets I purchased from the Amazon link are just a tad too large for the eye hole. The depth is fine. I measured both the hole and the magnet and they are both 8mm. How can I enlarge the hole to 8.1 or 8.2? I'm new to 3D printing, so I haven't learned enough to make that change. I stopped the print at the pause so I could remove it from the plate and try to put the magnet it. I'm adding a photo showing how the magnet doesn't fit. I've "liked" your model--it's really great since the magnet goes inside the print.
(Edited)
The designer has replied
designer
1
Reply
Welcome to the world of 3D printing! Magnet fit can vary a little depending on the printer, filament, slicer settings, and the actual magnet tolerances, even when both are listed as 8mm. The easiest way to adjust this in Bambu Studio is to resize the magnet hole object in the print profile. In the Process section, under Objects, locate and select: “Magnet Hole (for 8x2mm magnet)” Then use the Scale tool and turn off Uniform Scale. This will let you adjust the size of the magnet hole without changing all dimensions together. The current print profile has the magnet hole set to: 8.20 x 8.20 x 1.80 mm If your magnet is a little too tight, I would try increasing only the X and Y dimensions to: 8.30 x 8.30 x 1.80 mm I would leave the Z-axis at 1.80 mm for now since you mentioned the depth is fine. That controls the depth of the magnet hole. Since the magnet is inserted during the pause, I recommend testing the fit before the pause. Happy printing!
0
Reply
Print Profile
0.2mm layer, 2 walls, 15% infill
nice print, make the holes larger than on the model, make the model thicker to actually cover the magnet smoothly, second photo shows the difference in making model thicker
The profile uploader has replied
profile
1
Reply
Looks great! Had issues with them sticking to magnetic surfaces when making the model thicker. Glad this worked for you!
0
Reply
Print Profile
0.2mm layer, 2 walls, 15% infill
ok let me say this print is awesome. 1. you can edit it for whatever trip your going on. 2. it stops mid print allows you to put the magnet in an the it will finish up so the magnet is inside the print. how cool is that!
The profile uploader has replied
profile
1
Reply
Thank you so much for the awesome feedback and for sharing a photo of your print! I’m glad the editable text worked well for you. The pause mid-print is definitely an important part of the design. Embedding the magnet during the print keeps everything clean and fully enclosed in the finished piece. Really appreciate you taking the time to leave a review! Enjoy your upcoming cruise!
0
Reply
I bought the magnets you listed. The layer after the magnet was inserted isn't flat -- only one layer after magnet. I'm fairly new to 3d printing. Using a Bambu H2S. Could the gap for the magnet not be quite big enough?
The designer has replied
0
Reply
The model is designed to print 2 layers over the magnet. Ensure your magnet is pushed fully down into the hole when the print pauses. Our batch of magnets measured 1.70mm thick with digital calipers; hence the "magnet hole" is 1.80mm thick. Out of 300 magnets, we did have some that were over 1.80mm thick and couldn't use because they sat too high . We had some tiny imperfections on the back (non-text side) of some ducks where the magnet is located; not quite to the degree shown in your photo and it varied by filament color. However, we found this did not impact the magnet and we could still stick them on magnetic surfaces without issue. We printed only on P1S and P2S. The negative part in this model ("Magnet Hole (for 8x2mm magnet)" could be resized to accommodate thicker/thinner magnets. If adjusting for a thicker magnet, you will need to make the duck thicker too. Layer height on this print profile is set to 0.2mm; be mindful of this as you make adjustments.
0
Reply
Replying to @joshcuzzort :
Thank you. I will try your suggestion. I haven't done much in the way of adjusting to add a layer or increase the hole size just a tiny bit, but I will try it.
0
Reply
Print Profile
0.2mm layer, 2 walls, 15% infill
I had an issue with the magnets. I bought them from the link, but apparently their quality control is not reliable. The print is great. The ship name and sailing date are easy to edit in Bambi Studio and I love the idea of printing multiples and in different colors per printing session. I just wish the hole for the magnet was a little bit wider.
The profile uploader has replied
profile
1
Reply
Thank you for the feedback! I’m glad the print itself worked well and that the ship name/date were easy to customize in Bambu Studio. Magnet fit can vary a little from batch to batch, even when the magnets are sold as the same size. Since the depth worked well for you and the issue is only with the width, you should be able to adjust the magnet hole directly in Bambu Studio. In the Process section, under Objects, locate and select:“Magnet Hole (for 8x2mm magnet)” Then use the Scale tool and turn off Uniform Scale. This allows you to adjust the width of the magnet hole without changing all dimensions together. The current magnet hole is set to: 8.20 x 8.20 x 1.80 mm If your magnets are a little too tight, try increasing only the X and Y dimensions slightly. For example: 8.30 x 8.30 x 1.80 mm I would leave the Z-axis at 1.80 mm since the depth is already working correctly. That should give your magnets a little extra clearance while keeping the rest of the print the same.
0
Reply
Thanks for the tip. 8.30 worked.
(Edited)
profile
1
Reply
Replying to @joshcuzzort :
I've solved the magnet issue, thanks to your helpful instructions. Thanks so much!
0
Reply
Print Profile
0.2mm layer, 2 walls, 15% infill
Love these.
The profile uploader has replied
profile
1
Reply
Happy to hear that! Enjoy.
0
Reply
thank you. This is exactly what my mother was looking for. Going to print today some with magnets and some without
designer
1
Reply
Print Profile
0.2mm layer, 2 walls, 15% infill
profile
1
Reply
Print Profile
0.2mm layer, 2 walls, 15% infill
profile
1
Reply

License

This user content is licensed under a Standard Digital File License.

You shall not share, sub-license, sell, rent, host, transfer, or distribute in any way the digital or 3D printed versions of this object, nor any other derivative work of this object in its digital or physical format (including - but not limited to - remixes of this object, and hosting on other digital platforms). The objects may not be used without permission in any way whatsoever in which you charge money, or collect fees.