Search models, users, collections, and posts

Milwaukee 4-in-1 Drill Driver Packout Insert

IP Report
GIF

Print Profile(1)

All
H2D
X1
X2D
A1
P1P
H2C
X1 Carbon
A2L
H2S
P2S
H2D Pro
X1E
P1S

Perfect Fitment and everything stays in place
Designer
47.6 h
2 plates
4.8(12)

Open in Bambu Studio
Boost
168
585
28
21
393
210
Released 

Description

Boost Me (for free)

⚡ Support the Creator — Send a Boost!
Downloaded this model and liked the results? You can support my design work completely for free by giving this model a Boost!

MakerWorld awards points for boosts, which directly funds the prototyping, testing, and development of my next projects. If you want to see more functional prints, organizers, and designs, hitting that boost button is the best way to make it happen! 🛠️

Membership

🛠️ Want to Sell This Print Commercially? Support my work and unlock the rights to sell physical prints of my designs by joining my MakerWorld Membership! Basic Tier: Perfect for selling simple designs, toys, and fidgets. Premium Tier: Grants full commercial rights to ALL of my designs, including premium tools and my Milwaukee Packout organizers. Note: Commercial rights are valid only while you maintain an active subscription. Digital file redistribution is strictly prohibited.

Join

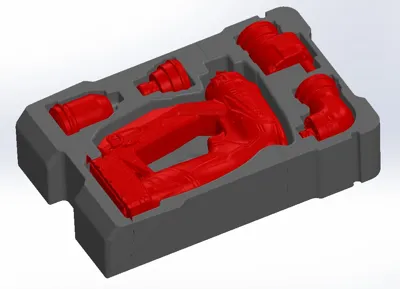
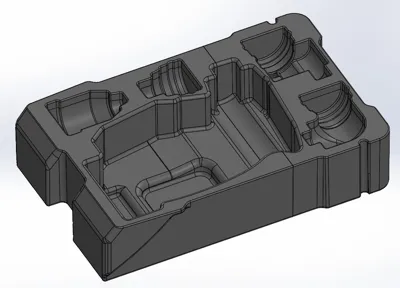
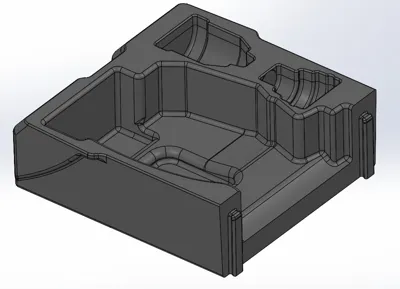
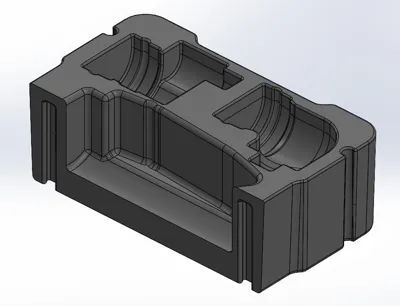
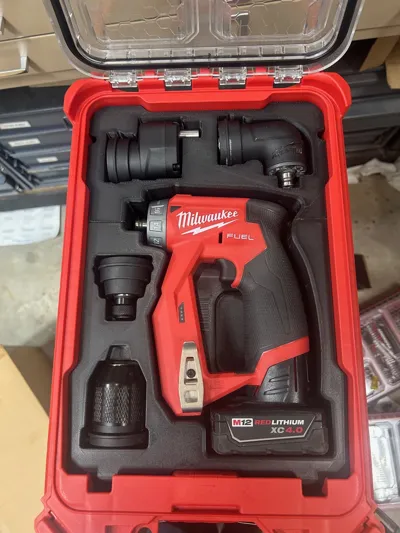
Here is a Milwaukee Packout Insert for organizing your tools. This Insert is for the Milwaukee M12 FUEL 12V Lithium-Ion Brushless Cordless 4-in-1 Installation 3/8 in. Drill Driver  (CAT.NO.2505-20). This Insert is designed to fit in a Milwaukee PACKOUT Tool Case, 5 Compartments, 9-7/8 in W x 15-1/4 in D x 4-5/8 in H (CAT.NO.48-22-8435). This insert works with large, small or no batteries. I 3d scanned and reverse engineered the tools and the Packout and completely dialed in the fit. I had intentions to sell a variety of Packout inserts but I realized I would need a print farm so I am giving them away for free. The inserts are designed in two pieces so they can be printed on more types of printers but it also allows the inserts to be locked into the Packout so it will not fall out. This insert holds the tools and battery secure so no matter how much you shake or drop the Packout the items will remain in place. Hope you all enjoy inserts! Please post your prints and leave some feedback.


IMPORTANT! - To properly install- insert nest-1 into the packout first and then slide in Insert-2. If you assemble both trays together and then try to place them inside the packout it will not fit. There is a example install video in the pictures of this print profile.


If you need a reference for which tools fit this tray or if you are missing one of the tools or the Packout here are the links to the exact items used in this model:


Milwaukee M12 FUEL 12V Lithium-Ion Brushless Cordless 4-in-1 Installation 3/8 in. Drill Driver:

https://amzn.to/4rW88CD


https://www.homedepot.com/p/Milwaukee-M12-FUEL-12V-Lithium-Ion-Brushless-Cordless-4-in-1-Installation-3-8-in-Drill-Driver-with-4-Tool-Head-Tool-Only-2505-20/309468737


Packout:

https://amzn.to/40NVd9C


https://www.homedepot.com/p/Milwaukee-PACKOUT-5-Compartments-Small-Parts-Organizer-48-22-8435/303005752?MERCH=REC-_-rv_typeahead_rr-_-303005752-_-2-_-n/a-_-n/a-_-n/a-_-n/a-_-n/a


Comment & Rating (28)

(0/1000)

after I read the directions it fits perfectly!!!!!! This picture was before I read to insert part 1 first lol
(Edited)
The designer has replied
0
Reply
Thats how it is designed lol. Don't throw it away. You have to angle insert 1 and put it into the packout THEN slide in insert 2. It is designed with an undercut to go under the front lip so the inserts hold into the packout tightly. There is a GIF video on the print profile that show you the order to install the inserts. Your print looks great.
GIF
0
Reply
Great print and it fit in the original fabric case. Thanks for the file!
The designer has replied
0
Reply
That is pretty cool. I didn't even know it would fit in that case. That beats buying an expensive packout
0
Reply
Print Profile
Perfect Fitment and everything stays in place
Just as described. Perfect fit.
(Edited)
0
Reply
Print Profile
Perfect Fitment and everything stays in place
Súper! fits perfectly!
0
Reply
I was a bit hesitant to print this because of the time it was going to take, decided to do it anyway and am so glad I did. fitment is absolutely perfect, best packout insert ive printed by far, please make more for other milwaukee tools, I printed it with cheap petg (sliced brand) on my p2s with .4mm hf nozzle with speed set to ludicrous (166%)
0
Reply
Print Profile
Perfect Fitment and everything stays in place
overall design is done very well however the issue that you're going to have with it is the infill is too much and the wrong kind so it takes like 25 hours to print and uses almost an entire thing of filament I've printed several of these types of items and this things made like a brick but it's sitting in a case so it really doesn't need to be and should have used half the filament.
The profile uploader has replied
1
Reply
I make them for myself really. I want them to last so I don't mind them taking a while. I do upload the raw stl files so you can adjust whatever infill, support, color or any other setting you want.
0
Reply
I go to print it on my X2d and it tells me that my printer isn’t supported
The designer has replied
0
Reply
These Insert halves are pretty large. I programmed the files on my H2D. Sometimes when opening up the file for smaller printers it wont place the print on the build plate correctly. I provide the raw STL file with all of my models so you can insert them into Bambu Studio and rotate things around to get them to fit. You can also change infill %, walls, color, filament types that way as well.
0
Reply
great designs! A suggestion for improvement - sink the head storage down on the top half and then add a tray for storage of a few bits (like your bit storage design)
The designer has replied
0
Reply
that would be nice. This was one of the first inserts that I created. It may be time to revisit some of my original insert designs.
0
Reply
Do you recommend PLA, PETG, or ABS?
The designer has replied
0
Reply
I always use PETG for everything. It seems to be pretty strong, holds up outdoors and in sunlight, my H2D seems to print best with PETG. Its the same price as PLA but I just like it more. ABS is probably all around better but you have to have a good ventilation system to run ABS so I rarely do.
0
Reply
what 3d scanner do you use?
0
Reply

License

If you want to use this model commercially, please join my membership.
Join Now
This user content is licensed under a Standard Digital File License.

You shall not share, sub-license, sell, rent, host, transfer, or distribute in any way the digital or 3D printed versions of this object, nor any other derivative work of this object in its digital or physical format (including - but not limited to - remixes of this object, and hosting on other digital platforms). The objects may not be used without permission in any way whatsoever in which you charge money, or collect fees.