Search models, users, collections, and posts
Broadlink RM4 Mini Wall Mount – Tape mount
Remixed by
IP Report


Print Profile(1)
0.16mm layer, 2 walls, 15% infill
Designer
3 h
1 plate
Open in Bambu Studio
Boost
3
10
0
0
19
16
Released
Description
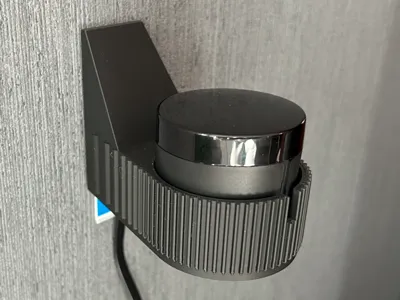
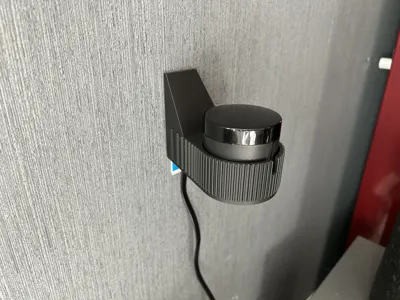
Broadlink RM4 Mini Wall Mount – Tesa Powerstrip Edition
Based on Broadlink RM4 Mini Wall Mount Modern Design by acosta290.
I wanted a damage-free wall mount — no screws, no holes, no permanent marks. I also wanted to keep using the original Broadlink twist-lock adapter. So I redesigned acosta290's mount to suit these needs.
Features
- Adhesive mounting - single Tesa Powerstrip (or similar). The 65 mm tall back plate provides full contact area for the strip's rated hold. Pull tab points down.
- Original twist-lock adapter - M3 screw bosses with hex nut traps let you bolt in the stock Broadlink adapter. Drop in the RM4 Mini and twist to lock. Note: the adapter doesn't center the device perfectly, but it does let you align the LED with the front slot.
- Cable channel - USB port faces the wall. A 32 mm deep channel routes the flat USB cable cleanly out the bottom.
- LED slot - narrow notch at the top front edge for status LED visibility.
- Ribbed texture - vertical ribs cover the entire surface from front to back.
- Parametric source - .scad file included. Tweak cavity size, cable gap, plate height, etc.
Printing
- Material: PLA (printed with Bambu Lab Matte PLA, ~40 g)
- Profile: 0.16 mm High Quality @BBL A1
- Supports: Tree (auto), threshold angle 25°
- Orientation: Bottom down
- Print time: ~3 hours
Assembly
- Press M3 hex nuts into the traps inside the cup. A tiny drop of super glue secures them permanently (recommended).
- Screw the Broadlink adapter to the base with two M3×8 screws.
- Route the USB cable through the back channel and out the bottom.
- Attach a Tesa Powerstrip to the back plate. Choose the right strip for your wall surface— Tesa makes variants for painted walls, wallpaper, tiles, brick, etc.
- Press firmly against the wall for 30 seconds, wait 1 hour before mounting the device.
- Drop in the RM4 Mini and twist to lock.
Notes
- Cavity is intentionally loose — the twist-lock adapter handles retention.
- Without the adapter, reduce cavity_r in the .scad file for a friction fit.
- Device + mount weigh well under the strip's 1 kg rating.
This remix is based on

License
This user content is licensed under a
Creative Commons Attribution-Noncommercial-Share Alike
Comment & Rating (0)