Search models, users, collections, and posts

Easter Bunny Bowl Basket

IP Report

Print Profile(3)

All
A1
H2D Pro
H2D
X1 Carbon
P1P
P2S
P1S
H2C
X1E
X1
H2S
X2D
A2L

Optimized Quality – 0.2mm layer, 2 walls, 10% infill
Designer
11 h
2 plates
4.6(152)

0.16mm layer, 3 walls, 10% infill
13.3 h
2 plates
5.0(1)

One plate, 0.22mm layer, 2 walls, 8% infill
4 h
1 plate

Open in Bambu Studio
Boost
2522
7266
346
224
5 k
2.7 k
Released 

Bill of Materials

Bambu Filaments
Select all
Beige (10201) / Refill / 1kg
Matte Sakura Pink (11201) / Refill / 1kg

Description

Boost Me (for free)

If you like the model and the print turned out well, please consider giving it a Boost. Your support helps me create more designs. Thank you 💛

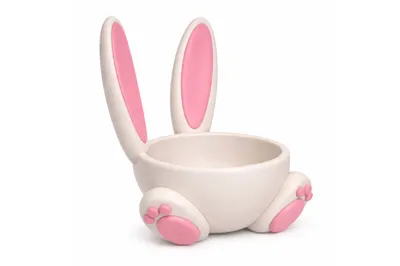
Easter Bunny Bowl Basket | Cute Easter Decor

This model is a stylized Easter bunny bowl basket designed in a clean, collectible decorative style. Combining charming character aesthetics with practical functionality, the design features recognizable bunny traits and a friendly silhouette in a smooth, display-ready 3D-printable form.

The simplified decorative proportions, paired with carefully balanced details, create a visually appealing design optimized for FDM 3D printing. The model is crafted for reliable single-color PLA prints, ensuring crisp edges, stable geometry, and clean surface results when printed with proper slicer settings.

Whether used as a festive table decoration, candy holder, or seasonal gift container, this bunny bowl adds a cheerful holiday accent to any Easter setup.

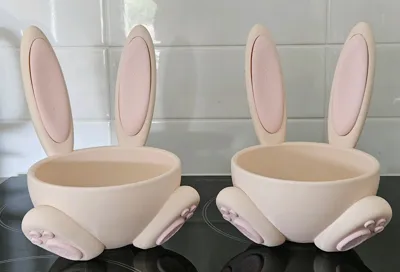
Assembly instructions include a painting reference visualization, showing one possible finishing style. For best results, acrylic paints or hobby paints can be used to enhance details and add colorful seasonal accents.


Details:

  • Stylized bunny bowl basket decoration.
  • Optimized for FDM desktop 3D printers.
  • Suitable for single-color PLA printing.
  • Clean geometry designed for stable printing.
  • Cute decorative proportions with print-friendly details.
  • Ideal as an Easter decoration or candy holder.
  • Scalable to adjust overall size if needed.
  • Includes painting reference image.
For personal use only. Commercial use and redistribution are not permitted.

Comment & Rating (346)

(0/1000)

Pinned by Designer
Print Profile
Optimized Quality – 0.2mm layer, 2 walls, 10% infill
it turned out to be a great candy dish, thank you
Show original
profile
1
Reply
is this big? like for Easter gifts and stuff for kids baskets or is it small like for decoration
0
Reply
Replying to @softball_chic :
Let me explain, you can think of it as a candy bowl or a serving dish for Turkish delight or treats. The bowl isn't excessively large, but the ears are a bit long :) Don't think of it as a toy basket. It's a very cute bowl, girls will love it, even my son loved it. You can even put personal items in it, like hair clips or bracelets, or you can keep your keys in the hallway.
0
Reply
Unfortunately, I'm having trouble with the base, it's not detaching correctly from the plate and then tearing off. Is anyone else having the same problem and possibly has a solution? Does the support need to be adjusted differently
The designer has replied
Show original
0
Reply
It’s probably happening because you’re removing the print while it’s still warm. Let the bed cool down completely first. Clean the plate well and use BambuLab Glue. The model is quite large, so it needs strong adhesion during printing.
(Edited)
0
Reply
Replying to @m4hazar :
I let the second print cool down completely. I also tried it with two different build plates. The bottom still tears off
Show original
0
Reply
Replying to @carpi65 :
I wrote you a private message, I will help.
0
Reply
Print Profile
Optimized Quality – 0.2mm layer, 2 walls, 10% infill
I really like this bowl. But since the result was very bad on the underside, I adjusted the file a bit. Cut off the bottom a bit, rotated the model a bit, and adjusted the settings. Then enlarged the bowl to 120%. Now it prints great and is even a bit faster. I have attached the profile with pictures.
Show original
0
Reply
how did you fix it?
0
Reply
I made it a bit more upright and cut off some. I also enlarged the file to 120% for a larger Easter basket. I then uploaded the profile here as an option to the original file
Show original
0
Reply
hi! please share the settings, I can't get anything to work
0
Reply
in itself nice bowl with far too many supports that destroyed everything at the bottom for me print time 8 hours completely for nothing
Show original
4
Reply
Same thing, I had strong support, and it came out bad. This print needs to be worked on. In the print settings, no support, only brim. not worth it at all. 2 bowls went to trash
1
Reply
Hello you two. I had the same problem but found the bowl very beautiful. Therefore, I adjusted the file and also uploaded it here as a print profile. But I enlarged it to 120% afterwards. After that, I had a very clean print
Show original
1
Reply
I printed this one twice: Optimized Quality – 0.2mm layer, 2 walls, 10% infill and both times the bottom ends up a mess due to the brim and supports. I increased the brim from 0 to 0.1 the 2nd print and you can't tell any difference from the 2. I wasted too much filament so it's time to find a different print that will work.
The designer has replied
1
Reply
Many people have printed this and continue to do so, and they evaluate the print quality positively. I have also printed it many times and tested the quality of the profile myself. The only thing that could possibly be criticized is that the supports are quite strong, which may leave a very slight mark after removal — however, this is intentional for safety reasons. I’m not sure how the issue you showed happened, but you should also take into account the filament you used for printing. The filament that should be used is PLA.
0
Reply
the underside also turned out really badly for me
Show original
1
Reply
Replying to @m4hazar :
Given the number of people complaining about the printing, it means the problem doesn't come from the filament. The people who have "succeeded" in printing it have all modified their settings. A correct print profile should not require modifications. I was ready to print this model before seeing the comments. Thanks to the people who reported the problems encountered for saving me filament!
Show original
1
Reply
Boosted
Print Profile
Optimized Quality – 0.2mm layer, 2 walls, 10% infill
Size: Model successfully tested at 200% and 300% of its original size. Technical tip (Z-Offset): If you have issues with infill or visible gaps on the first layer (especially behind the bunny ears), I recommend adjusting the Z-offset manually. How to do it: In Bambu Studio, go to your filament settings > Advanced tab > Filament Start G-code and add this line at the very end: G29.1 Z-0.06 (This will squish the first layer more to close gaps. See my photo for the exact location).
(Edited)
Show original
2
Reply
when zooming in it doesn't make the base? could you tell me if I have to do anything to it
Show original
0
Reply
Boosted
Replying to @user_2930672497 :
Hello, could you please send photos of Bambu studio, I would like to see the sliced plate with your rabbit, to see if Bambu indicates any error messages. Sincerely
Show original
0
Reply
Boosted
The print profile is no longer public
The profile uploader has replied
profile
3
Reply
Thank you for the opinion with the photo ❤️
(Edited)
1
Reply
Did you have any problems with the base
Show original
0
Reply
Boosted
Replying to @carpi65 :
i had some overhang issues on the radius but i didnt dry my filament so thats on me,
(Edited)
1
Reply
very nice. consider lowering 1mm as someone is advising in another comment. it comes out perfect if you lower it by 1mm before slicing
Show original
0
Reply
how did you fix the problem we been having?
0
Reply
Replying to @user_811957150 :
as he said: @ryker57 How to do it: In Bambu Studio, go to your filament settings > Advanced tab > Filament Start G-code and add this line at the end: G29.1 Z-0.06 @ryker57 Hello, it is best to lower the part on the tray by 1 mm to 2 mm for a good result
Show original
0
Reply
Replying to @user_811957150 :
...
0
Reply
Print Profile
Optimized Quality – 0.2mm layer, 2 walls, 10% infill
cute
Show original
3
Reply
Adorable! Zero print issues!
0
Reply
did you glue the ears and toes or did they snap in for you?
0
Reply
Replying to @user_3119526195 :
The toes snapped in, I had to glue the ears
0
Reply
Print came out good except the bottom, how can i get this as smooth as possible with tree supports?
1
Reply
Boosted
Hello, it is best to lower the part into the build plate by 1mm to 2mm to achieve a good result
Show original
0
Reply

License

This user content is licensed under a Standard Digital File License.

You shall not share, sub-license, sell, rent, host, transfer, or distribute in any way the digital or 3D printed versions of this object, nor any other derivative work of this object in its digital or physical format (including - but not limited to - remixes of this object, and hosting on other digital platforms). The objects may not be used without permission in any way whatsoever in which you charge money, or collect fees.