Self-aligning P2S Lead Screw Shield


Print Profile(4)


Description
IMPORTANT NOTE ON COMMERCIAL USE OF MY MODELS
Please note that I am sharing my designs for everyone to enjoy but for personal use only. You may share physical copies for FREE but not the digital copy nor sell as I have NOT provided any commercial license to any one to sell either digital or physical copies of my designs. I will not hesitate to report to Etsy's and other online sites' admin if I find them being sold there for profit.
__________________________
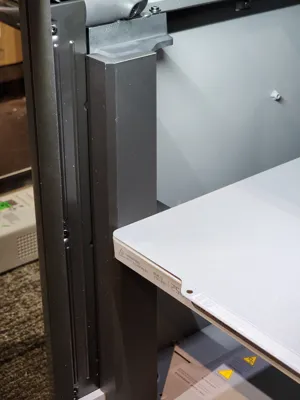
Meet the first-ever Self-Aligning Lead Screw Shield for the P2S!
The innovative 'floating' design finds its own center, providing total protection without the risk of Z-axis binding. Stop the grease rub for good—print yours now!
(A similar version for the X1C/P1S/P1P is available at this page)
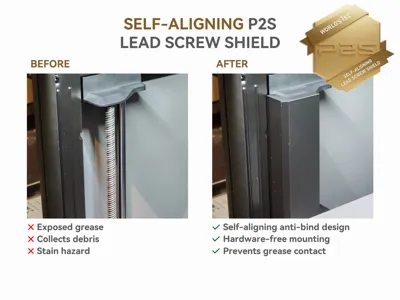
The Problem: "The Grease Trap" and Alignment
Most lead screw covers are rigid. Because 3D printers have slight assembly variances (tolerances), a fixed one-piece shield can often rub against the build plate, causing friction, noise, or print bed movement errors.
The Solution: A Self-aligning Lead Screw Shield System
This design features a dual-component sliding rail system that solves the tolerance issue once and for all:
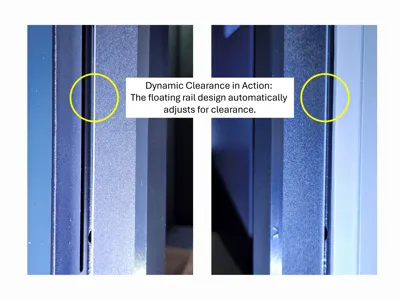
- Zero-Friction Sliding Design: The shield component "floats" horizontally within the mounting bracket. If your printbed is slightly offset, the shield simply slides to accommodate it—ensuring zero binding and zero impact on print quality.
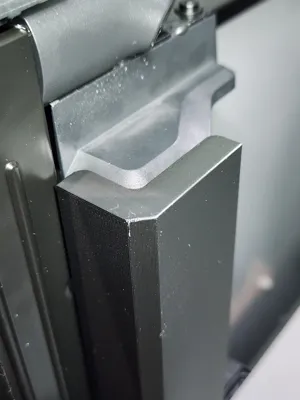
- Hardware-Free Mounting: No magnets or adhesives required. This bracket is engineered to lock into the lead screw top cover and the factory hole in the printer floor, providing a rock-solid mechanical fit that won't budge.
- Total Protection: Prevents sleeves, hands and build plates from getting grease and stops purged filament from sticking to the Z-rods.
IMPORTANT! Print the test pieces first for fitment check!
Filament Recommendation
- Material: ASA or ABS is highly recommended. While PLA or PETG will work for short-term use, the P2S chamber can reach temperatures that will warp lower-temp plastics over time. Use high-temp filament for long-term durability.
To ensure the Self-Aligning Lead Screw Shield functions correctly, the interaction between the shield rib and the mounting bracket rail must be smooth and friction-free.
Because every filament (and every printer's calibration) varies slightly, I have included a fitment test plate (Plate 1).
The Test Procedure:
- Print plate #1: This contains small samples of the rail and the rib.
- Check the slide: Insert the rib into the rail. It should slide freely with no resistance.
- Analyze the fit:
- Perfect Fit: The rib moves smoothly without "wobbling" excessively.
- Too tight / binding: If you have to force the rib into the rail, the "Self-Aligning" feature will not work, which could lead to Z-axis motor strain.
- Too loose: A small amount of play is fine (and necessary for alignment!), but it shouldn't rattle.
If your test pieces are too tight, do not print the full model yet! Instead, adjust your Filament Flow Rate (extrusion multiplier) in your slicer:
- Decrease Flow: Try reducing your flow rate by 1-2% (e.g., from 0.98 to 0.96) and reprint the test pieces.
- Check Calibration: Ensure your "Pressure Advance" or "Flow Dynamics" calibration is accurate for the specific filament you are using.
Note: A smooth-sliding fit is critical in preventing z-axis binding.
Installation
Thanks to @MadMopar, I learned that the distance between the lead screw’s top cover and the printer’s floor can vary quite a bit. To account for this, the bracket uses a configurable nub so you can set the exact height your machine needs.

How to set the bracket height:
- Start with the nub printed with the bracket and insert it into the hole on the underside of the bracket. Rotate the peg and try again if it doesn’t slide into the hole. Check picture above for the correct orientation.
- Test‑fit the bracket between the lead screw top cover and the printer floor.
- If the fit is too tight or too loose, print plate #6, which includes additional nubs with varying heights. Each bracket (left and right) has its own matching set of nubs on that plate.
- Try different nubs until the bracket sits firmly without bowing from excessive pressure or rattling from being too loose.
For the rest of the installation steps, follow the video tutorial below:
Verification & Safety Check
Once the mounting brackets and shields are installed, you must verify the clearance to ensure the self-aligning feature is moving freely:
- Lower the bed: Using the printer display, manually lower the print bed to its lowest position.
- Homing sequence: Press the "Home" button.
- Monitor for errors:
- Success: The bed moves smoothly to the top without any change in motor sound.
- Error: If the printer displays a "Homing Z axis failed" or "Motor Overload" error, the shield is binding.
Troubleshooting Binding Issues
If you encounter an error, the shield rib is likely too tight within the bracket rail. This is usually caused by slight filament over-extrusion.
- Do not force it.
- Reprint the parts with a slightly reduced flow rate and print the Fitment Test Plate to dial in the perfect "floating" clearance.
Lead Screw Maintenance
When cleaning the lead screw, remove the bracket and shield as a single unit. Reinstall them by following the same steps used during the original installation.
Boost Me (for free)
If you find this creation useful or just to show appreciation for the effort in making this model, please hit the BOOST button!
License
You shall not share, sub-license, sell, rent, host, transfer, or distribute in any way the digital or 3D printed versions of this object, nor any other derivative work of this object in its digital or physical format (including - but not limited to - remixes of this object, and hosting on other digital platforms). The objects may not be used without permission in any way whatsoever in which you charge money, or collect fees.
Comment & Rating (80)