ARC Raiders - Vitashot


Print Profile(2)


Description
More ARC Raiders Designs Available here!
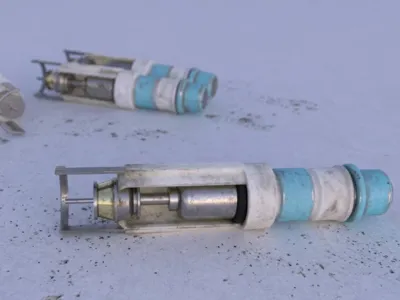
Vitashot - ARC Raiders
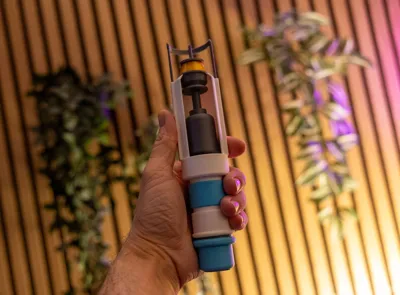
Cant find the blueprint? Well here is the physical thing you can clutch onto instead!
This model was made from scratch in Autocad Fusion, asuming measurements and scale from screenshots.
No AI was used in the creation of this model.
The model requires no AMS, but there is an AMS friendly profile too (I have not testprinted this though, only the assembly part).
Print with supports and brims as set up in the profile to achieve best results.
Print in the colors of the parts, or print it all in a single color and paint it yourself - your choise!
I printed these parts in a few different filaments (Bambu Lab Matte Ivory, Charcoal, Bambu Lab PLA+ Gold, Elegoo PLA Space Gray and eSun PLA+ Space Blue), but I've approximated the colors to Bambu Lab filaments and types for your convenience.
All parts are meant to be glued together. I suggest you glue one piece to another, wait for it to set, then glue on the next piece.
See the Assembly View in Bambu Studio to see how it should all come together.
Some notes on assembly:
When assembling parts inside the bottom of the shroud, use the shroud part as a guide to get the black piece aligned. Do not glue the shroud in place yet.
The tolerances are tested to be perfect, so the black bottom thing, which ingame is probably just a gasket) will be perfectly centered.

Glue the rest of the “metal” and gold parts together or everything in layers going up from the black thing. Alternately, glue all of the black and metal assemblies into one part, then slip it inside the bottom part of the shroud.
Place the shroud in with glue, then glue in the fake screws on the back. Finally, put some glue in the holes on each side of the screw for the needle guard to slip into, move it down until it stops and let everthing dry.
Boost Me (for free)
If you like this, please consider giving me a boost!
License
You shall not share, sub-license, sell, rent, host, transfer, or distribute in any way the digital or 3D printed versions of this object, nor any other derivative work of this object in its digital or physical format (including - but not limited to - remixes of this object, and hosting on other digital platforms). The objects may not be used without permission in any way whatsoever in which you charge money, or collect fees.
Comment & Rating (4)