Search models, users, collections, and posts

AMS Internal Hub Bearing Support Replacement Cover

Print Profile(1)

All
P1S
H2S
H2D Pro
X1E
H2C
A1 mini
X1
X1 Carbon
P2S
P1P
A1
H2D
X2D
A2L

0.08mm layer, 10 walls, 15% infill
Designer
30 min
1 plate
5.0(32)

Open in Bambu Studio
Boost
157
484
45
30
408
355
Released 

Description

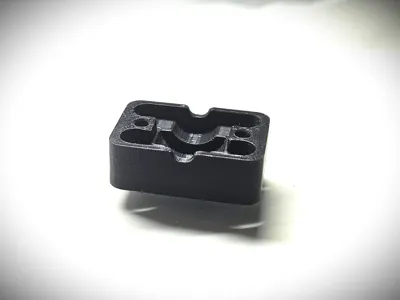
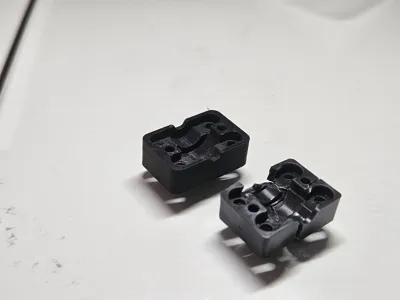
Don't let a cracked or worn-out housing force you into buying a completely new AMS Internal Hub. This is a precision-engineered replacement cover designed to restore your Hub Unit's functionality and extend its lifespan.


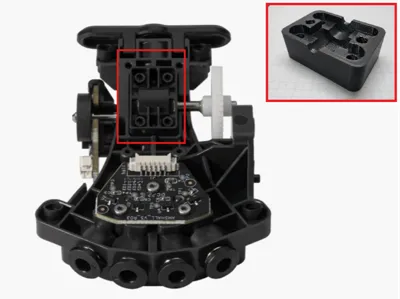
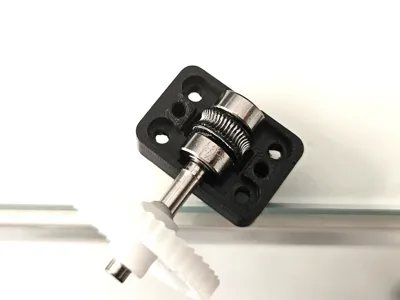
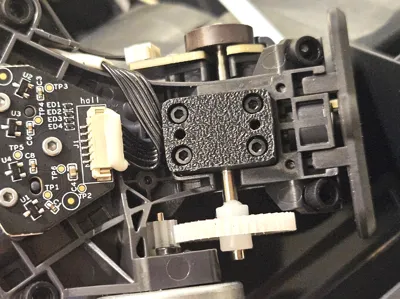
This printable part allows you to perform a targeted repair on the most common failure point. The AMS Bearing Support for the AMS Internal Hub Unit supports the bearing inside the AMS internal hub unit. After the loading/unloading assembly feeds the filament into the internal hub unit, the bearing guides the filament out of the AMS.

Boost Me (for free)

If you like this model, please consider giving it a boost! Your support helps me create more awesome designs and share them with the community. Every boost makes a difference! Thank you for your encouragement and happy printing!

Recommended Print Settings:

  • Material: ABS, ASA, or PA-CF (Materials with high heat resistance and durability are essential for this mechanical part).
  • Layer Height: 0.08mm - 0.12mm for high detail.
  • Walls: 6+ perimeters for maximum structural integrity.
  • Infill: 80% - 100% (Gyroid or Rectilinear).

Installation Note: To ensure that you can install the accessories conveniently and effectively after printing it, follow the operation guide here
AMS Bearing Support Replacement Guide for the AMS Internal Hub Unit | Bambu Lab Wiki


Comment & Rating (45)

(0/1000)

Print Profile
0.08mm layer, 10 walls, 15% infill
Came out great in Bambu ABS! I had already replaced the whole assembly under warranty a while back, but saved the old one and finally remembered to print a part to fix it. My printer over-extrudes a little at corners a little bit, so cleaned up the edges with a file and the screw holes with a small screwdriver. Next I test-fit this cover and applied pressure with my thumb while turning the gear. The gear got significantly harder to turn under pressure, indicating that something was rubbing. It was rubbing on the shaft where it passes through the side of the cover. See the yellow arrow in the picture below. I cleaned up my over-extrusion for that spot in the cover with a small round file. It works great now!
0
Reply
Print Profile
0.08mm layer, 10 walls, 15% infill
Thank you for making this! I submitted a ticket since I had no idea what was wrong, to find this piece crumbled in the machine. Now my AMS is back in business!
0
Reply
Thank you for modeling this up. I've only had my ams a short time and the mount was broken into several pieces. Looks like the original part was designed to fail. Another case of planned obsolescence! So glad someone can model something useful!
designer
3
Reply
I've printed this in ASA and installed it into my AMS, but now the motor "wind" is significantly louder than originally. I've tried to back off the screws a few different times and it seems like backing off the screws prevents the filament from reaching the extruder fully, the motor overdrives and gouges the filament. Am I missing something?
The designer has replied
0
Reply
there should not be any strange noise after installing, could be that something else is broken as well, follow the instructions below to dismantle and clean the AMS internal hub unit https://wiki.bambulab.com/en/x1/troubleshooting/clean-the-filaments-hub
0
Reply
I have printed it in ASA on Bambu Lab A1 and it came out perfect, although I had to disable the fan
Show original
0
Reply
I didn't know this was available so I put a ticket in. I'm still within warranty, but I printed this on my external spool in 40 minutes and fixed the issue in the ams, so now I'm back up and running and I'm getting a backup. this print will save you 60$ out of warranty. works perfectly. incredible.
2
Reply
Print Profile
0.08mm layer, 10 walls, 15% infill
I couldn't be happier to be able to print my own replacement parts for my printer. The original part looked like it was made to fail. This one should hold up better.
profile
2
Reply
I tried printing this multiple times on p1s, it fails everytime with bed auto level failing. I know it is not my printer becuase I can print anything without any problems right after this print fails.
The designer has replied
0
Reply
layer height can affect whether the P1S's auto bed leveling (ABL) appears to "fail," but it's usually indirect: very thin or very thick first layers change how sensitive the pressure‑based probe and the nozzle height tolerances are, which can make leveling errors or adhesion problems more visible. You could try to change layer height but you will loose some detail, I printed current profile using my P1S
0
Reply
Print Profile
0.08mm layer, 10 walls, 15% infill
Thank you for making a known weak-spot easily fixable and publicly available. You are a credit to the community.
profile
1
Reply
Boosted
Print Profile
0.08mm layer, 10 walls, 15% infill
You have made my day I had it broken and with this piece I have been able to repair it A million thanks!!
Show original
profile
1
Reply
The part on my AMS was also broken, and after a tip from Bambu support, I printed and installed this part here. The part fits quite tightly into the hub, but it's better that way than too loose. I printed it in PETG and it works perfectly!!!!
Show original
designer
1
Reply

License

This user content is licensed under a Standard Digital File License.

You shall not share, sub-license, sell, rent, host, transfer, or distribute in any way the digital or 3D printed versions of this object, nor any other derivative work of this object in its digital or physical format (including - but not limited to - remixes of this object, and hosting on other digital platforms). The objects may not be used without permission in any way whatsoever in which you charge money, or collect fees.