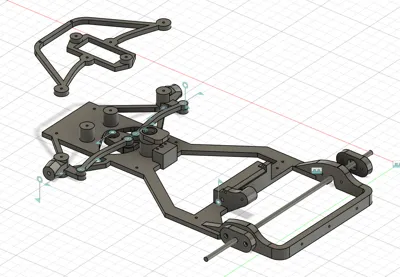
Mini RC Kart


Print Profile(11)

Description
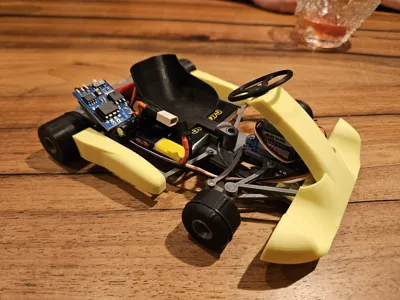
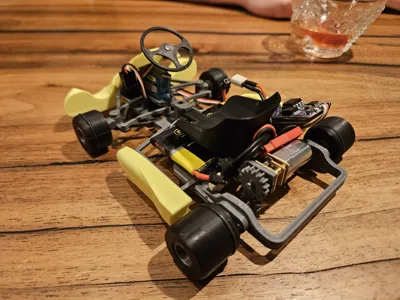
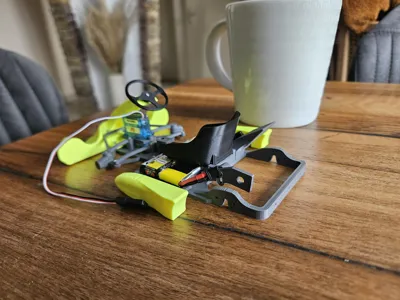
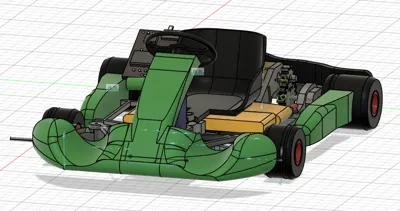
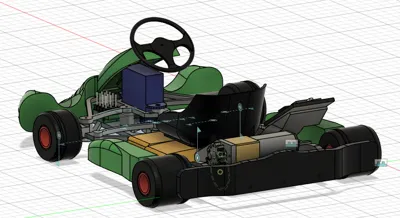
RC Mini Kart
The kart has a scale of approximately 1/10 It is, of course, significantly smaller than a 1/10 RC car In terms of size, it is more comparable to a 1/24 or 1/28 RC car
The download includes several optional parts:
- Motor mount
- Mount for a standard N30 motor (would also fit N20)
- Mount for a 1230 brushless motor
- Mount for a standard 050 motor
- Tires
- O1-O6: The tires are available in different versions (Front O1-O3 or Rear O1-O6) This refers to the number of O-rings (seals) that can be used on them The brushless version has significantly more power Therefore, more O-rings should be applied to the tires for the brushless version to give the kart more grip More on this below under “Recommendations”
- Slicks: The front and rear tires are now also available as slicks I was thinking of the Vario Shore TPU from colorFabb which was developed more or less specifically for RC tires The slicks are slightly larger to compensate for the missing O-ring - this is important so that the 26T main gear does not touch the ground - However, I have never tested this, as I unfortunately do not have this TPU here, so feel free to experiment and give feedback! :)
- Reduction gear (separate print profile)
- The reduction gear is intended to reduce the high RPM of the brushless motor so that it remains drivable without throttling
- Without a reduction gear, I throttle the motor's power using the servo travel function of the remote control
- Tie rods
- In the print profile “Toe-in Tie Rods” you can find shorter tie rods
- Instead of the usual 30mm, these measure only 29mm from eye to eye
- This achieves toe-in, which makes the kart much calmer and thus improves control, especially for large motors (050 and Brushless)
- I think the tie rods can also make sense for the N30 motor, as the kart simply reacts less agilely, making it generally easier to drive
- Feel free to try it out! :)
- Upper chassis frame
- For the steering servo DSpower 3.7G servo with metal gear
Meanwhile, there are more and more variants in which this kart can be built Therefore, please read the following carefully - this is intended as a guide so that you know which parts you need:
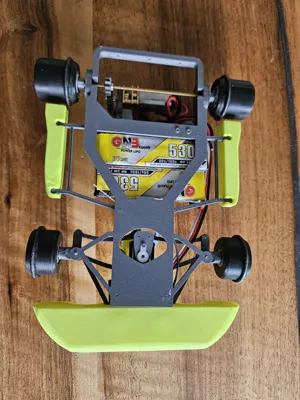
- Rear axle: The motor performance of the different motors differs enormously Due to the higher RPMs and higher speeds, the brushless motor generates greater forces and significantly more vibrations on the rear axle Therefore, an M3 threaded rod is recommended for the rear axle! This makes the kart much smoother and provides noticeably more grip on the rear axle For an N30 motor, an M2 threaded rod is recommended as the rear axle to save weight and keep the kart agile - but M3 is also possible
- Front axles: Ball bearings are pressed into the front rims on which the rim rotates The rims are then screwed to the knuckles (steering levers) using the ball bearings M2 is sufficient here in any case However, for brushless, I inserted M3 screws with 3x6x2.5mm ball bearings because this simply has the advantage that everything can be built with the same ball bearings - so only one type of ball bearing needs to be ordered for brushless However, it is still possible to use the front axle with M2 screws if the corresponding bearings (4x 2x5x2mm) are available
Reduction gear: Since I had to severely throttle the brushless version via the servo travel function of the remote control to keep the kart drivable at all, I have alternatively (via a separate print profile) published a reduction gear The advantage here is that the brushless motor can be run at full power/RPM Due to the shorter gear ratio, the braking force of the motor when coasting has noticeably increased In addition, the motor position shifts slightly further back due to the gearbox, which moves the center of gravity further to the rear I'm not sure which variant I like better myself - so it's best to try them out! :)
The reduction gear basically consists of a different motor pinion and a double gear An M3 screw is passed through 2 bearings and then screwed into the double gear (check out the pictures in the corresponding print profile)
- Tie rods: There is a separate print profile “Toe-in Tie Rods” for shorter tie rods The standard tie rods are 30mm long (eye to eye) These new tie rods are 29mm long to achieve toe-in This makes the kart more controllable when steering This can increase directional stability when driving straight Overall, the kart is easier to drive In every variant, the normal 30mm tie rods are always used If you want the 29mm tie rods, you can download and print them via the corresponding print profile It's worth trying!! :)
- Upper Chassis Frame: Optionally, a different upper frame can be printed here This allows a DSpower 3.7G metal gear servo to be mounted For me, the servo with plastic gears always held up - this was a request from a user who consistently had problems with the GH-S37G
The standard variants (ready-made print profiles) are structured as follows:
- Brushless Motor:
- Front axle: M3
- Rear axle: M3
- Bearings: 3x6x2.5mm
- Optional: Reduction gear
- The main gear is simply drilled out to 2.8mm so that it fits onto the M3 threaded rod
- Brushed 050 Motor:
- Front axle: M3
- Rear axle: M3
- Bearings: 3x6x2.5mm
- The main gear is simply drilled out to 2.8mm so that it fits onto the M3 threaded rod
- Brushed (N30 Motor):
- Rear axle: M2
- Front axle: M2
- Bearings: 2x5x2mm
Ultimately, everything can be freely chosen - for that, I would recommend the print profile with all parts
I hope I haven't forgotten anything - this is my first model :)
I printed everything from PLA - it holds up so far
Please pay close attention to the point regarding the mini drill set in the tools section below!
For the track in the living room, I use the DR!FT Track Boundary V2 Set from @AJEngineering
Here's everything you need for the kart:
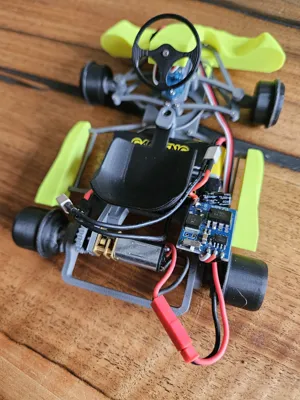
RC Components:
- RC receiver (max size 19x30mm):
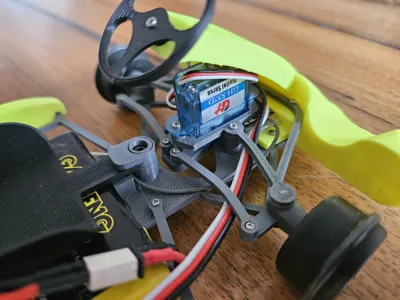
- Servo:
- GH-S37D (Standard Servo):
- DSpower 3.7g Servo (Optional: requires the optional upper chassis frame)
Drive components:
- Option A (Brushed, easy to drive, good for driving on a small track in the living room)
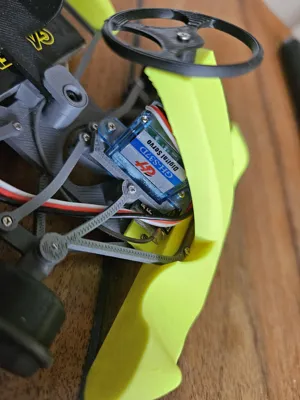
- LIPO:
- Important are 17mm width and approx 6mm height (length is not quite as relevant)
- Connectors (LIPO connectors for ESC, depending on battery connector):
- 1s LIPO Charger:
Further Parts:
- Ball bearings (M2 or M3 depending on motorization):
- For Brushless (M3 thread as axles):
- 2x per front wheel + 2x for rear axle + 2x for reduction gear (Optional)
- For N30 Motor (M2 thread as axles):
- 2x per front wheel + 2x for the rear axle (6 pieces)
- O-ring (4 rings):
- The O-rings should have an inner diameter of at least 16mm and the rubber should have a diameter of at least 2mm
- Steel rod (2 rods approx 8mm long each + 1x approx 30mm for the seat):
- The steel rod should be 1mm thick (a paper clip, welding wire, or similar may also work)
- Threaded rod (1x approx 105mm long, depending on motorization):
- M2 threaded rod (for Brushed, N30):
- M3 threaded rod (for Brushless Motor):
- Self-tapping screws (one set is enough for several cars):
- M2 screws (3x M2x6mm for motor mount and battery cover or seat):
- Screws/nuts for the axles (depending on motor)
- Brushless Motor
- M3 screws (2x M3x14mm as wheel axle for the front wheels)
- M3 nut (4x to secure the gear from both sides on the rear axle and the rear rims)
- Optional: M3 screws (1x M3x12mm as axle in the reduction gear)
- N30 Motor
- M2 screws (2x M2x14mm as wheel axle for the front wheels)
- M2 nut (1x to secure the gear on the rear axle)
- Double-sided adhesive tape to fasten the ESC, e.g., something like this:
- M1.6 screws (3-6mm length should fit, I use 5mm, for N30 motor)
Tools required:
- Soldering iron (incl accessories)
- Power connectors on the ESC may need to be re-soldered
- Motor can be connected to ESC via connector or soldered directly
- For the ESC, the cable to the receiver may need to be replaced with a longer one Or the receiver might need to be placed elsewhere It's already very tight - if a larger receiver is used, you'll probably have to put it somewhere else anyway (maybe stick it to the back of the seat or something)
- Small screwdrivers
- Side cutters
- Small needle-nose pliers or similar
- Mini drill set - important!
- Drill bits of 1mm and slightly less (e.g., 0.8mm) are important This primarily concerns the steel rods that sit vertically in the axle carriers at the front and horizontally in the seat at the back They should, for example, clamp in the seat but sit movably in the chassis (the same applies to the front axle for steering) The holes for the M2 screws must also all be drilled to the correct size (2mm or 1.6mm, depending on whether the screw is to be pushed through or screwed firmly into the respective part) If there are any questions - please ask in the comments
- Also helpful especially for M3 axles due to the 2.8mm drill bit:
Recommendations:
Motor variants:
- N30 Motor:
- Good for a small track in the living room or for children to practice
- 050 Motor:
- Quite fast for a small track in the living room But could work for experienced drivers
- The different pinions make a crucial difference
- The motor power fits the kart very well Enough power in every situation, but good handling
- My favorite setup
- Brushless Motor:
- Very powerful - maybe too much :D
- In my opinion, too much power for track driving
Gear ratio:
- Brushed (N30 Motor)
- Motor: 16T
- Axle: 11T/9T
- Brushed (050 Motor)
- Motor: 8T/6T
- Axle: 24T/26T
- Brushless (1230 Motor / 4500KV)
- Direct drive (with 30% servo travel on the motor)
- Motor: 6T
- Axle: 26T
- With reduction gear (with 100% servo travel on the motor)
- Motor: optional reduction gear (note in print profiles)
- Axle: 26T
- Direct drive (with 30% servo travel on the motor)
Tires:
- Brushed (N30 Motor)
- Front: O1 (1 O-ring)
- Rear: O1 (1 O-ring)
- Brushed (050 Motor)
- Front: O3 (3 O-rings)
- Rear: at least O4 (4 O-rings) - I drive with O6
- Brushless (1230 Motor / 4500KV)
- Front: O3 (3 O-rings)
- Rear: at least O4 (4 O-rings) - I drive with O6
- Body part “FrontBumper”
- The weight balance can be controlled via the front body part I printed the part very lightly (2 wall loops, 8% infill)
Updates:
- 2026-02-13: MiniKart V2.1.3mf - High-Power Brushless Update!!
- New (optional) motor mount for brushless motor
- Motor mount
- Brass threaded rod removed
- Tires (more grip for more power)
- Front O1-O3 (1 O-ring - 3 O-rings per tire)
- Rear O1-O6 (1 O-ring - 6 O-rings per tire)
- Each slick for ColorFabb Vario Shore TPU (not tested)
- Revision of object names in the .3mf file
- More space for the receiver (Spektrum SR3300T without housing fits, maximum approx 19x30mm)
- Adjustments were made to the FrontBumper and chassis for this
- Battery holder adjustment (change to chassis)
- I preferred to shift both batteries to the left to balance the weight of the ESC In doing so, the rear battery fell out downwards A small edge at the bottom of the chassis now prevents this
- Creation of the "Recommendations" section
- Adjustment of the introduction (model description)
- New (optional) motor mount for brushless motor
- 2026-02-16: various minor adjustments
- #MiniKart_V2 deleted - the old version only has disadvantages compared to the new one
- Print profile added
- 2026-02-22: M3 Axles and Reduction Gear
- The motor power in the brushless variant is enormous To achieve more stability (and fewer vibrations), the axles were changed to M3 In addition, there is an optional reduction gear to reduce the RPM in the brushless variant
- Print profile update: Mini Kart (Brushless) adapted to M3
- Print profile update: Mini Kart (N30) new chassis replaced
- Print profile update: AllParts expanded according to the new parts
- Print profile update: Tires expanded with new M3 rims
- New print profile: Reduction gear for brushless motor
- Parts list for M3 and optional gearbox supplemented
- M3 bearings 3x6x2.5mm (for M3 axles)
- M3 threaded rods (rear wheel axle)
- M3 screws (front wheel axles)
- M3 screw as axle for the reduction gear
- M3 nuts
- Description section for optional parts adjusted
- Description for optional brushless gearbox
- Following parts new or changed parts:
- New:
- M3 bearing block (for ball bearings 3x6x2.5mm)
- Knuckle M2 (Right and Left) (to use M3 screws)
- M3 rear rim (larger bore)
- M3 front rim (larger ball bearing)
- Reduction gear:
- Motor pinion
- Reduction pinion (stepped gear)
- Reduction gear mount
- Adjusted:
- M2 rear rim (name changed only)
- M2 front rim (name changed only)
- M2 bearing block (for ball bearings 3x6x2.5mm) (name changed only)
- Knuckle M2 (Right and Left) (name changed only)
- Chassis (recess for the rear axle was enlarged so that an M3 axle can be used)
- 2026-02-27: Motor Mount for 050 Motor
- 050 Motor Mount (9V, approx 10,000 RPM)
- new print profile with all motor mounts
- new print profile for a complete kart with the new 050 motor
- 2026-04-20: New Tie Rods
- Under the print profiles you can now find the profile “Toe-in Tie Rods”
- These are slightly shortened tie rods to achieve toe-in
- 2026-05-18: New Servo, A1 mini Print Profile and Chassis Optimization
- You can now find a special version for the A1 mini in the print profiles
- Based on user feedback, a new upper frame was created into which a different steering servo can be mounted (DSpower 3.7G Metalgear)
- The servo arm had a bit too little space at the bottom of the chassis - so the hole at the bottom of the chassis where the servo arm moves was slightly enlarged
- The motor power in the brushless variant is enormous To achieve more stability (and fewer vibrations), the axles were changed to M3 In addition, there is an optional reduction gear to reduce the RPM in the brushless variant
- Brushless Motor
- For Brushless (M3 thread as axles):
Comment & Rating (130)