Mx Master Case


Print Profile(2)
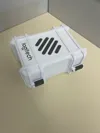

Description
To create this box, you need to print the specified number of pieces listed next to their names.
For the hinges, I recommend using 5mm metal axes, but you also have the option to print the axes if you don't have them.
Assembly instructions:
First, insert the rear hinge between the bottom case supports and the top case, then insert the axes to secure them. The box should now be able to open and close. Next, repeat the process for the front hinge, placing the hinge in its designated spot and then inserting the axis. Finally, insert the logos into the slots provided for them. It may be helpful to add some glue for added durability.
And there you have it! Your case is ready to use. Feel free to customize and leave a comment if you encounter any issues.
License
You shall not share, sub-license, sell, rent, host, transfer, or distribute in any way the digital or 3D printed versions of this object, nor any other derivative work of this object in its digital or physical format (including - but not limited to - remixes of this object, and hosting on other digital platforms). The objects may not be used without permission in any way whatsoever in which you charge money, or collect fees.
Comment & Rating (27)