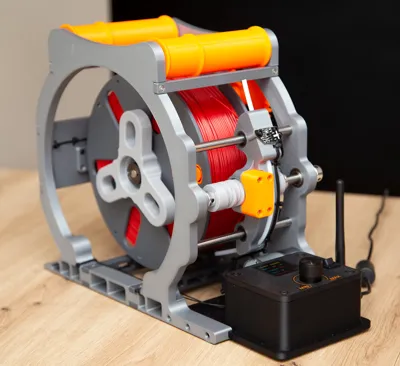
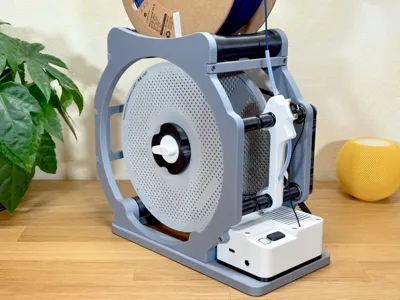
High-Speed Smart Respooler-Pro - Spool-Full - 4kg


Print Profile(0)
Description
V3 is current and last uploaded version. Wiring instructions and BOM below!
Fully Assembled Respooler or Kit can be purchased HERE
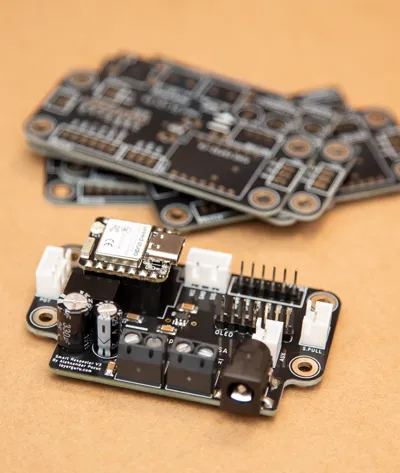
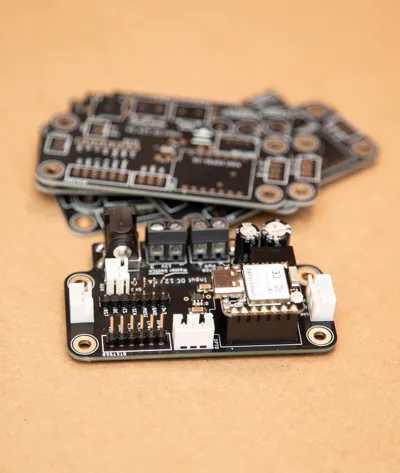
PCB can be purchased HERE
Github resources are HERE:
- Full ESP32 Code, both YAML and .ino
- PCB Gerber production files
Boost Me (for free)
Changelog:
V3 - Current version: PCB added + electronics box redesign
The electronics box has been slightly redesigned to fit the PCB. A PCB BOM has also been added in the BOM section below.


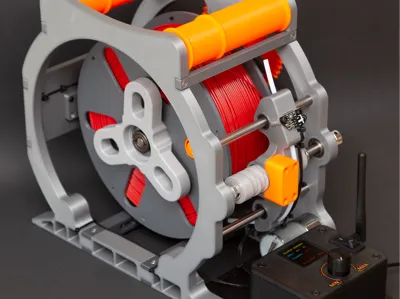
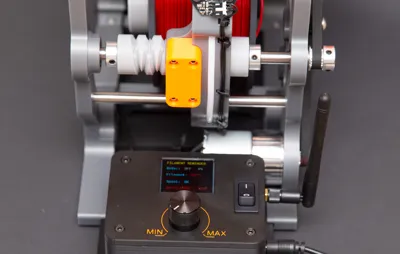
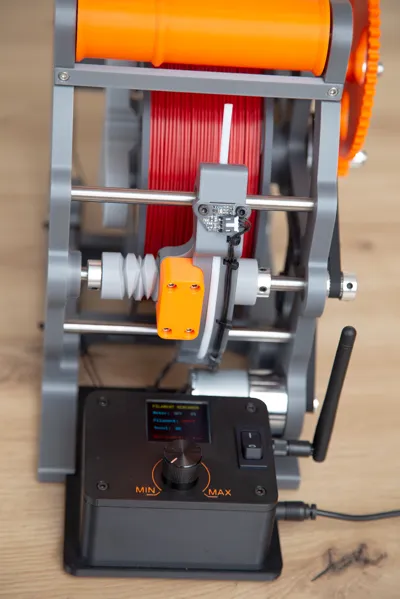
Below photos show V2 with OLED display and functionality, Current V3 version has slightly redesigned electroniics box.


Features
- Adjustable, retractable “Spool Full” sensor
- Accepts 2.5 kg spools
- Optical filament sensor (no friction, no wear)
- More stable and robust—capable of higher speeds
- Bottom rollers removed to reduce friction and noise
- 8 mm steel rods for sturdier, smoother motion
- Home assistant and Local Control
- 1.5 Inch OLED display
Printing material:
- Electronics box: ASA, Fillamentum Black
- Everything else: PETG, Extrudr
Reversing screw (level-wind) – quick math & why it winds neatly
The reversing screw is there to guide the filament back and forth so it lays down evenly instead of piling up in one spot.
The only “math” that matters is the lead (travel per revolution):
- Lead = how far the guide moves sideways in one full screw turn (mm/rev)
- Your guide speed must match the filament laying down:
A practical rule of thumb:
- Lead ≈ filament diameter × 1.0–1.2
So for:
- 1.75 mm filament → ~1.8–2.2 mm/rev
- 2.85 mm filament → ~3.0–3.5 mm/rev
If the lead is too small, the guide “overlaps” too much and can start stacking; if it’s too big, you get gaps and sloppy winding.
The reversing mechanism simply flips direction at the ends of travel, giving a consistent “level-wind” pattern — which is what makes the spool look neat, uniform, and stable even at higher speeds.
----------------------------- What's changed from the original -----------------------------------
First of all, many thanks to LTS for the original design! I really liked the core footprint and overall concept, but there were several areas I felt I could improve.
1) Motion system upgrade
I’m not a fan of 3D-printed axes, so I switched to 8 mm steel rods with GT2 belts, pulleys/idlers, and 8 mm bearings. This also let me remove the lower spool rollers, because the weight of the winding spool is now supported by the 8 mm rod—resulting in less friction and less noise.
2) Filament sensor redesign
I wasn’t happy with the original latching switch as a filament sensor. It failed multiple times due to a very narrow trigger margin. A bigger issue was the filament grinding against the steel ball, creating unnecessary friction. To fix this, I replaced it with an optical (opto) sensor: no rubbing, no added resistance, and accurate every time.
3) Reversing screw + guiding improvements
In the original design, the self-reversing screws also act as guides. Instead, I’m using one beefier reversing screw plus two 8 mm steel guide rods, with sliding bearings on the filament guide assembly. This makes the movement smoother and more robust at higher speeds.
4) “Spool Full” sensor
I also wanted a proper spool-full sensor, since I often respool from 2.5 kg spools. The sensor arm is retractable for easy spool removal.
And finally, I moved away from the complexity of a stepper motor and dedicated PCBs. I’m using a 550 RPM 12 V DC motor, controlled by an ESP32 through a BTS7960 driver. It’s fully integrated into Home Assistant, so I can control everything from my phone and receive notifications when the sensor triggers or rewinding is complete.
Other changes
- Widened the frame to accept 2.5 kg spools
- Removable reversing-screw guide with an added spring (keeps tension and is easy to remove)
- Removable electronics tray
- Simplified idler mechanism for two belts
- Bottom rollers removed
- Retractable “spool full” arm with magnetic locking (two positions: retracted / deployed)
- Adjustment screw added to the spool-full arm so the trigger level is easy to fine-tune
- Updated gear ratio to fit a GT2 20T pulley into a smaller gear
I also redesigned the stand with sturdier cross-beam holders. The result is a rewinder that’s more stable, quieter, capable of higher-speed winding, and overall more solid and reliable.
A 1 kg spool rewind takes about 3 minutes.
I’m sporadically available if anyone has questions.
LTS generously provided the STEP file, and I’m uploading my updated STEP as well.
Thank you!
-------------------- Detailed instructions and working principles -------------------
Goal
A reliable motorized filament rewinder with:
- Home Assistant control (Start/Stop + speed)
- Local control (potentiometer speed knob, no HA needed)
- Hard safety stops
- Filament present sensor (optical, frictionless)
- Spool full switch
- “No surprises” behavior:
- The motor cannot start unless filament is present and spool is not full
- The motor stops immediately on any safety trigger
- The motor will not auto-start on power-up
- The speed knob must be turned to 0 first before it can start the motor (prevents “jump to 90%” after power restore)
Hardware / Components (BOM)
Control + Power
- MCU: Seeed Studio XIAO ESP32-C6 (ESP-IDF / ESPHome) - ANY ESP32 should do.
- Motor driver: BTS7960 / IBT-2 (H-bridge module)
- Motor: 12V DC geared motor (my unit rated “550 RPM”) - Greartisan DC 12V 550RPM Geared Motor
- 12V PSU: 12V 5A adapter (or stronger if your motor needs it)
- Buck converter: XL4015 (12V → 5V) to power ESP + driver logic + sensors
- Main power switch: SPST/DPST cutting +12V only (recommended) - Marquardt 1552.3102
Sensors
- Filament present (recommended): OptoTap Rev 2.1 module (Voron TAP optical board, frictionless filament pass-through)
- Output behavior (tested): ~4.5V when no filament, 0V when filament detected (active-low)
- Logic level shifter: TXS0108E (AZ-Delivery 8-channel)
Needed because OptoTap signal is ~5V and ESP32 GPIO is 3.3V. - Spool full sensor: Omron lever microswitch
- Wired using NC (normally closed) for fail-safe behavior
Local UI
- Speed knob: 10k linear potentiometer (wired to 3.3V ADC)
- Display: Waveshare 1.5" RGB OLED (SSD1351, 128×128, SPI)
Mechanics
- DC motor drives a GT2 belt reduction (example used previously: 16T → 80T = 5:1)
- Steel rods 8mm - 4x8mmx140mm, 1x8mm x 150mm
- LM8UU Linear Ball Bearings 24mm wide
- 6x F625ZZ Flange Ball Bearings 5 x 16 x 5 mm
- 9x F688ZZ Flange Ball Bearings, 8 x 16 x 5 mm
- 6x GT2 20T Pulley - 8mm bore
- 1x GT2 16T Pulley - 6mm bore (NOT 6.35mm)
- 1x GT2 80T Pulley - 8mm bore
- 6x3mm Magnets
- Various screws M5 and M3
- GT2 6mm wide closed loops belts: 316mm for the reversing screw and 406mm for the main drive
PCB
| Part | Description | Mfr. No: | QTY |
| TSR 1-2450E | DC/DC Converters - Through Hole 7-36Vin 5Vout 1A | TSR 1-2450E | 1 |
| SN74LVC1T45DBVR | Level Shifter SOT-23-6 | SN74LVC1T45DBVR | 1 |
| Seeed Studio XIAO ESP32-C6 | 113991254 | 1 | |
| DC Barrel Jack 2.1mm | PJ-002AH-SMT-TR | 1 | |
| 220 µF electrolytic | ≥10V (I’d use 16V) | 1 | |
| 0.1 µF (100 nF) | MLCC, X7R, 50V, 1206 | 4 | |
| 470 µF electrolytic | 25V (or 35V), radial | 1 | |
| JST-XH 3-pin | (potentiometer) (OptoTap sensor: GND / +5V / SIG) | 2 | |
| JST-XH 2-pin | (spool-full switch) + AUX | 2 | |
| 7-pin header | OLED SPI | 1 | |
| JST-XH 6-pin | (BTS logic/control header) | 1 | |
| Terminal Block | universal PCB screw terminal block, 2 pole- 2.54mm pitch | 2 |
8 mm steel rods and the printed parts are connected using a GT2 20T pulley with the flange removed (you can simply grab the top flange with pliers and twist it off). This type of connection—especially with tight tolerances—is very robust and reliable.

Wiring Philosophy (important)
- Common ground is mandatory: driver GND, ESP GND, buck GND, sensor GND must all be tied.
- Driver enable pins tied high: BTS R_EN + L_EN → 5V (always enabled)
Direction is handled by which PWM input you drive. - Safety should stop even if HA is gone: sensors are enforced locally in ESPHome, not in Home Assistant automations.
FULL Pinout (as built)
Power distribution
- 12V adapter + → BTS B+ and XL4015 IN+
- 12V adapter – → BTS B- and XL4015 IN-
- XL4015 set to 5.00V
- 5V OUT+ → BTS VCC (logic) + OptoTap + + TXS0108E VB
- 5V OUT- → common GND bus
ESP32 power:
- XIAO can be powered from 5V input (from XL4015)
(Keep grounds common.)
Motor driver (BTS7960 / IBT-2) — one direction
- Motor → BTS M+ / M-
- BTS RPWM → ESP GPIO18
- BTS LPWM → GND
- BTS R_EN + L_EN → 5V
- BTS VCC → 5V
- BTS GND → GND
Reverse direction permanently: swap motor M+ / M- (simplest).
Filament sensor (OptoTap) via TXS0108E level shifter
OptoTap module (3 pins):
- G → GND
- + → 5V
- S → TXS0108E B1
TXS0108E (must wire OE!)
- VA → 3.3V (ESP 3V3)
- VB → 5V
- GND → GND
- OE → 3.3V (VA) (without OE, it won’t work correctly)
Signal channel:
- B1 ← OptoTap S
- A1 → ESP GPIO16
Result in ESPHome: filament sensor is ON when filament present (active-low input inverted in YAML).
Spool full microswitch (Omron) — recommended NC wiring
- Switch COM → GND
- Switch NC → ESP GPIO17
- ESP pin uses INPUT_PULLUP
- Meaning:
- Normal state (not full): NC closed → stable logic state
- Full triggers (lever moves, opens NC): ESP detects event and stops immediately
- If wire breaks/disconnects: looks like “full” → fails safe
Potentiometer (local speed knob)
Use 10k linear pot:
- Pot end → 3.3V
- Pot other end → GND
- Pot wiper (middle) → ESP GPIO1 (ADC)
IMPORTANT: pot must be referenced to 3.3V, not 5V.
Waveshare 1.5" RGB OLED (SSD1351 SPI)
- VCC → 3.3V
- GND → GND
- DIN (MOSI) → ESP GPIO19
- CLK (SCK) → ESP GPIO20
- CS → ESP GPIO21
- DC → ESP GPIO22
- RST → ESP GPIO23
How it works (behavior)
Safety rules (always enforced locally)
Motor can run only if:
- Filament sensor = ON (filament loaded)
- Spool full = OFF
If any safety triggers:
- filament goes OFF (even briefly) → STOP immediately
- spool full triggers → STOP immediately
- stopping also disarms the pot-start logic (must go to zero again)
Home Assistant control
- Entity: Rewinder Motor (Start/Stop)
- Entity: Rewinder Speed (0–100%)
Rules:
- HA switch starts motor only if sensors are OK
- HA slider never starts the motor (it only changes speed while running)
- If HA tries to start but sensors aren’t OK → it is blocked and motor stays off
Local knob control (no HA needed)
The potentiometer controls speed and can start/stop, but safely:
- Power on → motor stays OFF always
- You must turn pot to 0% once to ARM
- Then turning up from 0 starts motor smoothly
- If pot is not at 0 on boot, it will NOT start from e.g. 90% → you must hit 0 first
This prevents the most common dangerous behavior: “power restored and motor jumps to last knob position.”
Display
RGB OLED shows:
- Yellow title/header
- Blue motor/filament/spool status
- Spool status goes RED when full
- Filament goes RED when missing
- Optional splash screen at boot
Project “philosophy” (why it’s designed this way)
- Fail-safe by default
- Motor should stop if anything becomes uncertain (missing filament, full spool, broken switch wire, flaky signal).
- No auto-start ever
- The motor never starts just because power returned or HA reconnected.
- Local interlocks > HA automations
- HA is great, but safety belongs on the device. This continues to work even if Wi-Fi or HA is down.
- No “hidden starts” from a slider
- A speed slider should not be a “start motor” control. Start is explicit.
- Pot must “acknowledge zero”
- This is a real-world machine-safety pattern: the operator must intentionally reset to a safe state.
Notes / Tips
- Cut +12V only with your main switch (leave GND connected).
- Keep SPI and sensor wires short-ish and clean (twist GND with signal if you want to be fancy).
- If your driver ever acts weird: check common ground, check EN pins tied high, check that OE on TXS0108E is tied to 3.3V.
Right — if you’ve read this far, you’re probably thinking: “Isn’t this wildly overkill for something that should be dead simple?”
Yes, it absolutely is.
But that’s kind of the point. It’s overkill because it’s possible, because it’s fun, and because tinkering is the whole hobby. The end result is a rewinder that feels “proper”: it won’t start unexpectedly, it stops instantly on any safety condition, it works with or without Home Assistant, and it’s easy to live with day-to-day.
In other words: unnecessary… and exactly why it’s worth doing.
Happy rewinding!
Alek
Respooler Kit can be purchased HERE
PCB can be purchased HERE
Boost Me (for free)
This remix is based on
License
You may create derivative works based on this object, provided that all such derivative works are published exclusively on the MakerWorld platform and include proper attribution to the original creator. You may not share, upload, host, distribute, or publish this object—or any derivative work of this object—on any other digital platform, marketplace, or distribution channel. Commercial use of this object and any derivative works is strictly prohibited. This includes, but is not limited to, selling, renting, sublicensing, or using the object in any context in which you receive monetary compensation or other financial benefits.
Comment & Rating (55)