[UPDATED] Control assembly for the JRY-W9RQUHD-SA1

Print Profile(1)
Description
[New version]
Updated and improved. Stronger and better aligned levers. New fixture to secure the whole assembly inside the iMac shell.
Additional parts needed
- M3 x 8mm screws x 3
- Tape
- Cyanoacrylate glue
- (optional) a short piece of transparent filament.
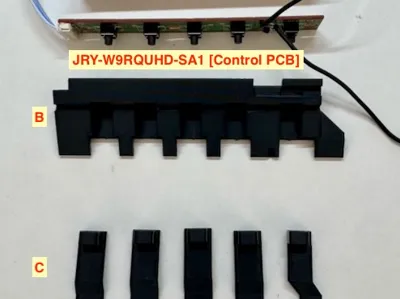
The Printed Parts

A) Control fixture. This part has two functions, securing the PCB in place and the whole assembly inside the iMac shell.
B) Assembly body. Container for the control levers and the PCB
C) Control levers 1-4 identical and the 5th (power switch).
D) Strip to keep levers in place.
Assembly instructions
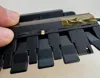
Fix the JRY-…-SA1 control PCB to the assembly body (B).

Add the control fixture (A) and secure with three M3 x 8 mm screws. The holes in the assembly body (B) are 2.7 mm so M3 screws or self tapping screws can be used.

(optional In case you have soldered cables to the power switch). Secure the cables for the (5th) control power switch with some tape.

Slide in the control levers (C) from the bottom of the assembly body (B) and test that they can control the PCB switches

Test that the strip (D) fits in side the assembly body (B). You may need to sand the slot space in case the 3D print quality requires it.

Next, place a few glue spots (cyanoacrylate) in between the control levers and secure the strip (D) in the assembly body (B). Test that the control levers (C) are moving freely and stay in place.

(optional) LED light pipe in case you want visual indication of the SA1 video board status.
Insert and tape a short piece of transparent filament in the hole. Make sure it reaches the PCB where the PCB LED is placed. The hole is larger than the filament diameter but may need to be expanded if the quality of the 3D print requires it to be expanded.

Secure the filament with tape so it stays in place and cut the filament to a bit longer than the control levers (C).

The whole assembly is now ready to insert in the iMac shell. Make sure it is correctly lined up with the rectangular holes of the iMac shell and push the assembly in place in under the lip of the iMac shell.


Done! the LED pipe in action.

Comment & Rating (0)